Space Mission - Rules

An exciting space adventure by Matt Worden for 2 to 5 space travellers from age
10.
Game materials
12 planets
1 jump gate
5 spaceships in 5 colours, one for each player
60 cards
6 overview cards
100 space-probe/space-station chips in 5 colours, 20 for each player
64 planet tiles (48 point tiles and 16 space tiles)
History of the game
It’s the year 2342 A.D. Science has meanwhile made considerable progress. The invention
of the jump gate has made it possible for spaceships to reach distant planets and
galaxies amazingly quickly. Now the time has come for you, the daring space pilots,
to jump into your spaceships and explore worlds never before seen by any human.
In search of resources and fame, you set off to explore planets so far unknown.
The crew and the spaceship are ready for takeoff – fasten your seat belts, select
the coordinates of a planet using the “NavComp” and use the jump gate to take off
into unknown worlds …
Objective of the game
The players are pilots who discover new planets in their spaceships. The cards provide
the coordinates for jumping through the jump gate to planets and to scan them
and develop them. As soon as a space station has been built there it is possible
to discover what’s on the planet and the important point tiles can therefore be
collected. At the end of the game, the players receive points for their point tiles
and the space stations which have been built. But watch out: each player is pursuing
their own goal in the Space Mission …
Preparing for the game
The jump gate is placed in the middle of the table. The planets are shuffled and
8 planets are randomly placed around the jump gate. The remaining four planets
go back into the box and are not required for this game. The planet tiles are shuffled
face down and evenly divided so that a pile of eight tiles is lying face down by
each of the planets. Each player receives one spaceship as well as all the chips
of their colour. The players’ spaceships are placed on the jump gate. The cards
are then shuffled face down. Each player is dealt five cards to be held in their
hands. The remaining cards are kept face down and form the draw pile. The last
player to fly in a spaceship is allowed to begin. If there is any doubt, the youngest
player begins.
On Yucata the start player will be decided randomly.
How to play
The game is played clockwise over several rounds. Starting with the first player,
each player always carries out two actions during his turn. The
players can carry out the actions in any order (they are also allowed
to carry out an action twice).
The active player can choose from any of the following six actions:
1.) Topping up:
The active player can top up his hand of cards back to five cards.
This is the only way for players to receive new cards. Before taking new cards,
the player is allowed to discard any number of cards onto the discard pile.
Click
 to go to the card view. Here you may click any number of cards before clicking
 ,
after which the selected cards will be discarded and new cards will be drawn. This
move cannot be cancelled! Once done viewing your new cards, click
,
after which the selected cards will be discarded and new cards will be drawn. This
move cannot be cancelled! Once done viewing your new cards, click
 to continue your turn.
2.) Jumping:
 In order to make a space jump from one planet to any other planet
with the spaceship, the player must play a card with the jump coordinates of the
target planet. He places the card onto the discard pile and places his spaceship
on the planet. As the player uses the jump gate to make the space jump with his
spaceship, he then has to put one of his chips on the jump gate with the space probe
side facing upwards. EXAMPLE: With a blue 1, the player has the
possibility of jumping with his spaceship to one of the two planets with the jump
coordinate 1 (Freezer or Hazard). The player plays the card, places one space-probe
chip on the jump gate and places his spaceship on the new planet.
In order to make a space jump from one planet to any other planet
with the spaceship, the player must play a card with the jump coordinates of the
target planet. He places the card onto the discard pile and places his spaceship
on the planet. As the player uses the jump gate to make the space jump with his
spaceship, he then has to put one of his chips on the jump gate with the space probe
side facing upwards. EXAMPLE: With a blue 1, the player has the
possibility of jumping with his spaceship to one of the two planets with the jump
coordinate 1 (Freezer or Hazard). The player plays the card, places one space-probe
chip on the jump gate and places his spaceship on the new planet.
Click
 to go to the card view. Here you need to click a card with a jump coordinate followed
by clicking a planet with the corresponding jump coordinate. Then watch your travel.
to go to the card view. Here you need to click a card with a jump coordinate followed
by clicking a planet with the corresponding jump coordinate. Then watch your travel.
3.) Flight:
 With his spaceship a player can fly from its current planet to one of the two neighbouring
planets, without having to play a card and thus surrender it. He takes his spaceship
and places it on a neighbouring planet. The jump gate is not needed for a flight
to a neighbouring planet and it is therefore not necessary to place a space-probe
chip on it. Hazard’s two neighbouring planets are Green Heggar
and Ruby Red.
With his spaceship a player can fly from its current planet to one of the two neighbouring
planets, without having to play a card and thus surrender it. He takes his spaceship
and places it on a neighbouring planet. The jump gate is not needed for a flight
to a neighbouring planet and it is therefore not necessary to place a space-probe
chip on it. Hazard’s two neighbouring planets are Green Heggar
and Ruby Red.
Click
 to be enabled to fly. Then choose and click on one of the neighbouring planets.
Watch your flight.
to be enabled to fly. Then choose and click on one of the neighbouring planets.
Watch your flight.
Players can always only carry out the following actions on the planet on which their
spaceship is currently located!
4.) Scanning:
 A player can “reserve” a tile by scanning (He receives it as soon as the planet
has been developed). Only undeveloped planets (that means planets
that do not yet have a space station) can be scanned. The player
then plays a card with the scanning coordinates of the planet. When scanning, the
player takes the pile with the planet tiles and selects a point tile of his choice
from it. He places the chosen tile face down next to the planets and marks it with
one of his space-probe chips. If the planet is developed later on, all the players
receive the tiles of this planet which they have scanned. If the planet has not been
developed by the end of the game, none of the players receive any tiles scanned
there. The player is not allowed to look at the scanned tiles during the game.
A player can “reserve” a tile by scanning (He receives it as soon as the planet
has been developed). Only undeveloped planets (that means planets
that do not yet have a space station) can be scanned. The player
then plays a card with the scanning coordinates of the planet. When scanning, the
player takes the pile with the planet tiles and selects a point tile of his choice
from it. He places the chosen tile face down next to the planets and marks it with
one of his space-probe chips. If the planet is developed later on, all the players
receive the tiles of this planet which they have scanned. If the planet has not been
developed by the end of the game, none of the players receive any tiles scanned
there. The player is not allowed to look at the scanned tiles during the game.
Click
 to go to the card view. Here you need to click a card with the scan coordinate of
the planet where your spaceship is located. Then click the planet to commit to scan
it. This move cannot be cancelled! On the planet view, choose one tile to reserve
by clicking it. Watch your probe claim the tile for all to see.
to go to the card view. Here you need to click a card with the scan coordinate of
the planet where your spaceship is located. Then click the planet to commit to scan
it. This move cannot be cancelled! On the planet view, choose one tile to reserve
by clicking it. Watch your probe claim the tile for all to see.
On Yucata, you are able to look at your scanned tiles during the game.
5.) Developing:
 To develop a planet it is prerequisite that the player must have scanned the planet
beforehand. A player may not develop a planet he has not yet scanned.
Only one player can develop each planet (that is why this action
can only be carried out if no other player has yet developed that planet and the
landing field is still vacant). A planet is developed as follows:
To develop a planet it is prerequisite that the player must have scanned the planet
beforehand. A player may not develop a planet he has not yet scanned.
Only one player can develop each planet (that is why this action
can only be carried out if no other player has yet developed that planet and the
landing field is still vacant). A planet is developed as follows:
- The player plays two cards with the two corresponding landing
coordinates of the planet on which his spaceship is currently standing.
- The player then places one of his own space stations on the landing field of the
planet to show who has developed this planet.
- The scanned (reserved) tiles are given to the players (also to the other players)
who had previously marked the tiles with their space probes. The space-probe chips
are put back into the players’ piles.
- The player who has developed the planet now chooses a point tile of his choice
from the pile. The remaining tiles are again placed facing down by the planets.
Click
 to go to the card view. Here you need to click 2 cards with the landing coordinates
of the planet where your spaceship is located. If you want to use 1 joker, play
this as the second card. Then click the planet to commit to develop it. This move
cannot be cancelled! Watch your planet develop. After being sent to the planet,
choose one tile to take by clicking it.
to go to the card view. Here you need to click 2 cards with the landing coordinates
of the planet where your spaceship is located. If you want to use 1 joker, play
this as the second card. Then click the planet to commit to develop it. This move
cannot be cancelled! Watch your planet develop. After being sent to the planet,
choose one tile to take by clicking it.
6.) Discovering
If the player and his spaceship are located on a planet which has already been developed
(identifiable by the space station on the landing field), he may
use the Discover action. He may take a point tile of his choice and place the remaining
tiles back to the planet according to his discretion. In this case it makes no difference
who built the space station. No card is needed to carry out this action! If a space
station has not yet been built on the planet, this action may not be carried out.
If a player decides to carry out this action, the player must also
take a tile.
Cards which have already been played are collected on the discard pile. If the draw
pile has been used up, the discard pile is shuffled and placed down at the ready
as the new facedown draw pile. The players place all the tiles they have taken face
down in front of them. The players may, of course, look at their tiles at any time.
Click
 to discover a tile on the planet you are at. Click the planet to commit to discovering
a tile. This move cannot be cancelled! At the planet, choose one tile to take by
clicking it.
to discover a tile on the planet you are at. Click the planet to commit to discovering
a tile. This move cannot be cancelled! At the planet, choose one tile to take by
clicking it.
CAUTION! Whenever a pile contains only space tiles after a tile has been taken,
they must be placed down face up.
Special case: On the rare occasion that when scanning a planet
for the first time a player finds only space tiles left in the pile, the player
gets nothing and displays the tile. If a player develops a planet where the Space
tile is already facing up, he cannot take a tile for development.
End of the game
The game ends as soon as the following total numbers of space tiles have been revealed:
For 2 players at least – 6 space tiles
For 3 players at least – 8 space tiles
For 4 players at least – 10 space tiles
For 5 players at least – 12 space tiles
The current round is played to the end so that all players have had the same amount
of turns. Scanned tiles of undeveloped planets are not given to the players. Now
the points are counted up.
Scoring
Jump gate
 The player with the most space probes on the jump gate receives 9 points; the player
with the second most receives 6 points, the third player 3 and the fourth player
1 point. If two or more players have the same number of space probes on the jump
gate, these players all receive the corresponding points and the points for the
third highest score are not given to anyone. In the example here
green receives 9 points, red, blue and yellow take 2nd place together, receiving
6 points each. Since there is no 3rd or 4th place, black receives no points.
The player with the most space probes on the jump gate receives 9 points; the player
with the second most receives 6 points, the third player 3 and the fourth player
1 point. If two or more players have the same number of space probes on the jump
gate, these players all receive the corresponding points and the points for the
third highest score are not given to anyone. In the example here
green receives 9 points, red, blue and yellow take 2nd place together, receiving
6 points each. Since there is no 3rd or 4th place, black receives no points.
Space station
 Each player receives three points for each space station they have built on a planet.
Point tiles
Point tiles Minerals, aliens, matter, water and medals are point tiles.
The players receive points as follows:
Minerals(16x):
 Minerals are available in the colours red, purple, green and blue. The total number
of points for all of the minerals held by one player is calculated by multiplying
the total number of the player’s mineral tiles by the number of the most minerals
of one colour. The player adds all his minerals together (for example, 3 red, 2
blue and 2 green minerals = 7 minerals). He counts how many of the colour he has
most of (in this case 3 red ones). Now the two colours are multiplied for the number
of points (in this case 7 x 3 = 21 points).
Minerals are available in the colours red, purple, green and blue. The total number
of points for all of the minerals held by one player is calculated by multiplying
the total number of the player’s mineral tiles by the number of the most minerals
of one colour. The player adds all his minerals together (for example, 3 red, 2
blue and 2 green minerals = 7 minerals). He counts how many of the colour he has
most of (in this case 3 red ones). Now the two colours are multiplied for the number
of points (in this case 7 x 3 = 21 points).
Aliens(10x):
 There are two types of aliens in two different colours. The total number of points
for all aliens held by one player is calculated analogous to the calculation of
minerals. The player multiplies the total number of his alien tiles by the number
of the most aliens of one colour. Thus, for example, 4 brown and 2 blue aliens come
to 6 x 4 = 24 points.
There are two types of aliens in two different colours. The total number of points
for all aliens held by one player is calculated analogous to the calculation of
minerals. The player multiplies the total number of his alien tiles by the number
of the most aliens of one colour. Thus, for example, 4 brown and 2 blue aliens come
to 6 x 4 = 24 points.
Matter(8x):
 There is green as well as blue matter on the planets. A pair consisting of one tile
each of green and blue matter earns the player 7 points. A single type of matter
that does not match up to a pair earns the player 2 points.
There is green as well as blue matter on the planets. A pair consisting of one tile
each of green and blue matter earns the player 7 points. A single type of matter
that does not match up to a pair earns the player 2 points.
Water(8x):
 Water is also a rare commodity in the future. For water tiles, the player receives
points depending on the total amount of his collected water tiles:
Water is also a rare commodity in the future. For water tiles, the player receives
points depending on the total amount of his collected water tiles:
- 1 tile = 2 points
- 2 tiles = 5 points
- 3 tiles = 9 points
- 4 tiles = 14 points
If a player collects more than four water tiles, the player receives the fourteen
points for four tiles and then the points for the remaining tiles according to the
table. This means that for 6 water tiles he receives, for example 14 + 5 = 19 points.
Medals(6x):
 Each medal tile earns the player 3 points.
Space tiles
Space(16x):
 Space tiles are not point tiles and may not be taken into any of
the players’ hands. If a player does so nevertheless, the player has ten points
subtracted from his score. If a player has taken the last point tile from a planet
and there are only space tiles left in a pile, the player must
turn the space tiles face up.
Space tiles are not point tiles and may not be taken into any of
the players’ hands. If a player does so nevertheless, the player has ten points
subtracted from his score. If a player has taken the last point tile from a planet
and there are only space tiles left in a pile, the player must
turn the space tiles face up.
On Yucata it is not possible to take a space tile into your hand.
Winner of the game
The player with the most points goes down in history as the bravest and most successful
participant of the space mission. If more than one player has the same amount of
points, the player who has built the largest number of space stations is the winner.
In case of a tie in space stations as well, there is more than one winner.
GUI Reference:
The following image shows the "Main view", with its clickable areas
numbered 1-5:
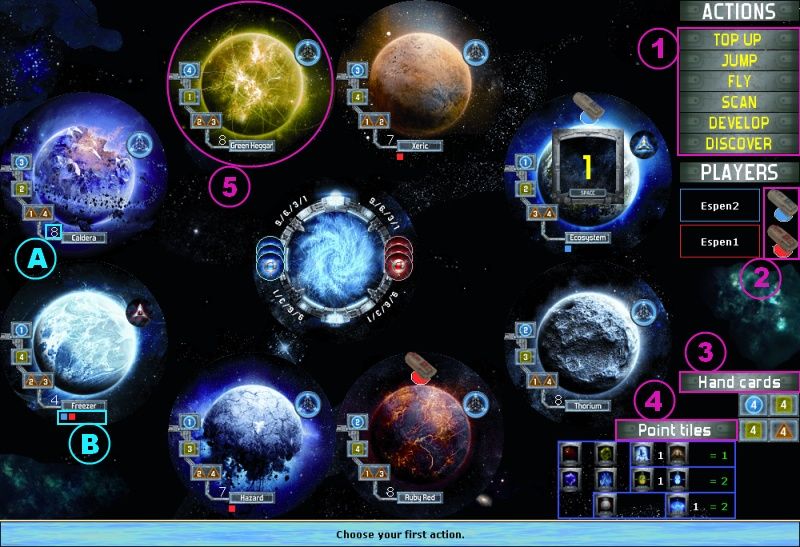
- Actions: Click one of the 6 actions to perform this action.
- Player tokens: Click one of the players' tokens to view his
- Points:
- jump gate
- space stations
- tiles - other players' points from tiles are hidden during the game
- total
- Number of tiles
- Number of cards
- Last move
- First action performed
- Second action performed
- Note: When the game is over, you will also get to see what tiles your opponents
have collected, under the "Point tiles" sign.
- Hand cards: This sign, over your card summary area, can be clicked.
This will take you to the "Card view" (inspect mode).
- Point tiles: This sign, over your tile summary area, can be clicked.
This will take you to the "Tile view".
- Planets, here represented by Green Heggar, can all be clicked.
This will take you to the "Planet view" (inspect mode), where you
can view the planet's remaining tiles, scanned tiles or remaining space tiles, in
case all point tiles have been taken. If a planet is a possible target for a chosen
action, you will not get this view. Instead, clicking this planet will set it as
the target for the chosen action. Therefore, it is advised to inspect planets
in this fashion before choosing an action.
In addition:
- Tiles left: The number on the left of each planet name indicates
the number of tiles that are left on this planet.
- Small coloured squares: The squares under each planet name indicates
which players that have seen tiles on this planet.
The following image shows the "Card view" (action mode), with its
clickable areas numbered 1-4. This example shows the "Card view" after choosing
the "Scan" action:
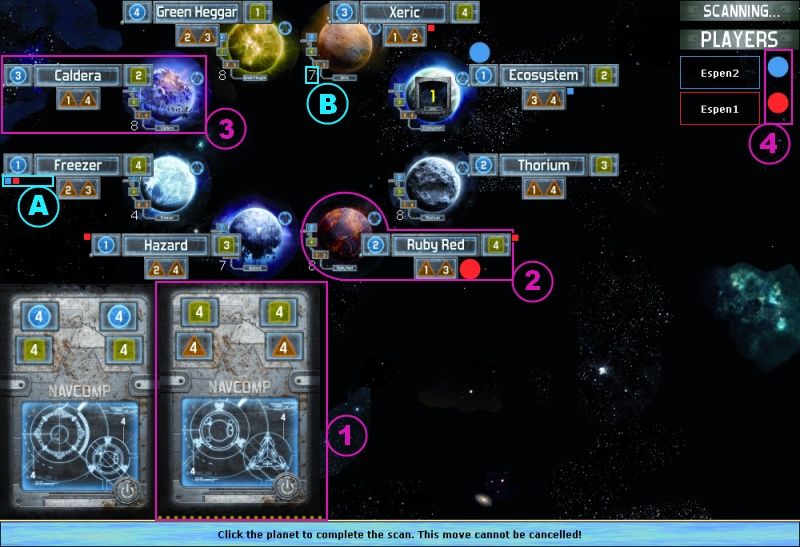
- Cards: Here, the only applicable card for scanning the planet where
the player is at has already been clicked. During any action, only viable cards
for the chosen action will be clickable. In "inspect mode", no cards are clickable.
- Planets: Here, the only legal target for the scan is the planet
where the player is at, Ruby Red. Clicking any other planet will take you to the
"Planet view" (inspect mode). In "inspect mode", all clicks on planets will take
you to the "Planet view" (inspect mode) as well
- Other planets , here represented by Caldera, can be clicked to
be inspected, only. "Other planets" are planets that are not viable targets for
the chosen action. In "inspect mode", all planets behave like this.
- Player tokens behaves exactly as in the main view. In "inspect
mode" the same applies.
In addition:
- Small coloured squares: The squares near each planet indicate which
players that have seen tiles on this planet.
- Tiles left: The number on the left of each planet name indicates
the number of tiles that are left on this planet.
The following image shows the "Planet view" (action mode), with
its clickable areas numbered 1-2. This example shows the "Planet view" after clicking
a planet to scan:
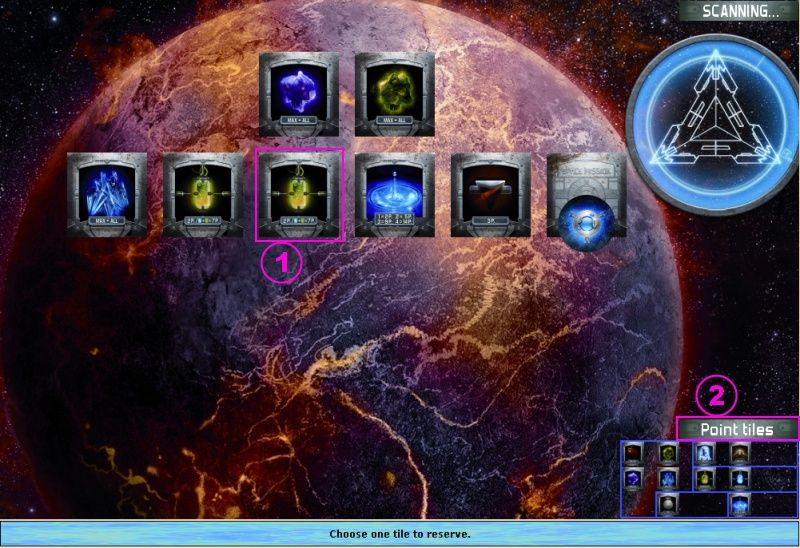
- Open point tiles, here represented by a green matter tile, can
be clicked either to reserve it, as in this example, or to take it. Reserved tiles
and space tiles cannot be clicked. In "inspect mode", all tiles are hidden. Exceptions:
You can see your own scanned tiles, and you can see the space tiles when there are
only space tiles left. No tile is clickable in "inspect mode"
- Point tiles: This sign behaves exactly as in the "main view".
In "inspect mode" the same applies.
The following image shows the "Planet view" (inspect mode). Here
you can view what tiles were left after the last time you scanned,
developed or discovered the planet. This information is only available on your turn.
If you haven't performed any of these actions, you won't see the "Last visit" table.
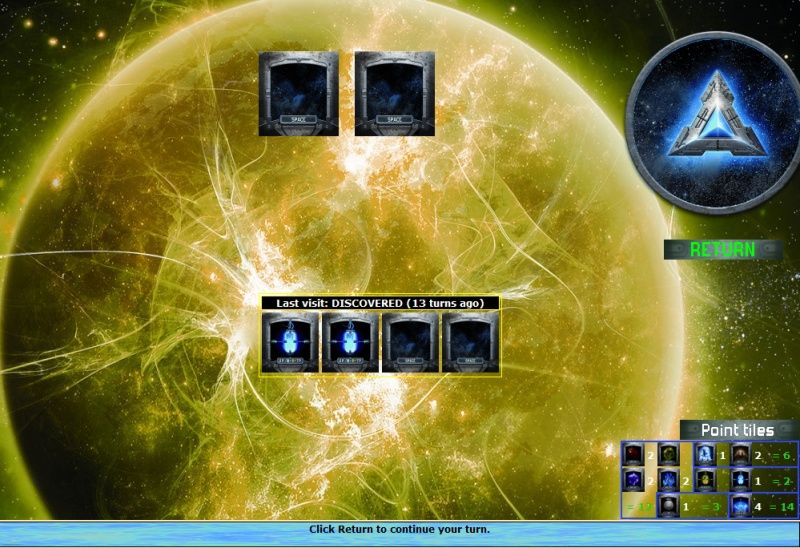
You can view:
- What your last action on this planet was
- When it was
- What tiles you left there. Hint: If you see tiles missing, you'll know someone else
took them!
The following image shows the "Tile view". This view is "inspect
mode only". It shows your tiles at the top, sorted by type, and your reserved tiles
under, sorted by location.
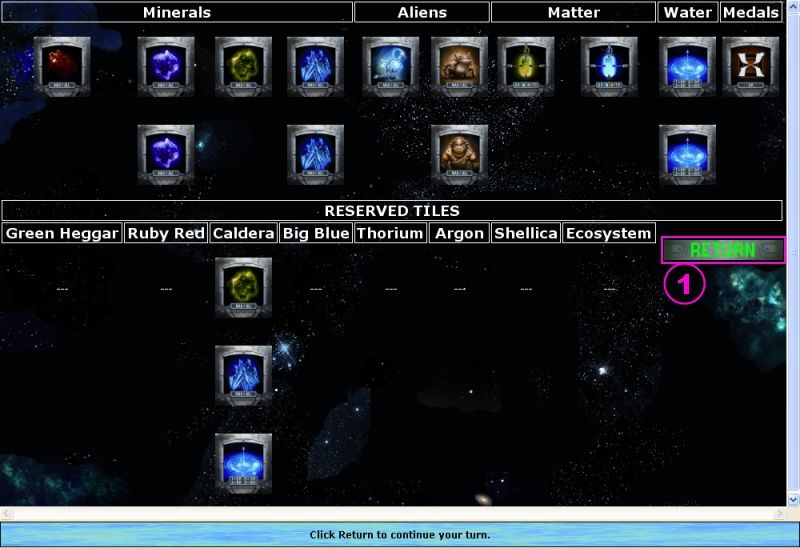
- Return: Click return to continue your turn. All "inspect
views" have this button.