|
|
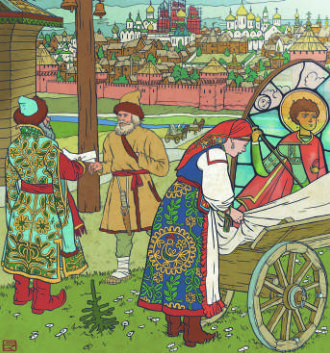
 n the mid-15th Century, to commemorate his military victories, Tsar
Ivan the Terrible ordered the construction of the temple that would
become known as St. Basil’s Cathedral. Its original design took several
decades to complete, and many different teams took part in its
construction.
n the mid-15th Century, to commemorate his military victories, Tsar
Ivan the Terrible ordered the construction of the temple that would
become known as St. Basil’s Cathedral. Its original design took several
decades to complete, and many different teams took part in its
construction.
In The Red Cathedral you will take on the role of a team
of architects charged with building the cathedral. Each player will
build different parts of the monument. Using your influence with the
clergy and the different guilds of the city, you will attempt to earn
more of the Tsar’s favor than your rivals. When the work on the
cathedral has been completed, the player who has earned the most
prestige will be the winner!
Contents
Base Game
Expansion: Contractors
Promos
Appendices
4 Player Markers
20 Lumber
20 Brick
20 Stone
15 Gold
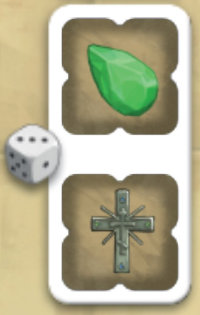
10 Green Jewels
10 Purple Jewels
1 Market board
4 Workshop boards
8 Resource tiles
28 Workshop tiles
16 Ornamentations
40 Coins
66 Cards
5 Dice

-
Place the Market board A
in the center of the table, making sure to leave space next to
it for the Cathedral Construction Site. B
-
Each player chooses a color and places the following in their
own playing area:
-
Their personal Workshop board, with either the
basic side (recommended for your first few games) or the
advanced side up. C
-
4 (of their 6) Banners are placed in the
Inventory on their Workshop board. The remaining Banners
are placed outside the Inventory. D
-
Their 4 Ornamentations 1 Door, 2 Arches, and 1
Cross, are placed in the matching spaces of their
Workshop board. E
The Advanced Workshop side shows a compass on the
workbench. They have special rules for the use of Workshop
tiles and for unlocking the Ornamentations ( here). If you are playing
with the Advanced Workshops, use the following setup:
Ornamentations are placed in the indicated Workshop tile
spaces, four Banners are placed in your Inventory and two
Banners are placed in your white Workshop tile spaces.
-
Place the score markers for each player on the 2 space of
the Scoring Track (around the edge of the Market board), with
the “+40” facing down. F
-
Shuffle the Resource tiles and place one randomly in each
of the 8 spaces on the Market board. Turn them face up. G
-
Shuffle the Influence cards for each of the four groups
(the Craftsmen’s Guild, the Teamsters’ Guild, the Merchants’
Guild, and the Clergy) separately. Draw one of each and place
them in the four spaces indicated on the Market board (it does
not matter which position each card is placed in). H
-
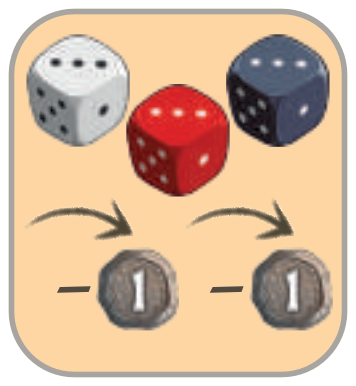
Take all 5 dice in both hands and shake them. Starting
with the space next to the Resource tile that grants
 , let one
die fall randomly into that space. Then drop one die in each of
the following spaces, in the direction of the arrows. I , let one
die fall randomly into that space. Then drop one die in each of
the following spaces, in the direction of the arrows. I
-
To one side, within reach of the players, create a general
reserve for all of the building Materials and
Rubles. J
Resources and Materials
We use the term Materials to refer to any “physical” objects
that are used in the construction, such as bricks or lumber.
The concept of Resources (as we use it) includes the
Materials, but also Rubles and Recognition Points.
 Lumber  Brick
 Stone  Gold
 Green Gem  Purple Gem

This icon is equivalent to one unit of any one material.
-
 Take the Building Plan cards that show the number of players in
the game and mix them. Draw one at random and leave the rest in
the box. This card will show the height for each of the towers
that the players will build. Every tower has exactly one base
and one dome, but the number of middle sections between each
base and dome can vary.
Take the Building Plan cards that show the number of players in
the game and mix them. Draw one at random and leave the rest in
the box. This card will show the height for each of the towers
that the players will build. Every tower has exactly one base
and one dome, but the number of middle sections between each
base and dome can vary.
-
 Take the Cathedral cards and shuffle them into three
decks: the bases, the middle sections, and the domes. Randomly
pull the number of base cards indicated on the Building Plan and
place them in the Construction Site, B making sure that the face showing
the Building Costs on each card is showing. After that, place
the number of middle cards indicated on the Building Plan for
each tower above them, and then finish each tower with a dome
card. You can now return the Building Plan card and the rest of
the Cathedral cards to the box with the others.
Take the Cathedral cards and shuffle them into three
decks: the bases, the middle sections, and the domes. Randomly
pull the number of base cards indicated on the Building Plan and
place them in the Construction Site, B making sure that the face showing
the Building Costs on each card is showing. After that, place
the number of middle cards indicated on the Building Plan for
each tower above them, and then finish each tower with a dome
card. You can now return the Building Plan card and the rest of
the Cathedral cards to the box with the others.
-
Take the Workshop tiles. If the game is being played with
less than three players, put all of the tiles that have this
icon
 back in the box. Place the tiles face down on the table
and shuffle them well. Then, one by one, turn them face up and
place one randomly on each of the Cathedral cards L. Put any leftover tiles back in the
box. back in the box. Place the tiles face down on the table
and shuffle them well. Then, one by one, turn them face up and
place one randomly on each of the Cathedral cards L. Put any leftover tiles back in the
box.
-
You may choose who will be the first player to take their turn
however you like. Once that has been decided, the first player
will take 3 Rubles. The rest of the players are then given
Rubles in clockwise order, receiving 4 Rubles, 4 Rubles, and 5
Rubles respectively.
The game is played in turns. Each player plays their full turn
before it becomes the next player’s turn, and the order of play is
always clockwise around the table.
The game ends when one player has completed the construction of
their sixth Cathedral section. That player gets 3  as a reward
and the end of the game is triggered. The other players will
have one final turn before the game ends. as a reward
and the end of the game is triggered. The other players will
have one final turn before the game ends.
Solo Play
If you wish to play the Solitaire Mode, you can find the rules you
will need here.
During their turn, the player must carry out one of these 3 basic
actions:
a
Claim a cathedral section
b
Build sections of the cathedral
c
Acquire resources from the market
In addition, at any moment during their turn, a player
may decide to execute any of these two optional actions:
-
 Lose Prestige Points in exchange for rubles at a rate
of 1 for 2 Rubles. They move their score marker back to the
previous Prestige Point space and take 2 Rubles from the
general reserve.
Lose Prestige Points in exchange for rubles at a rate
of 1 for 2 Rubles. They move their score marker back to the
previous Prestige Point space and take 2 Rubles from the
general reserve.
-
 Lose 1 Prestige Point in order to roll the dice from
any one space on the board. Move the score marker to the
previous Prestige Point space, choose one of the eight
spaces on the board and re-roll all the dice there. Players
can use this optional action only once per turn.
Lose 1 Prestige Point in order to roll the dice from
any one space on the board. Move the score marker to the
previous Prestige Point space, choose one of the eight
spaces on the board and re-roll all the dice there. Players
can use this optional action only once per turn.
 he builders are assigned sections of the Cathedral to work on
and place the scaffolding they need to carry out their work,
represented in the game by the Banners. This will allow the towers
to grow vertically out of the main structure and allow the
construction teams to reach the highest parts of the towers.
he builders are assigned sections of the Cathedral to work on
and place the scaffolding they need to carry out their work,
represented in the game by the Banners. This will allow the towers
to grow vertically out of the main structure and allow the
construction teams to reach the highest parts of the towers.
To claim part of the Cathedral, a player carries out these steps:
-
They take any one Banner from their personal Workshop board
(possibly opening up a space in their Inventory).
-
They Claim one available Cathedral card by placing their
Banner on top of it. A Cathedral card is available if it does not
have a Banner on it and it is either any base card or any other type
of card that is directly above another card that already has a
Banner on it (from any player).
-
They take the Workshop tile
that is on the claimed Cathedral card and place it in any empty
Workshop space on their Workshop board. They have two choices:
A Place the Workshop tile
face
down
. If they do, they will not be able to
activate that Workshop later.
B Pay the cost (in Rubles) shown
in that Workshop space and place the Workshop tile
face up
. They will be able to receive the benefit shown on
that Workshop tile each time they move the die that matches
that Workshop’s color—
see “Activate a Workshop Tile”
(here)
.
-
If the Workshop tile is paid for and placed face up, the player
immediately gains the benefit shown on it.
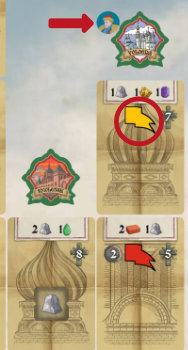
In this example, we can see that the yellow player has placed one of
their Banners on a Cathedral card that has the white die Workshop
tile on it 12. The yellow player pays 2 Rubles to
place it in their blue Workshop 3.
The player obtains resources based on the current position of the
white die on the Market board, which is 2 Rubles 4.
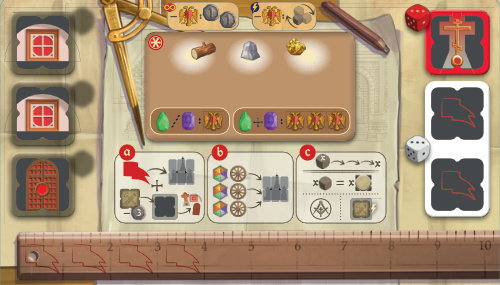
If you have chosen to play the game on the advanced side of the
Workshop boards, keep the following things in mind:
The game plays the same as the standard game in all aspects
except that placing a tile in the Workshop has a
fixed cost of 3 Rubles and that the Ornamentations are
not available right at the start of the game.
When part of the Cathedral is claimed and the Workshop tile is
placed (after first paying the costs), the corresponding
Ornamentation becomes available. If the player cannot or does
not want to pay to place the tile, the Ornamentation does not
become available.
The Banners in the white Workshops are used in the same way as
those in the Inventory, and can be taken directly from there. A
Workshop tile cannot be placed on a white Workshop space if the
Banner blocking it has not been used.
-
The yellow player is going to claim part of the Cathedral.
They decide that the Workshop tile will go in their green
Workshop so they can take the Arch there, moving it to the
corresponding space on their board.
-
Then, the player takes a Banner from their Inventory and
places it on the Cathedral card to claim it and its Workshop
tile.
-
Finally, when placing the tile on the green space and paying
3 Rubles, the player moves the Arch and places it in its
available place on their Workshop board. If they would have
taken a Banner from their white Workshop spaces instead,
their new Workshop tile could have gone to one of the white
Workshop spaces.

 nce the scaffolding has been installed, the construction teams can
get to work and finish that part of the Cathedral. To do that, they
will need construction Materials and, if they have the opportunity,
they can add finishings to the work with beautiful Ornamentations.
nce the scaffolding has been installed, the construction teams can
get to work and finish that part of the Cathedral. To do that, they
will need construction Materials and, if they have the opportunity,
they can add finishings to the work with beautiful Ornamentations.
Each time a player chooses this action, they may deliver up to
three Materials to the Construction Site.
Then those materials can be used to Build and/or
Decorate the Cathedral. If a section now has all of the
required Materials, it is completed and the player is awarded
Recognition Points and possibly Rubles. Adding Ornamentations may
also award Prestige Points.
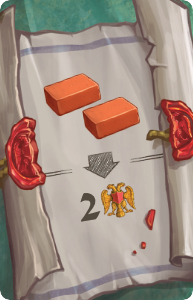
Building
The player takes the Materials they want to deliver from their
Inventory and assigns them to one or more Cathedral cards that have
their Banners on them. There is no requirement that the player
finishes a section in a single delivery—simply leave the Materials
on the card to show that they have already been delivered.
1
Building a Cathedral Section
A Cathedral section is finished once it has all of the required
Materials on it 2. When this
happens, the following steps are taken:
-
The Materials are removed and returned to the general
reserve.
-
The player gains the Recognition Points and Rubles shown on
the card .
-
The card is flipped over so it is showing the finished side.
The player’s Banner is left on the card 3.
What happens if a Cathedral section is completed when there are
unfinished sections below it?
If, when a section of the Cathedral is completed, there are cards
that have not been finished below it in the same tower, the players
who have claimed those unfinished sections will be chastised by the
Tsar. The player(s) who claimed those unfinished cards immediately
lose Recognition Points equal to the number of finished sections
above their cards without counting their own completed sections.
Decorating the Cathedral
nce a section of the Cathedral has been completed, there is an
opportunity for the construction teams to add finishings, installing
decorations and other types of improvements.
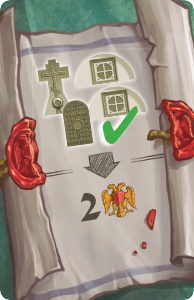
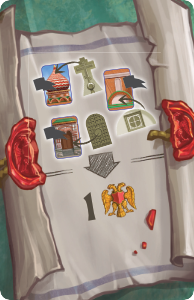
Each section of the cathedral, once finished, has space to place a
single Ornamentation: bases allow the construction of a Door;
middle sections allow the addition of Arches, and domes allow the
erection of a Cross.
Any player can install an Ornamentation on
any completed Cathedral section, regardless of who built that
section.
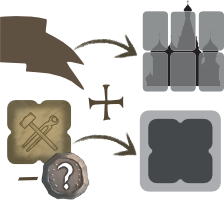
To decorate a Cathedral section, the player must deliver the
Materials required for the Ornamentation (Door = lumber; Arch
= stone; Cross = gold) plus 0, 1, or 2 jewels, which are
“set” into the Ornamentation. If jewels are set into the
Ornamentation, the player immediately gains:
-
1 for each jewel set into it, or
-
a total of 3 if 2 jewels of different colors are
set into it.
If an Ornamentation is added without any jewels, no Prestige Points
are awarded at that time.
Either way, all Ornamentations can generate Prestige Points at the
end of the game (in addition to those awarded for any jewels when
built), so it makes sense to invest in them even if they are not
accompanied by jewels.
Each Material (including any jewels) used for an Ornamentation
counts as one Material delivered. Remember that you can only deliver
a maximum of three Materials during each Build Sections of the
Cathedral action. In this case, when a player sends
Materials for
a Decoration
, all the chosen materials must be sent on the same
turn. Unlike parts of the Cathedral, Decorations must be sent and
finished in one go.
The yellow player uses their 3 deliveries to decorate a
Cathedral dome, creating a Cross with 2 different jewels
encrusted in it, which awards him 3 .
The yellow player is using all 3 deliveries for Ornamentations,
creating a Door (paying 1 lumber) with a jewel set in it (which
gives them 1 ) and a Cross (paying 1 gold) that does not
grant them any immediate points.
 fundamental part of construction is having all of the required
Materials at the moment you need to use them. Everything you might
need is available in the Market. Furthermore, your relationships
with the different Guilds will help you complete your job and are
crucial to becoming the most famous and appreciated architect!
fundamental part of construction is having all of the required
Materials at the moment you need to use them. Everything you might
need is available in the Market. Furthermore, your relationships
with the different Guilds will help you complete your job and are
crucial to becoming the most famous and appreciated architect!
Resource management and the use of the Market are the heart of The
Red Cathedral. To visit the Market, a player must follow these
steps:
-
Announce which Market die they are going to use.
-
Move that die around the Market board in the
direction of
the arrows
exactly the same number of spaces as the value it shows.
-
Optionally, if they use the
white die or
the die that is their own
color
, they may spend Rubles to move it
additional spaces, at a rate of one Ruble for
each extra space (which can result in a total
movement that is greater than six spaces).
-
Important: A die cannot end its movement on a
space that is already occupied by three dice.
In other words, the maximum number of dice that can
be in each space is three. If the moving die would
end up in a full space, the player must choose a
different die to move or—if it is the white die or
their color—they may pay to increase its movement.
-
The die remains on the space it reaches after moving.
-
The player now performs any
Market actions that they want to take, based on the
space they moved to.
-
Finally, they roll all of the dice that are in that
space and then put them back in that space.
The yellow player decides to move the yellow die. It shows the
number 3, so they move it three spaces, landing on the same space as
the blue die. Since the yellow player is moving the yellow die
(their color), they could spend Rubles to move it further, but they
do not want to do so this time.
Market Actions
Once the die has completed its movement, the player may perform
any or all of the following actions. They may perform each
action only once, but they may be performed
in any
order the player wishes
.
1Obtain Resources from the Market
The player takes the resources shown on the Resource tile next
to that space from the general supply,
multiplied by the
number of dice in that space
(as a maximum: the player may
take a smaller amount if they wish).
Resources are limited to the quantity in the general supply. If any
of them run out, any action that would award that Resource has no
effect until the supply is replenished.
After moving the yellow die, the player performs the “Take 2
Bricks” action twice (because there are 2 dice in the space) and
gets 4 bricks. Since yellow is the player’s color, they could
have paid 1 Ruble and instead landed where the red die is to
obtain 4 Lumber.
The Inventory
Every time a player gets Materials, they must put them in
their Inventory zone. Each Inventory initially has six open spaces,
which can hold one Material each. Players can increase the size of
their Inventories by claiming sections of the Cathedral.
Important: If you obtain Materials but there is no open space
for them in your Inventory, you cannot discard those already
in your Inventory to make space. You can only keep Materials that
you have enough space for.
2Use influence

Players can use their influence with the four groups on the
board—the Craftsmen’s Guild, the Teamster’s Guild, the Merchant’s
Guild, and the Clergy—to perform a variety of actions. Each group is
assigned a quadrant (representing the seasons of the year) on the
Market board, which includes two Market spaces. The quadrant where
the chosen die’s movement ends determines which of these groups can
be influenced that turn.
When a player influences a Guild or the Clergy, they may perform
one of the two actions shown on that group’s card. Some
of these actions require a cost and others do not. Actions
marked with the lightning icon only allow the player to perform
that action one time this turn, while those with the infinity
icon can be performed as many times as the player wishes. For
more details, see the Influence Actions Chart (here).
To continue the example from before, after obtaining bricks, the
player decides to use the Merchant’s Guild action to exchange 2
of their recently obtained bricks for 1 green jewel.
If the player has a Workshop tile assigned to their Workshop that
matches the die they moved this turn, they may immediately obtain
the benefit shown on that tile.
When this player moves the blue die, they can also receive
resources from the space the red die is located in at that
moment (2 lumber, in this case). If they move the yellow die,
they gain 1 .
Some Workshop tiles provide resources, while others show one of
the five dice colors. When you activate a Workshop tile that
shows a die, you gain the resources shown on the Resource tile
next to the space that die is sitting in.
You only get these
resources once
, regardless of the number of dice in that
space.
White Workshop spaces
The White Workshop space on each player’s Workshop board has two
spaces where Workshop tiles can be placed. If a player moves the
white die on the Market board and has two tiles assigned to it
in their Workshop,
they may only choose one of the two to
activate
that turn (you cannot use both).
Remember: After completing your actions in the Market,
you must roll all of the dice in the space you landed on.
As soon as any player has completed their
sixth Cathedral
card
, and the Recognition Points provided by that card have been
awarded,
they gain 3 additional for bringing an
end to the game. Then, the other players will each have one
final turn before the final counting of points is performed.
At this time, all players must move their score counters back
to the closest lower Prestige Point space. If the player is already
on a Prestige Point space, they do not move.
Important: If a player goes beyond 40 Prestige Points, flip
their score counter so it shows the “+40” side and continue counting
from the beginning of the track.
The yellow player must move back to the 14 space. The green
player will remain on the 18 space.

Additional Scoring
On top of the Prestige Points earned during the game, players will
add:
-
1
for every 5 Materials and Rubles that they return to
the general reserve at the end of the game.
-
A number of based on
their contributions to
each of the towers.
The total value of a tower is 2 for each section that is
completed, plus 1 for each Ornamentation on it. Any sections
that are not completed are not counted at all in the final scoring.
Each player counts the number of
Banners and Ornamentations of their color they have on the
completed Cathedral cards in that Tower.
The player with the highest total receives the full value of that
tower.
The player with the second highest total receives half of the total
value of the tower (rounding down for half points). The next player
after them receives half of that, and so on.
If there is a tie for any position, add up the Prestige Points for
the positions of the tied players and divide them evenly between
them (rounding down). If a player does not have any Banners or
Ornamentations in a tower, they receive no points for that tower.
The player with the most Prestige Points is the
winner!
If there is a tie, the tied player with most completed sections
wins. If the tied players have completed the same number of
sections, the one with the most Ornamentations placed will be the
winner. If the are still tied, then the players share the victory.
van Yakovlevich was the architect chosen by the Tsar to design his
great cathedral. By direct order of Ivan the Terrible, he will be
the one who personally directs one of the construction teams.
Nevertheless, your team will also take part in the job. Will you be
able to do such brilliant work that it dazzles the Tsar even though
you are in direct competition with the architect in charge of the
construction?
Setup

Set up the game as you would for two players. Place both score
counters on the Scoring Track and set the six Banners and the
Ornamentations of the other color to the side. This will be the
color used by Ivan Yakovlevich for his building team. You will not
need his Workshop board.
Take the Workshop tiles that are only used in games with 3-4 players
that
have the die action icons. You will have five, one of each color.
Shuffle the five Solitaire cards and lay them out in a line. This is
the order that Ivan will carry out his actions. Then, mix up the
Workshop tiles that you pulled out and randomly place them face up
in the spaces indicated on the Solitaire cards. Place five of Ivan’s
Banners on top of the “Claim a Cathedral Section” Solitaire card.
Place Ivan’s Ornamentations at the end of the row.
Then, with the remaining Banner, immediately perform a
Claim a
Cathedral Section
action for Ivan, claiming the Cathedral base
card that grants the most Recognition Points. If there is more than
one card worth the same number of points, Ivan will choose the tower
that is farthest to the left. Remove the Workshop tile that was on
the base card claimed by Ivan from the game.
Now the game starts with you playing your first turn.
Gameplay
Play your turn in the normal way, choosing one of the three
available actions. Then it will be Ivan’s turn. Continue alternating
turns in this way until
you or Ivan have finished their six parts
of the Cathedral
. Regardless, as soon as the end of the game is
triggered, no player will get the 3 bonus, but the other player will
still get one final turn.
Ivan's Turn
During Ivan’s turn, look at the row of Solitaire cards and find the
one furthest to the left that has a face-up
Workshop tile. First, move the die shown on that Workshop tile as if
Ivan was performing an
Acquire Resources from the Market basic
action, and then flip the Workshop tile face-down
. If this would
move a die to a space that already has three dice, do not perform
this part of Ivan’s turn.
Ivan will not gain any Resources from this action, but he may still
obtain a Recognition Point (either because he lands on a Market
space that grants it or because the Influence card gives him a ). In
this case, update his score counter.
After the die moves (if possible), perform the action indicated
on that Solitaire card.
If, at the start of Ivan’s turn, all of his Workshop tiles are face
down, carry out these steps before taking Ivan’s turn as
normal:
-
Iván will place one Ornamentation on a built card, if
he can, following this criteria and order:
A
What Ornament to place? The order in which to
place them is Door - Arch - Arch - Cross. Once the
Door is in place, then the next to be placed is one
of the Arches, and so on.
B
Where to place it? Ivan will try to decorate
a card constructed by the player (if there are more
than one, you chose which one). If that is not
possible, he will choose one of the cards built by
him (if there is more than one, you chose which
one).
C
If this is not possible, ignore this step, even if
there are other Ornamentations that can be placed.
If Ivan has placed an Ornamentation, he gets 1 . He
doesn’t have to pay any Materials to place them.
-
Then, take all his Workshop tiles, mix them up again, and
place them one by one on the cards face up to prepare for
his turn.
Actions Performed by Ivan
|
Recognition
|
Ivan immediately obtains 4 .
|
|
Inventory

|
Place 4 Materials of any type on this card. The Material type
does not matter, simply take Materials from the pile that has
the most.
|
|
Transport
|
Place all of the Materials from Ivan’s Inventory on top of
his Construction card.
|
|
Claim a Cathedral Section

|
If he still has any Banners, put 1 on a Cathedral card
according to this order of preference:
-
On a card directly above a section claimed or built
by you.
- On a base.
If neither of these conditions can be met, the player
chooses which card Ivan claims.
If the Workshop tile on that card grants ,
Ivan gets that . Either way, any tile that he
obtains is discarded.
|
|
Construction
|
Place all of the Materials on top of this card on the
Cathedral sections under construction by Ivan. When Ivan
takes this action, he does not need to match the
specific resources indicated on the Cathedral cards. The
only thing he must respect is the number of Materials
required. (For example, if a section requires 2 lumber,
1 brick, and 1 gold, for Ivan it requires any 4
Materials). If that section is now completed, Ivan
receives the that would normally be awarded.
To determine which card will receive the Materials, look
from left to right, bottom to top. The first card
claimed by Ivan that you find will be where the
Materials are placed.
If Ivan has more Materials than are needed, the extras
are placed on the next Cathedral card he is
building.
For example if the current card only needs
3 Materials to be completed, and Ivan has 4 to place,
the 1 remaining will go to the next card.
|

Note: each guild has three associated cards, and each card has two
choices. The numbers 1-3 shown below indicate the card that the choice
will appear on. (This is important for identifying which cards were
chosen in a fully customized game configuration. See the
hints for handling
for more details.)
Craftsmen's Guild


|


Sell any 1 Material for 1 Ruble.
|


Buy 1 of the indicated Materials for 1 Ruble.
|


Sell 1 of the indicated Materials for 1 Ruble.
|

Buy 1 Material of any type for 2 Rubles.
|

Sell 1 of the indicated Materials for 2 Rubles.
|

Buy 1 of the indicated Materials for 2 Rubles.
|
Teamster's Guild

|

Pay 1 Ruble to deliver 1 Material to the Construction Site. It can be used to build and/or decorate.
|

Obtain 1 Ruble.
|

Pay 3 Rubles to deliver 2 Materials to the Construction Site. They can be used to build and/or decorate.
|

Pay 2 Rubles to switch the positions of any 2 Resource tiles in the Market.
|
Merchant's Guild

|

Exchange 2 of the same Material in your Inventory for any 1 Material.
|

Exchange 1 Ruble plus 1 Material from your inventory for 1 of any other Material.
|

Exchange 4 of the same Material in your inventory for any 2 Materials.
|

Activate 1 of your Workshop tiles.
|
Clergy

|

Obtain 1 .
|

Pay 3 Rubles to obtain 1 .
|

Discard 3 different Materials to obtain 1 .
|
If you have completed at least 1 Cathedral section of each type, you get 2 .
|
 o ensure that the construction of St. Basil’s Cathedral moves forward at
a good pace and becomes the work of art that it is destined to be, the
very best specialists and craftsmen must be found who can carry out the
creation of a work worthy of the Tzar.
o ensure that the construction of St. Basil’s Cathedral moves forward at
a good pace and becomes the work of art that it is destined to be, the
very best specialists and craftsmen must be found who can carry out the
creation of a work worthy of the Tzar.
To do that, the building teams send their contractors out to hire the
best employees they can find in the cities around Moscow.
This expansion includes the main module, called
The Contractors, and 10 new Guilds. It also has 6 new
Building Plan cards and 1 card for playing in Solitaire Mode.
Some of these new Guilds can only be used with The
Contractors module, but most of them can also be used with the
basic game by itself. A few will need additional playing pieces, but
those will be explained in detail in these rules.
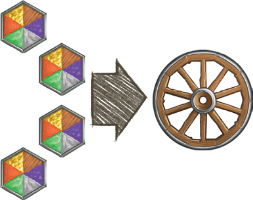
The Contractors adds a fourth action to the 3 actions
in the base game. This new action lets you send a Contractor to hire
Specialist workers in the most important cities around Moscow, who
will help you carry out the most complex tasks and thereby increase
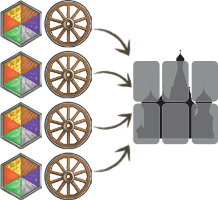
your recognition as an architect. When you send your Contractor to a
city (including Moscow itself) to hire Specialists, you will need
Permits and money. Using these subcontracted workers has
repercussions over the length of the game: every time you complete
one of the Cathedral’s towers, it triggers a scoring in that city
and closes off the possibility of hiring more workers there.
a
Claim a cathedral section
b
Build sections of the cathedral
c
Acquire resources from the market
The Specialist Tiles and the Specialists' Die
The new die for the Specialists works just like the colored dice for
each player and the white die. This means that you can pay money to
advance it additional spaces.
When you perform the Acquire Resources from the Market action
and move the black die, you can use the effects of your Specialist
tile as if it were a Workshop tile.

Each Specialist tile can only be used once. When you use your
Specialist tile, you get the bonus shown (for further details, see
Specialist Tiles). Then you must place the tile face down next to your
board so it shows one of the 6 tools.
At the end of the game, you will get 1/2/4/7/11/16 Prestige
Points for each group of different tools you have. Specialist
tiles are one use only.
Example: With this combination, Jorge gets 5 Prestige Points
at the end of the game: 4 for the group of 3 tools and 1 point
more for the tool that is on its own.
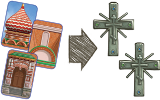
For example: The cities of Smolensk and Ryazan are not
available so no more Contractors can be placed in them.
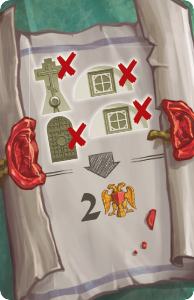
 here are 6 cities on the Grand Duchy of Moscow board that may or
may not be available for you to hire Specialists. Unavailable cities
will be covered with a tile showing a red X, to indicate that
Contractors cannot be placed there. In order to hire Specialists,
you must have money and Permits.
here are 6 cities on the Grand Duchy of Moscow board that may or
may not be available for you to hire Specialists. Unavailable cities
will be covered with a tile showing a red X, to indicate that
Contractors cannot be placed there. In order to hire Specialists,
you must have money and Permits.
When you choose this action, follow these steps:
-
Move the Contractor that is farthest to the left on your board
to an available city on the Grand Duchy of Moscow board. Then
pay as many Permits from your supply as there are Contractors in
that city (counting the Contractor you just placed plus any
other Contractors of your color and any other colors).
-
Moving a Contractor may unlock a bonus on your board, which
you must apply immediately.
-
Pay 2 Rubles and choose 1 of the 2 available Specialists next to
that city. If you already have a Specialist on your board, you
must discard it face down without activating its ability
to make space for the new tile. Important: You may decide
not to pay the 2 Rubles and simply discard the new Specialist
and remove it from the game instead.
-
Finally, place a new Specialist tile in the empty space.
In this example, the yellow player will get a Material of
their choice upon sending their third Contractor.
-
Shei wants to hire a Specialist in Suzdal, so she moves the
Contractor on the far left of her board to that city.
-
To do so, she must pay 5 Permits (there are now 5
Contractors there). She also gets a Material of her choice.
-
Then she must choose between tiles A or B. She decides to
take A. She pays the 2 Rubles it costs and places the tile
on her Workshop board extension.
-
Not shown Finally, she takes a tile from the bag and places it in the
space that was left empty.
Hiring in Moscow
When it is available, hiring Specialists in Moscow allows you to
choose any of the 5 Specialists available. With regard to the other
effects and costs, everything works just as it does in the other
cities.
During setup, you placed a City tile at the top of each of the
towers. When a tower is completed, you must follow these steps:
-
Move the City tile to the matching city space on the Grand Duchy
of Moscow board, and place it face down with the X showing. This
indicates that Contractors can no longer be sent there to look
for Specialists.
-
City points Each player who has Contractors in that city gains
Recognition Points equal to the number of Banners of their color
in that tower multiplied by the number of Contractors they have
in that city.
Once this has been done, the game continues as normal.
Shei (green) has just finished the middle section of a 3-card
tower, thereby closing off the city of Suzdal. She places the
City tile with the X showing on the Grand Duchy of Moscow board.
Now, no more Contractors can be sent there. When scoring the
city of Suzdal, Isra (yellow) gets 1 Recognition Point (1
Contractor x 1 Banner in the tower) and Shei (green) gets 4
Recognition Points (2 Contractors x 2 Banners). Jorge (red),
despite having an Ornamentation there, does not get any points
because he has no Banners on the tower. Likewise, Jose (blue)
does not receive any points since he does not have any Banners
on the tower. Moscow, on the adjacent tower, is not scored until
Isra (yellow) has completed the dome card.

Permits are a resource that is not stored in your inventory,
but are instead kept in the space reserved for them on your
board extension. [On Yucata, permits are shown in the
header of the player section.] Permits are used to hire
the best professionals in the most important cities of the
Grand Duchy of Moscow. They can be obtained in the Market in
the same way as other resources, thanks to the corresponding
Resource tile.

Additionally, at any moment during your turn you can lose 1
prestige point and obtain 1 Permit.
When awarding points at the end of the game, your Permits
are counted together with your Rubles and other Materials.
If a player completes their sixth Cathedral card (triggering the end
of the game) and a tower at the same time, the city points are
counted first as they would be normally. Then, the player who
triggered the end of the game adds 3 Prestige Points to their score.
At the end of the game, if there are still any towers that have not
been completed, the cities associated with them are not scored.
he construction of the Cathedral has led to an increase in the
city’s population to match the offer of employment. The new Guilds
that have been established can help you with the more complex tasks
of building.

Each new Guild is made up of 3 cards that may be combined with new
game pieces. For all intents and purposes, they work just like any
of the Guilds from the base game. Some cards from these Guilds can
only be played when using The Contractors module, but most
can be played regardless of whether you are using The
Contractors or just the base game. The cards that can only be
used with The Contractors are marked with this icon so they can be
identified quickly.
Setup
All of these Guilds come into play in the same way: You will use a
Guild card for the merchants, craftsmen, and teamsters from the
basic game, and replace the Clergy card with the Guild from
the expansion you wish to use instead.

Additional pieces: 15 Diamonds
Diamonds are stored in your inventory in the same way as any other
Materials. When you pay or spend Materials (regardless if it is for
a Cathedral section or Ornamentation), Diamonds can take the place
of any other Materials in any amount. This means that for a section
that needs 2 Bricks and 1 Wood, you could use 3 Diamonds instead.
During the setup of the game, take the Diamonds and place
them with the rest of the building Materials to create a supply.
Artisans allow you to activate Workshop tile actions (not Specialists).

Additional pieces: 1 Foreman Piece
Foremen grant players money and recognition as they move about
assessing the state of the projects being done on the Cathedral.
During setup, place the Foreman under the tower that is farthest to
the left.
When you have to move the Foreman, it always moves from left to
right, with 1 move for each tower. The tower where the Foreman ends
his movement will be the tower he evaluates. When he reaches the
tower farthest to the right, he will continue his movement starting
from the left again, as though he were walking in circles around the
construction site.
The Foreman provides additional awards and penalties. He has got his
eye on you! When a section is completed in the tower the foreman is
at, the player who completed that section is granted 1 additional
Recognition Point, and for completed sections above unfinished
sections belonging to other players, the penalty is 2 Recognition
Points per card (instead of just 1).
Additional pieces: Components from The Contractors module.
The Contractors allow you to obtain resources based on the
Specialists’ die or to obtain benefits based on where your
Contractors are on the board.
Wholesalers allow you to carry out more actions in the Market every time you acquire resources.
Managers give you greater flexibility when acquiring and using basic
construction Materials for the Cathedral.
Additional pieces: Components from The Contractors module.
Lawyers help you acquire more Permits for your Contractors or to exchange them for benefits.

Additional pieces: 15 Contract cards
Archivists allow you to draw 3 Contract cards and keep 1 of them to
score at the end of the game or provide you with benefits in
exchange for Recognition Points. During setup, take the Contract
cards, shuffle them, and place the deck face down near the
Archivist’s Guild.
Contract cards grant you additional Prestige Points based on their
objectives. Contract cards are scored at the end of the game, but
always before all the other end-of-game scoring. You cannot have
more than 3 Contract cards: If you already have 3 cards when you
draw, then you can discard one of those already held and place it on
the bottom of the deck. Keep your Contract cards secret from the
other players until the end of the game.
The Contract Cards:
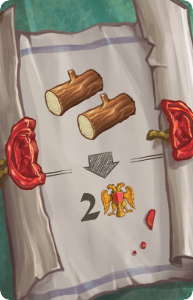 Return 2 Wood to the supply to obtain 2 Prestige Points.
|
 If you have claimed at least 3 sections in the same tower
(whether they are completed or not), you obtain 3 Prestige
Points.
If you have claimed at least 3 sections in the same tower
(whether they are completed or not), you obtain 3 Prestige
Points.
|
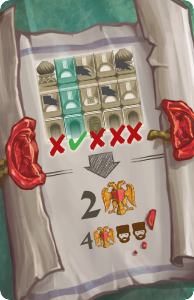
 If you have 6 face-up Workshop tiles in your Workshop, you
obtain 3 Prestige Points.
If you have 6 face-up Workshop tiles in your Workshop, you
obtain 3 Prestige Points.
|
 Return 2 Stones to the supply to obtain 2 Prestige Points.
|
 For each tower where you have NO presence
(Banners/Ornament.), you obtain 2 Prestige Points (4 points
in 2-player games).
For each tower where you have NO presence
(Banners/Ornament.), you obtain 2 Prestige Points (4 points
in 2-player games).
|
 For each Ornamentation you have that is NOT built, you
obtain 2 Prestige Points.
For each Ornamentation you have that is NOT built, you
obtain 2 Prestige Points.
|
 Return 4 Rubles to the supply to obtain 2 Prestige Points.
|
 If you have completed a section of each type (base, middle,
and dome), you obtain 2 Prestige Points.
If you have completed a section of each type (base, middle,
and dome), you obtain 2 Prestige Points.
|
 For each Ornamentation you have built on THE OTHER PLAYERS’
Cathedral sections, you obtain 1 Prestige Point.
For each Ornamentation you have built on THE OTHER PLAYERS’
Cathedral sections, you obtain 1 Prestige Point.
|
 If you have built all of YOUR Ornamentations, you obtain 2
Prestige Points.
If you have built all of YOUR Ornamentations, you obtain 2
Prestige Points.
|
 Return 2 Bricks to the supply to obtain 2 Prestige Points.
|
If you have 3 Ornamentations of any type in the same tower,
you obtain 3 Prestige Points.
|
 For each Ornamentation you have built on YOUR OWN Cathedral
sections, you obtain 1 Prestige Point.
For each Ornamentation you have built on YOUR OWN Cathedral
sections, you obtain 1 Prestige Point.
|
 Return 1 jewel and 1 Gold to the supply to obtain 3 Prestige
Points.
Return 1 jewel and 1 Gold to the supply to obtain 3 Prestige
Points.
|
 For each tower where you are present (Banners/
Ornamentations), you obtain 1 Prestige Point (2 points in
2-player games).
For each tower where you are present (Banners/
Ornamentations), you obtain 1 Prestige Point (2 points in
2-player games).
|

Additional pieces: The Cathedral cards that were not included in the game
Master Builders allow you to use the Cathedral cards that were not
used in the game. During setup, take all these extra cards and
shuffle them to create a single deck. After resolving the action,
place the Cathedral card in a discard pile. If this deck runs out,
reshuffle the discard pile and create a new deck.
 bviously, Ivan Yakovlevich’s influence can be seen in the team of
contractors involved in the construction of Saint Basil’s. He is
able to show his side as a fierce competitor both at the building
site as well as in the search for specialized workers.
bviously, Ivan Yakovlevich’s influence can be seen in the team of
contractors involved in the construction of Saint Basil’s. He is
able to show his side as a fierce competitor both at the building
site as well as in the search for specialized workers.
Setup

Set up the game as you would normally for a 2-player game along with
The Contractors expansion. In addition to the normal solitaire
setup, you must add the Contractor card for Ivan and the tile
showing , for the black colored die.
After setting up the cards and tiles, place all of Ivan’s
Contractors next to the card that performs the hire action as shown
in the image.

Place Ivan’s marker next to the City tile above the tower where Ivan
claims his starting section. Then, place one of Ivan’s Contractors
in that city without obtaining any Specialist tile.
Ivan starts out with a slight advantage: Place Ivan’s score marker
in the space that shows 3 Prestige Points. Place your own marker
according to the usual rules. Remember that you will be the starting
player with 3 Rubles and 1 Permit.
Playing with Ivan and The Contractors
The solitaire game plays in the same way as normal, with the
exception that Ivan performs one more action. When Ivan carries out
the hire action, place 1 of his Contractors on the city matching the
tile Ivan’s marker is currently located next to. Ivan does not turn
in any Permits in order to perform this action. He simply places 1
of his Contractors there.
After placing the Contractor in the city, take both of the available
Specialist tiles. Ivan does not perform the tiles’ actions unless he
can obtain Recognition Points without paying anything. Then flip
them over and put them to one side to make up part of Ivan’s score
at the end of the game. At any time, if Ivan has 2 Specialist tiles
with the same tool, both are returned to the bag and he loses them.
It is Ivan’s turn. After moving the green die, he must place a
Contractor in the city of Smolensk. After placing the Contractor
(A), he obtains the 2 tiles available in Smolensk: Flip them
over and place them in his scoring area (B). Since he now has 2
tool tiles of the same type, those 2 tiles are both returned to
the bag (C).
Moving Ivan’s marker: Every time you or Ivan claim a new
section, Ivan’s marker must be moved to that tower.
Important: If Ivan places a Contractor in Moscow, he does not
obtain any tiles, but instead gains 1 Prestige Point
Ivan just claimed a section in the tower with the Vologda tile,
so Ivan’s marker is moved there. Later, you claim a section in
the tower corresponding to Smolensk, so his marker is moved
there.
The scoring of cities when a tower is completed works just as it
does in the multiplayer game (see here).

hieves and swindlers were also present during the construction of
St. Basil’s Cathedral. Instead of placing a Clergy card, place a
random card from the Thieves’ Guild.

hese 4
special new Workshop tiles allow you to perform more powerful
actions every time you visit the Market.
During setup, starting with the last
player and finishing with the first, each player chooses 1 of these
tiles. If there are any extra tiles, they are returned to the bag.
During the game, instead of placing the
tile you obtain normally when claiming a Cathedral section, you can
discard the one you just obtained and place your special Workshop
tile. The cost is not the usual cost: instead, the cost is
equal to the number of available spaces in your Workshop: if you
have 6 empty spaces (i.e., you are going to place your first tile),
it will cost you 6 Rubles to place it. If you have only 2 spaces
free (i.e., you have already placed 4), it will cost you 2 Rubles,
and so forth.
 Obtain 1 Diamond. (Its function is the same as described in the
Jeweler’s Guild.)
Obtain 1 Diamond. (Its function is the same as described in the
Jeweler’s Guild.)
|
 Obtain 1 Material of your choice and 1 Ruble.
|
 Activate the Market die of your choice.
|
 Activate any 1 of the 4 Guilds as usual.
|
In order to avoid endless loops, the fourth Workshop tile above in some cases
will not allow you to activate an Artisan or Merchant guild card that activates a
Workshop tile.
Appendices
Base Game
Contractors Expansion
As with most games on yucata.de, you are allowed to choose your
player colors under the Settings menu. However, since your player
color is associated with dice on the market board, you will notice
the die colors changing accordingly. Furthermore, the die colors
are associated with the workshop slots on the player board, so some
of those elements might move around when you change colors as well.
Gameplay is not affected.

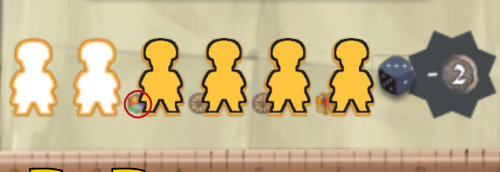
There are a limited amount of resources available in the game. This
section above the market board shows how many resources of each type
remain.
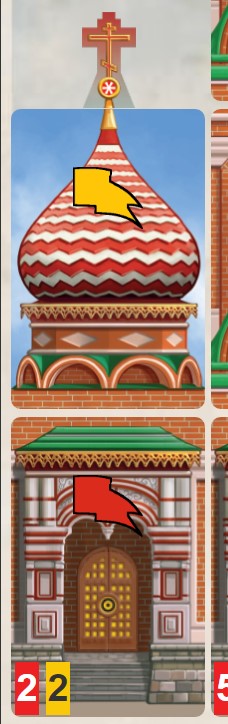
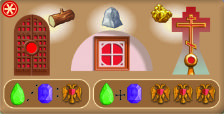
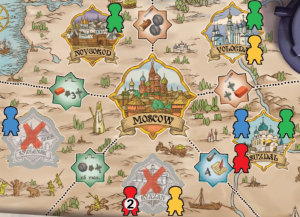
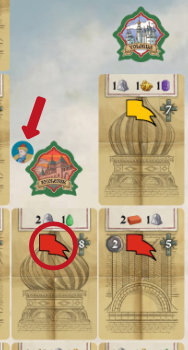
The numbers that appear at the bottom of each tower makes it easy
to see at a glance which player is leading the race to contribute
the most to that tower, which is important in the final scoring.
In this example, each of the two players has contributed two items
to the tower. The red player has completed the bottom section and
added the cross ornamentation. The yellow player has completed the
top section and added the door ornamentation.

One of the invitation options allows you to fully customize the
guild cards for the game. For each of the three standard (always
included) guilds, you can pick which card to use, or you can specify
to use a random card. You can also choose which fourth guild to
use, and choose a specific or random card from that guild too.
Choose the card with a question mark to specify a random card.
When you see an invitation for a fully customized game,
interpret the options specified by the inviter as follows:
-
If any of the standard guilds is set to "Random", that guild
does not appear in the invitation description.
-
If the chosen fourth guild has no corresponding number, then
the card from that guild will be chosen randomly.
-
A value between 1 and 3 next to the guild name specifies
which card the inviter has chosen for that guild. You can
look in the guild sections above to find details about that
card. Look for a circled number in the top right corner of
the description for each guild choice.
For example, the invitation string "(Merchants 1, Archivists)" means
the game will include:
- A random craftsman card
- A random teamster card
- Card 1 from the merchants, which has the 2-for-1 and 4-for-2 trades.
- A random archivists card
The header of each player section shows how much recognition a player has earned in the game so far.
It also shows in parenthesis how much recognition the player would have including anticipated end
game bonuses. You can click on this number to see further scoring details. These details are all
reported in terms of recognition, even for the anticipated end game bonuses (which are normally computed
as prestige).
During the game, these scoring details include estimates for most
end game bonuses. However, they do not include the scoring
for the contract cards used with the Archivist guild, since those cards
remain hidden from other players until the end of the game.
The end game summary reports the player scores in terms of prestige instead of recognition. You can
see more information about the relationship between recognition and prestige here.
| |