If you are reading these rules for the first time, ignore the text
along the right hand side. These rules serve as a summary to help
you quickly familiarize yourself with the game.
GAME SETUP
Build the island in the middle of the table. Place the 35
animal tiles (7 of each color) onto the island
Give each player:
- 1 cardholder
-
6 explores (placing 1 on the 0/50 space as a victory
point marker)
- 5 resources (one of each color)
- 1 large animal tile
Place the remaining explorers and resources in general supply
piles next to the island
Shuffle, and place all 120 (or 180) cards face down in multiple
draw piles
The oldest player begins
When playing the game for the first time, carefully remove all
card-board pieces from their frames. Fold and fasten the cardholders
so that the game summaries A-D are visible at the bottom of their
front sides.
Important! There is one extra tile for each type of
animal (i.e. 5 extra small animal tiles). These are not needed
during the game, and are included as replacements only!
Build the island in the middle of the table. Add the 10
"teeth" pieces in random order to the central connector, so that a
ten-sided island, La Isla, results.
Note: There are more than 3 million options for what La Isla
might look like!
Take 7 of each small animal tile and randomly distribute
them onto the 35 dark green jungle regions of the island. The
numbers 2, 3 and 4 printed on the regions should remain visible.
Place the game board (with the victory point track and the
five animal tracks) next to the island.
Place 1 purple marker onto the starting space at the
bottom of each animal track.
Give each player:
-
1 cardholder in the color of their choice, placed in
front of them.
-
6 explorers in the same color. Place one of them onto
the 0/50 space of the victory point track, and the remaining 5
below the letter C on the player's cardholder.
-
Place the remaining explorers (2 per color) in a
general supply pile next to the island.
They will only
enter the game via the corresponding cards.
-
5 resources (one per color) also placed below the
letter C on the player's cardholder.
-
1 large animal tile (randomly distributed), placed
next to the player's cardholder (easily visible by all).
With fewer than 4 players, return the unused game components
(large animal tiles, cardholders, and explorers) to the game box.
Place the remaining resources next to the island as a
general supply.
Sort the 180 cards by value: There are 120 1-value cards
and 60 2-value cards
(numbers are located in the lower middle of
each card)
. New players should play with the 1-value cards only,
returning the 2-value cards to the game box. (After you have played
the game a few times, use all 180 cards to make the game more
interesting.)
Shuffle all 120 (or 180) cards and place them
face down
in multiple draw piles next to the island.
Give the oldest player the starting player card.
At Yucata the starting player is chosen randomly. This is the only
deviation to the original rules.
GAMEPLAY
Each round consists of a card phase, followed by action phases
A, B, C, and D
The game is played in multiple rounds. Each round consists of a
card phase followed by four action phases (A, B, C and D).
At the end of a round, give the starting player card to the next
player in clockwise order, and play a new round (starting with the
card phase, followed by action phases A-D), etc, until the game is
over.
Card Phase
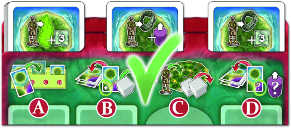
Each player draws 3 cards, and assigns them to the letters A,
B, and D of their cardholders
A: This card grants a special function
B: This card yields one resource
D: This card moves the corresponding animal marker
All players carry out action A first, then B, etc.
Action C must be played in clockwise order
In the card phase, all players draw
3 cards from the face down draw piles of their choice, and
add the cards to their hands. Each card has three possible
uses:
- Perform a
special function
(top)
- Receive resource (bottom left)
- Move marker ahead (bottom right)
Place these cards face down below your cardholder, such
that exactly one card is assigned to each of the letters A,
B, and D. This identifies which card you will later use to perform a
special function (the card under the A), which you will use to
receive a new resource (the card under the B), and which you will
use to advance a marker (the card under the D).
Once all players have assigned their cards, the action phases
begin.
Action Phases A › B › C › D
Players first carry out action A. When all players have finished
action A, they continue to action B, followed by action C, and
finally action D. Action phases A, B, and D can be carried out by
all players simultaneously, but action phase C
must be
played in clockwise order
, beginning with the current starting
player.
Action A
Add the card assigned to A to your cardholder
Its special function may now be used
More details about the special functions on the cards may be
found at the end of the rules.
Take the card you assigned to the letter A and add it
face up
to your cardholder, leaving only the top half of the card
(i.e. its
special function
) visible. From this point on, you may continue to use this
special function, even in subsequent rounds.
As long as you still have an empty slot in your cardholder (i.e.
during the first three rounds), you may fill an empty space with the
card that you chose. Starting in the fourth round, you must choose a
card in your cardholder to cover up, taking away your ability
to use the covered-up card's function. Note: You may cover up cards
in the same slot multiple times.
Note! You are never allowed to have the
identical
special function visible in more than one slot on your
cardholder. Similar functions, however, are allowed,
and are often very useful.

Action B
Discard the card assigned to B and take the
corresponding resource from the supply
Take the card you assigned to the letter B and add it face up to
a discard pile next to the draw piles. Then, take a resource from
the general supply that matches the one indicated on the card, and
add it to your own personal supply.
Note: The general supply of resources is not intended to be
limited. Should it run out, use something else temporarily as a
resource.
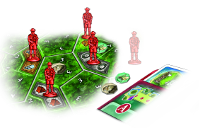
Action C (Main Action)
In turn order, place one explorer onto a
landscape space
Pay with 2 resources of the same color:
Desert space

Grassland space

Mountain space

Steppe space

Swamp space

In clockwise order starting with the current starting
player, place one of your explorers onto the island. Take an
explorer from your personal supply to start; once your supply
is exhausted (i.e. after the fifth round), choose one of your
already-placed explorers and move it elsewhere on the island.
Place explorers onto the middle of the colored landscape
spaces, such that the space's symbols (tent, hat, rope, bottle, and
backpack) remain visible.
Placing an explorer costs two resources of the same
color as the space you are placing the explorer onto.
Example: Anna places her explorer onto a desert space.
She returns two yellow resources to the general supply.
Note! If you can't or don't want to place an
explorer, you may instead take one resource, of your choice, from
the general supply.
Animal Tiles
As soon as you have completely surrounded a jungle region with
explorers, claim the corresponding animal tile and receive victory
points
Once you have placed explorers onto all of the landscape
spaces that surround a jungle region, you receive the animal tile
from that space, as well as victory points. First, place the
animal tile next to your cardholder so that it is easily visible.
Then, score the number of victory points indicated by the jungle
region (2, 3 or 4) by moving your victory point marker forward the
corresponding number of spaces on the victory point track.
It is possible to claim more than one animal tile at the same
time by surrounding more than one jungle region when placing a
single explorer.
Example: Paul places his explorer onto the grey
mountain space. This lets him claim two animal tiles, the Owlet Moth
and the Sardinian Pika, since he has surrounded two jungle regions
with four explorers. He places the two animal tiles next to his
cardholder and scores a total of 5 (2 + 3) victory points.
Notes:
-
Explorers of different colors may be on the same space, but
never more than one explorer of the same color.
-
The number of victory points awarded for surrounding a
region and claiming an animal tile always equals the number of
explorers needed to accomplish this.
-
If you surround an empty jungle space (i.e. the animal tile
has already been claimed), you receive nothing.
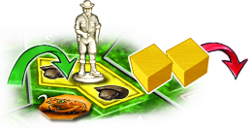
Action D
Discard the card assigned to D and move the
purple marker that corresponds to the animal on the card one space
higher; score 1 VP for each animal of that type that you own
Note! The values of the areas the purple markers are in
have no effect on scoring during the game. You only score
1 VP per animal, no matter what area the purple marker lands
in
Take the card you assigned to the letter D and add it face up to
the discard pile. Then, move the purple marker corresponding to the
animal type on your card one space higher on the animal track. You
(and only you!) immediately score 1 victory point for each animal of
that type that you possess. Large animal tiles are worth 2 points.
Example: Lena plays a card showing a Dodo. She moves
the purple marker on the Dodo track one space higher. Since she has
the large Dodo tile as well as one small Dodo tile, she scores a
total of 3 victory points. All other players with Dodo tiles score
nothing
.
Notes:
-
Depending on the cards in your cardholder, it is possible
that you could also move markers in action phases B or C, or
even move the markers more than once. Each time you move a
marker, score points as outlined above.
-
Once a purple marker has been moved to the topmost space of
the track (the 5 space!), you can no longer move it when
carrying out this action. However, you do continue to score
points as normal.
Card Effects
You may use 1 brown resource as any color
You may use 1 beige resource as any color
You may use 1 yellow resource as any color
You may use 1 gray resource as any color
You may use 1 green resource as any color
You need only 1 resource to place an explorer on a
space with a backpack symbol
You need only 1 resource to place an explorer on a
space with a bottle symbol
You need only 1 resource to place an explorer on a
space with a hat symbol
You need only 1 resource to place an explorer on a
space with a rope symbol
You need only 1 resource to place an explorer on a
space with a tent symbol
If you place an explorer on a space showing the
hat symbol:
move any 1 marker up 1 space, and possibly get victory
points
If you place an explorer on a space showing the
rope symbol:
move any 1 marker up 1 space, and possibly get victory
points
If you place an explorer on a space showing the
tent symbol:
move any 1 marker up 1 space, and possibly get victory
points
If you place an explorer on a space showing the
backpack symbol:
move any 1 marker up 1 space, and possibly get victory
points
If you place an explorer on a space showing the
bottle symbol:
move any 1 marker up 1 space, and possibly get victory
points
If you place an explorer on a space showing the
hat symbol:
+ any 1 resource
If you place an explorer on a space showing the
backpack symbol:
+ any 1 resource
If you place an explorer on a space showing the
tent symbol:
+ any 1 resource
If you place an explorer on a space showing the
bottle symbol:
+ any 1 resource
If you place an explorer on a space showing the
rope symbol:
+ any 1 resource
If you place an explorer on a space showing the
rope symbol:
+ 3 victory points
If you place an explorer on a space showing the
tent symbol:
+ 3 victory points
If you place an explorer on a space showing the
backpack symbol:
+ 3 victory points
If you place an explorer on a space showing the
bottle symbol:
+ 3 victory points
If you place an explorer on a space showing the
hat symbol:
+ 3 victory points
During action B, if you get a brown resource:
+1 additional brown resource
During action B, if you get a green resource:
+1 additional green resource
During action B, if you get a beige resource:
+1 additional beige resource
During action B, if you get a yellow resource:
+1 additional yellow resource
During action B, if you get a gray resource:
+1 additional gray resource
During action B, if you get a gray resource:
move any 1 marker up 1 space, and possibly get victory
points
During action B, if you get a yellow resource:
move any 1 marker up 1 space, and possibly get victory
points
During action B, if you get a brown resource:
move any 1 marker up 1 space, and possibly get victory
points
During action B, if you get a green resource:
move any 1 marker up 1 space, and possibly get victory
points
During action B, if you get a beige resource:
move any 1 marker up 1 space, and possibly get victory
points
During action B, if you get a yellow resource:
+ 2 victory points
During action B, if you get a gray resource:
+ 2 victory points
During action B, if you get a green resource:
+ 2 victory points
During action B, if you get a brown resource:
+ 2 victory points
During action B, if you get a beige resource:
+ 2 victory points
During action D, if you move the marker of the golden toad:
+ 2 victory points
During action D, if you move the marker of the owlet moth:
+ 2 victory points
During action D, if you move the marker of the dodo:
+ 2 victory points
During action D, if you move the marker of the pika:
+ 2 victory points
During action D, if you move the marker of the giant fossa:
+ 2 victory points
During action D, if you move the marker of the owlet moth:
+ any 1 resource
During action D, if you move the marker of the giant fossa:
+ any 1 resource
During action D, if you move the marker of the golden toad:
+ any 1 resource
During action D, if you move the marker of the dodo:
+ any 1 resource
During action D, if you move the marker of the pika:
+ any 1 resource
If you place an explorer on a gray landscape
space:
+ any 1 resource
If you place an explorer on a green landscape
space:
+ any 1 resource
If you place an explorer on a beige landscape
space:
+ any 1 resource
If you place an explorer on a yellow landscape
space:
+ any 1 resource
If you place an explorer on a brown landscape
space:
+ any 1 resource
If you place an explorer on a brown landscape
space:
+ 3 victory points
If you place an explorer on a yellow landscape
space:
+ 3 victory points
If you place an explorer on a beige landscape
space:
+ 3 victory points
If you place an explorer on a green landscape
space:
+ 3 victory points
If you place an explorer on a gray landscape
space:
+ 3 victory points
If you place an explorer on a gray landscape
space:
move any 1 marker up 1 space, and possibly get victory
points
If you place an explorer on a green landscape
space:
move any 1 marker up 1 space, and possibly get victory
points
If you place an explorer on a beige landscape
space:
move any 1 marker up 1 space, and possibly get victory
points
If you place an explorer on a yellow landscape
space:
move any 1 marker up 1 space, and possibly get victory
points
If you place an explorer on a brown landscape
space:
move any 1 marker up 1 space, and possibly get victory
points
The following special functions are on the 60 cards
which are not used in the beginner's game:
Take 1 additional explorer from the supply. Keep it
even after covering up that card.
If you place an explorer in the outer "ring":
+ 2 victory points
If you place an explorer in the inner "ring":
+ 2 victory points
If you place an explorer in the middle "ring":
+ 2 victory points
You may move any marker instead of the owlet moth marker
You may move any marker instead of the giant fossa marker
You may move any marker instead of the golden toad marker
You may move any marker instead of the dodo marker
You may move any marker instead of the pika marker
If you get a pika animal tile:
+ any 1 resource
If you get a golden toad animal tile:
+ any 1 resource
If you get a dodo animal tile:
+ any 1 resource
If you get a giant fossa tile:
+ any 1 resource
If you get a owlet moth animal tile:
+ any 1 resource
If you get a pika animal tile:
+ 3 victory points
If you get a golden toad animal tile:
+ 3 victory points
If you get a owlet moth animal tile:
+ 3 victory points
If you get a giant fossa animal tile:
+ 3 victory points
If you get a dodo animal tile:
+ 3 victory points
If you get a dodo animal tile:
move any 1 marker up 1 space, and possibly get victory
points
If you get a pika animal tile:
move any 1 marker up 1 space, and possibly get victory
points
If you get a golden toad animal tile:
move any 1 marker up 1 space, and possibly get victory
points
If you get a owlet moth animal tile:
move any 1 marker up 1 space, and possibly get victory
points
If you get a giant fossa animal tile:
move any 1 marker up 1 space, and possibly get victory
points
Place this card beside your cardholder: You now have
one extra slot in which to place a card.
In the card phase, draw 1 additional card. After
assigning 3 cards, discard the unused one.
If you place your explorer on a space with another
explorer:
swap any 1 resource with 1 from the supply
If you place your explorer on a space with another
explorer:
+ 2 victory points
If you place your explorer on a space with another
explorer:
"pay" only 1 resource