|
|
Glen More – of plats, sheep and strong drinks

|
Each player becomes the head of a Scottish clan of the 1600s and
seeks to maximize the clan’s influence and power in the Scottish
highlands. Each clan leader attempts to steadily increase his
landholdings by adding tiles to his display, which he then activates
for specific benefits: resources that can be used to gain new territory
or transformed into victory points; or new clan members to oversee
territorial expansion; or any of the 13 special locations, which offer
particular advantages to their owners. This is to say nothing of the
countless whisky distilleries and taverns...
Due to the novel game system – in which the current turn goes to the
player whose figure is at the end of the chain of figures and tiles on
the track – players have an unusual amount of self-determination over
the size and development of their territories. This keeps the games
interesting and replayable.
The player with the most points after 3 scoring rounds wins the game.
|
Contents
-
25 clan members (black wooden men)
-
5 player figures (colored wooden men)
-
44 resources (10 green wood cubes, 10 gray stone cubes, 8 yellow
grain cubes, 8 brown cattle cubes and 8 white sheep cubes)
-
16 whisky barrels (natural colored, octagonal pieces)
-
1 die (with 1-1-1-2-2-3 pips)
-
8 die-cut frames with:
-
1 game board
-
13 special location cards
-
72 tiles (villages, forests, meadows, pastures, castles, ...)
-
33 coins
-
58 victory point tokens (18 x 1, 10 x 3, 15 each 5 and 10)
-
2 summary cards (front side: rules summary; back side: tiles)
An important note: the game is not component limited! In the rare case that the supply of
some component is exhausted during the game (resource cubes, whisky barrels or victory
point tokens), players should use a substitute to represent the component until more become
available.
Preparation
Before your first game, carefully punch out all of the die-cut pieces from their frames.
-
Place the game board in the middle of the table.
-
Sort the tiles by their backs (0, 1, 2, and 3) to form 4 face-down
stacks next to the board. In addition, there are 5 starting villages
(with identical fronts and backs), 1 per player (see below).
-
Set the 13 special location cards near the game board.
- Form a general supply near the board of the following pieces:
-
25 clan members (black wooden men)
-
16 whisky barrels (natural colored, octagonal pieces)
-
44 resource cubes
-
33 coins
-
all victory point tokens
- Each player takes:
-
1 starting village, which he places in his play area (the space
on the table near him); this begins the player’s display
(return unused starting villages to the game box)
-
1 clan member from the general supply, which he
places on his starting village
-
1 player figure in his chosen color, which he
places according to the rules below
-
6 coins, which he places visibly in his play area
The die is only used when playing with 2 or 3 players. (See rules for 2 or 3 players.)
|
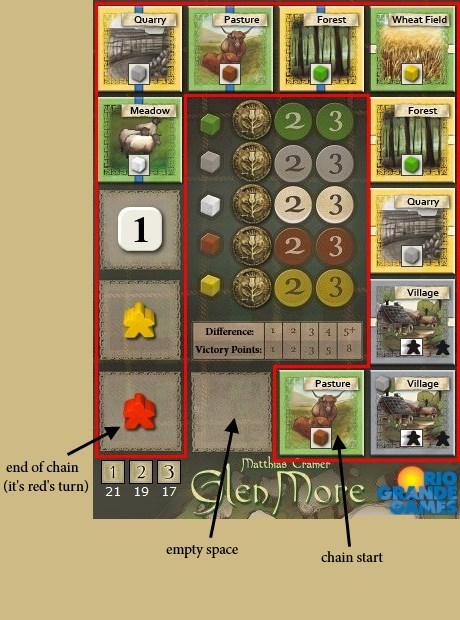
The players choose a starting player. He places his
figure on any of the 14 spaces on the track around
the board. The other players, in clockwise order,
place their figures on the next spaces on the track
in clockwise order around the track until all players
have a figure on the track (see figure at right).
Next, the players draw tiles from the "0" stack one
at a time and place them face-up, one per space on
the track, starting with the next space after the last
player’s figure and continuing up to, but not including the space
directly behind the starting player’s figure. When playing with fewer
than 5, the players will need to draw from the "1" pile to complete
the track.
Important: the space behind the start player remains empty,
regardless of how many are playing (see figure at above right).
This one space (behind the "end" player of the chain), remains
empty during the game so players know where the chain begins and
ends.
|
|
Playing the game
The game consists of 3 rounds. At the end of each round, a scoring
phase takes place. The first round ends when the last tile from the "1"
pile is placed on the board; the second when the last "2" tile is placed,
and the third when the last "3" tile is placed. After the third scoring
phase, players conduct a special final scoring. Whoever has the most
points wins.
Important! In contrast to most types of games, players do not take
turns in clockwise order. Rather, the player whose turn it is always the
player whose figure is at the end of the chain on the track. How many
turns a player gets in the game will depend on how far he moves his
figure each turn. This also means that players may have uneven numbers
of turns, or that a player may get several turns in a row.
A player’s turn always consists of the following, in the order shown:
-
He moves his figure to any space on the track that contains a tile.
-
He places that tile in his own display.
-
He activates this same tile and all adjacent tiles.
-
He draws a new tile and places it at the end of the track.
1) Moving a figure
On his turn, the player moves his figure to any space containing a tile
(as long as he can legally place the tile in his display and pay for it, as
discussed below).
2) Placing a tile
The player takes the tile under his figure
and places it in his display in his play area
see section "placement rules".
3) Activating tiles
The player then activates the new tile and all adjacent tiles (including
diagonally adjacent tiles). More details about what the tiles do are
covered in the sections below.
4) Drawing a New Tile
At the end of his turn, the player draws a new tile from the current stack
and places it on the space at the start of the track so that, once again, 13
of the 14 spaces are covered (with figures or tiles). Of course, once the
"0" stack is exhausted, players draw from the "1" stack, then the "2"
stack when the "1" stack is exhausted, and, finally, the "3" stack when
the "2" stack is exhausted.
Note: it can sometimes happen that the spaces directly behind the starting player
figure still have tiles on them. A player should remove any such tiles in phase 4 of
his turn (putting them back in the game box), adding an equal number of newly
drawn tiles face-up to the end of the track.
Note: at the end of a turn,
there are always 13 of the 14
spaces occupied – either by a
tile of player figure – and there
is always a player figure at the
beginning of the chain.
The tiles
-
Each tile has an name and a colored border that indicates the tile’s
type. For example, all brown tiles produce victory points for their
owners.
-
About half of the tiles have purchase costs, usually in resources
(pictured in the upper left). If no costs are shown,
the tile is free. If a player cannot pay the full costs
shown before placing the tile (either with his current
holdings and/or through buying and selling at the
warehouse, as indicated below), he cannot place
his figure on it.
-
On some tiles (villages, distilleries and special locations), a picture
on the bottom right of the tile shows what a player gets as a 1-time
windfall when the tile is placed in his display in addition to
whatever the tile’s activation allows.
-
The bottom middle of each tile shows what a player gets each time
he activates the tile.
-
The 13 special location tiles are marked on the lower left
so they can be easily identified.
|
|
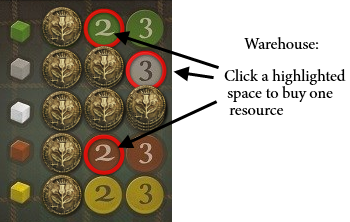
The warehouse
|
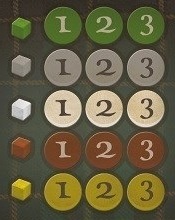
The warehouse is in the center of the board. Each of the 5 resources has its own
row (containing the numbers 1, 2 and 3). A player may engage in transactions at
the warehouse at any time on his turn by buying and selling resources there.
|
Buying (only permitted to cover immediate costs!):
when a player wants to
buy a resource from the warehouse, he places as many coins as are shown on the
cheapest open numbered space (which will be either 1, 2 or 3 coins). If the row is
already full, the player is temporarily not permitted to buy that resource.
A player can purchase as many resources of as many types as he wants on a given
turn, as long as it is done only to cover the immediate costs of placing a tile or
to cover the costs of a brown tile or a distillery when needed. In such cases, the
player should just leave the purchased resource(s) in the supply because he will
have to turn them in immediately upon buying them anyway.
Selling (allowed at any time on a player’s turn, including multiple times):
when
a player wants to sell a resource to the warehouse, he places the resource back
into the general supply and takes the coins from the highest coin-occupied space
in that resource’s row. A player may sell as many resources of as many types as
he wants on a turn; however, if there are no coins in the corresponding row, the
player is temporarily unable to sell that resource.
Note: whisky does not count as a resource and, therefore, cannot be bought or sold.
(Obviously, the same is true for clan members.)
A comprehensive Example:
Anna wants to take the Iona Abbey and needs 1
wood, 1 stone, and 1 sheep to pay for it. She has 2 wood, 1 cattle, and 3 coins.
She sells her cattle to the warehouse for 2 coins. She then buys 1 stone, placing 2
coins into the warehouse, and 1 sheep, placing 3 coins into the warehouse. She
then turns in 1 wood, places the Iona Abbey next to a stone quarry, a meadow,
and the mid-sized annual fair. As a result, she gets 1 stone, 1 sheep, and the
opportunity to turn in up to 4 different resources for victory points. As the benefit
of the Abbey, she chooses to take 1 sheep, which she then sells to the warehouse
for 3 coins. With this money, she buys 1 grain for 1 coin, which she turns in
together with her 1 wood, 1 stone and 1 sheep for 8 victory points (as the annual
fair’s function).
Placement rules
-
Every tile must be placed so that at least 1 of its edges is adjacent to
that of another tile. (Corner to corner is not enough!)
-
Additionally, at least 1 of the neighboring tiles must have a clan
member on it (in this situation, corner to corner does count!).
-
A river must be continuous, and a player may not start a second
river. Also, the river must run straight North and South. The same is
true for the road, except that it must run straight East and West.
-
Tiles without a river or road may only be placed along the edge of
another tile if that edge also does not show a river or road.
-
Otherwise, there are no further limitations on placement, and
tiles of different colors may be placed adjacent to each other.
In other words, it is permissible to place a castle
next to a meadow, or a forest next to a loch, etc.
The function of the tiles
Once a player has legally placed a tile in his display, he may take
any one-time benefits it provides (as shown on the tile’s bottom
right). Then, he may activate the tile he just placed as well as all
neighboring tiles (including those diagonally adjacent!). The player
may choose the order in which he activates eligible tiles. The benefits
of any 1 tile may only be used once per activation phase. Therefore,
during an activation phase, a player may use a distillery to
exchange exactly 1 grain for exactly 1 whisky barrel, or he may
use an annual fair once to change resources into victory points,
and so on.
Yellow and green bordered tiles: production tiles, distilleries and the Iona
Abbey
Stone quarry, forest, meadow, pasture, and wheat field:
whenever a yellow or
green production tile is activated, the player takes 1 resource cube of the type
shown from the general supply and places it on the producing tile.
Important: a tile may never contain more than 3 resources at once. If
a player is supposed to receive more than that, he simply does not take
the extra.
Tip: it may be wise to make room in such circumstances by selling a resource
to the warehouse before activating the tile.

|
Distillery:
when a player adds a distillery to his display, he immediately
takes 1 whisky barrel from the supply. Additionally, whenever the distillery
is activated (including upon initial placement), the owner may distill
whisky by turning in any yellow resource cube from his display to the
supply (the tile it comes from need not be activated) and placing a new
whisky barrel next to his display (not on the distillery itself).
|

|
Iona Abbey:
in addition to special location cards (see below), activating the
abbey permits a player to take 1 resource cube of his choice and place it
on the abbey tile. As with other tiles, the abbey can only hold a
maximum of 3 resources.
|
Brown bordered tiles: butchers, taverns, annual fairs, etc.

|
Butcher:
there are 3 types of butchers. One permits a player to turn
in 1 (or 2) sheep for 2 (or 4) victory points by returning the chosen
number of white resource cubes from any tiles to the supply and
drawing the corresponding number of victory point markers. There is an
identical butcher for cattle. The third butcher requires the player to turn in
exactly 1 sheep and 1 cattle for 5 victory points.
|

|
Annual fair:
depending on which fair the player has, he can turn in 1-3, 1-4 or
1-5 resources of any type as long as they are all different (buying
and selling at the warehouse as necessary) in exchange for 5, 8, or
12 points. In other words, to score 8 points with the mid-sized fair,
a player may not choose to turn in 2 cattle and 2 sheep, but must instead
turn in 4 of the 5 different resources. Whisky, as mentioned earlier, does
not count as a resource!
|

|
Grocer:
the player must turn in exactly 3 resources of any types in
exchange for 8 victory points.
|

|
Bridge:
the player must turn in exactly 1 stone and 1 wood in exchange
for 7 victory points.
|

|
Tavern:
a tavern allows a player to score 3 or 4 points when
activated without any further costs.
|
Gray bordered tiles: villages and castles

|
Whenever a player adds a village or castle tile to his display, he immediately
takes 1 clan member from the supply and adds it to the tile. In the case of a
castle, he also gets to take the corresponding card (see below under "Special
Locations").
Additionally, the player gets 1 movement point for each gray tile that
is activated (including the one just placed). The player totals these
movement points and may, at the end of his turn, divide them among his clan
members as he sees fit. It costs a clan member 1 movement point to move to an
adjacent tile (diagonal movement is allowed!). Unused movement
points cannot be saved.
If, for example, a player has 3 movement points at his disposal, he
could use them to move 1 clan member 3 tiles or 3 clan members 1 tile.
|

|
Important: a player may also pay 1 movement point to take any of his clan
members from his display and place it to the side. This clan member becomes a
chieftain, and will score points for the player (see below under "Scoring").
Note:
-
Once a clan member becomes a chieftain, the piece can never be returned to the player’s
display.
-
Players must always make sure to leave at least 1 clan member in their respective displays
(at least until the last turn) because, otherwise, they will not be able to add any more
tiles.
Blue bordered tiles ("Lochs")

|
When a player adds a loch to his display, he immediately takes the matching
card (see below). Activating a loch has no further effect (which is why there is
no symbol in the lower middle of the tile).
|
Note: A player may pay the placement costs for Loch Ness with 1 clan member or 1
chieftain, and the costs for Loch Oich with any 2 resources, as long as they are different.
The special locations
When a player adds 1 of the 13 special location tiles to his display, he takes the
matching card from the pile. These cards offer various advantages:
|
|
Iona Abbey
at the end of the game, the player scores 2 points for every yellow
tile in his display (including the abbey itself).
|

|
Loch Lochy
the player immediately (and therefore once in the game) takes
any 2 resources from the supply.
|
|
|
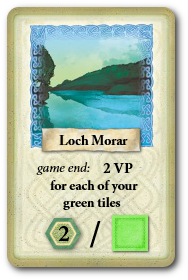
Loch Morar
at the end of the game, the player scores 2 points for every green
tile in his display.
|

|
Loch Ness
once per turn, the player can activate any tile. This does
not require activation of or adjacency to Loch Ness itself or the new tile.
Remember, though, that no tile can be activated twice in the same phase.
|

|
Loch Oich
the player may immediately activate all of his tiles in any order.
His turn then ends, and he may not carry out a normal activation (or use Loch
Ness!).
|

|
Loch Shiel
the player immediately places 1 matching resource from the
supply on each of his empty production tiles (i.e., stone quarries, forests,
meadows, pastures, wheat fields). If he also owns the Iona Abbey and it is
empty, he may place any 1 resource on it as well.
Tip: before taking resources, the player may sell as many resources as he
likes to the warehouse, within legal limits.
|
|
|
Castle Stalker
the player immediately takes another clan member from the
supply and places it on the tile (which then contains 2 clan members).
|

|
Castle Moil
the player immediately takes 1 whisky barrel from the supply
and places it next to his display.
|

|
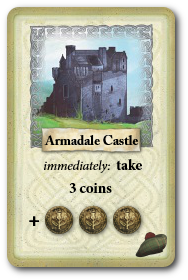
Armadale Castle
the player immediately takes 3 coins from the supply.
|

|
Duart Castle
at the end of the game, the player scores 3 points for every
village (not castles!) in his display.
|

|
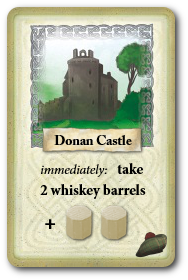
Donan Castle
the player immediately takes 2 whisky barrels from the supply
and places them next to his display.
|

|
Castle of Mey
during every scoring (see below), each of the player’s
chieftains scores double.
Important: the players’ Tam o’ Shanters ("tams" or typical Scottish caps) also
count but not double!
|

|
Cawdor Castle
During every scoring (see below), the player adds
3 tams when comparing chieftains.
|
Example cards:
The 3 scorings
As soon as the last "1" tile is placed on the board, the game comes to
a momentary halt for the first scoring. Afterward, the game resumes
with the player whose figure is farthest behind on the track taking a
turn. The same holds true for the second scoring which occurs after
the last "2" tile is placed on the board, and the third scoring which
occurs after the last "3" tile is placed on the board.
During each of the 3 scorings, players compare their levels of
achievement in 3 areas: whisky production, chieftains (including all
tams on the players’ cards) and the number of special locations they
possess (determined by comparing how many cards they have).
To score whisky production, each player compares how many whisky
barrels he has to the number owned by the player with the fewest
(which could be 0).
Each player then uses the difference to score points according to the
table on the game board (below the warehouse), taking the number
of victory point chips indicated. Players then do the same with their
chieftains (counting tams) and their special location cards.
Game end
Right after the third scoring, the final scoring takes place:
-
The owners of the Iona Abbey, Loch Morar, and Duart Castle score
victory points for their tiles.
-
Each player scores 1 point for each of his coins.
-
Each player compares his total number of tiles with the total of the
player who has the fewest. For each point of difference, the player must
give up 3 victory points. For example, at the end of the game, Anna
has 15 tiles, Bruce 13, Clara 16, and Danny 13. Anna has to give up 6
points, and Clara has to give up 9.
The player with the most points wins. If there is a tie, the tied player
with the most resources wins. If there is still a tie, those players rejoice
in their shared victory.
Playing with 2 or 3 players
All of the rules described above remain in effect, with the following exceptions:
During setup, cover each of the "1" spaces on the warehouse with a coin.
Additionally, players will use the die. At the start of the game, each player places
his figure as described. Then they place the die (as a third or fourth player,
respectively) on the next clockwise open space. Then fill the remaining spaces
with tiles as normal, drawing from the "0" pile and then also from the "1" pile,
as needed.
Whenever it is the die’s turn, a player rolls it and moves it forward the number
of tiles rolled (player figures do not count!). Remove the tile on which the die
lands from the game (back to the box), and place a new tile at the end of the
chain, etc.
The User Interface / Playing online
General notes:
-
The players’ victory points and coins are open information.
-
New tiles from the stack are placed on the board automatically when a player has finished his turn.
Since no secret information is revealed on a player’s turn, you may always undo your former actions step by step or reset the whole turn.
-
The dummy player (2 or 3 player games) will make his move(s) automatically after the former player has finished her turn. You can look at the dummy player’s move(s) by using the game history.
- If you want to convert clan members into chieftains, you have to do it before moving any other clan members.
-
For the time being, you may convert your last clan member into a Chieftain only if there is only one tile left in stack #3 on your turn.
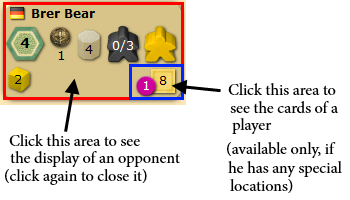
Anatomy of the Player Info

Note: In the example player info above, the number of tams is not shown. This means that the player has none.
However, the number of tams is shown if a player has collected at least one.
The display
The game board
|
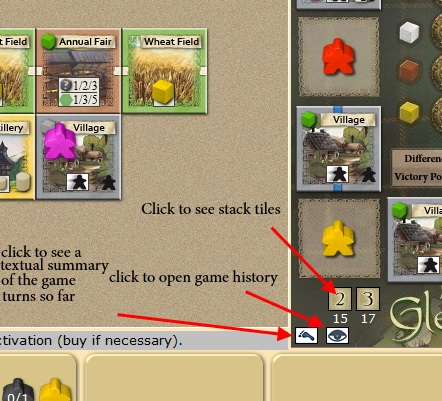
Note: Viewing opponents’ display, stack tiles, players’ cards and the game history cannot be done simultaneously.
You have to close an open view before choosing another one.
The history view is toggled by clicking the "eye" icon. The stack view is closed by the button that occurs.
The cards view is toggled by clicking the bottom right area of a player info. The display view is toggled by clicking the main part of a player info.
|
| |