If you are reading these rules for the first time, ignore the text along the right hand side. These rules serve as a summary to help you quickly familiarize yourself with the game.
You are master architects of antiquity, working to rebuild Imperial Rome. Compete for access to blueprints and materials in the
court of the Emperor, while strategically managing resources and laying out buildings to maximize your score.
Gameplay
The game is played over 14 rounds. Each round is divided into three phases:
-
Upkeep Phase
-
Emissary Phase
-
Action Phase
1. Upkeep Phase
Flip over the topmost action strip and place it at the bottom of the stack./p>
Place one building from each deck face up next to their respective decks.
If applicable take the influence from the top of deck I and place it next to the deck.
First, take the topmost action strip (A), flip it over (B) and place it at the bottom of the
stack (C).
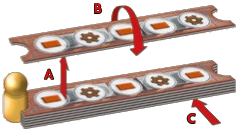
Then, draw the top building from each deck and place them faceup in front of
their respective decks. These buildings are the offer for this round.
After drawing buildings, if an influence card is on top of deck I, place it in the
middle of the table next to deck I.
Note: The buildings from deck I are special buildings, denoted by a gold outline
around the symbols in the top corners. Because there are 14 buildings
in deck I and the game is played over 14 rounds, each of these special
buildings will be available in the offer every game.
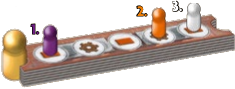
2. Emissary Phase
Starting with the first player and proceeding clockwise, players take turns placing their emissaries on any unoccupied space of
the topmost action strip.
Starting with the first player and proceeding clockwise, players take turns placing their emissaries on any unoccupied space of
the topmost action strip.
-
The closer your emissary is to the emperor, the earlier you will be able to choose a building from the offer in the upcoming
action phase, but the fewer bricks and cogs you will have to perform actions with.
-
The further your emissary is from the emperor, the more bricks and cogs you will have in the upcoming action phase, but the
fewer choices you will have from the offer.
Bricks and cogs are used to perform actions during the action phase. Each action strip has five spaces—three bricks and two
cogs—arranged in different configurations on each strip.
3. Action Phase
Players take turns resolving
the action phase in the order of the emissaries on the action strip. The
player whose emissary is closest to the emperor pawn goes first.
After all players have placed their emissaries, players take turns resolving
the action phase in the order of the emissaries on the action strip. The
player whose emissary is closest to the emperor pawn goes first.
Note: During the action phase, the first player marker does not matter.
The order of play is determined by the emissaries.
Choose a Building From the Offer
First, choose one of the remaining buildings from the offer and add it to your hand.
Perform Actions
You may perform one build action and/or one produce action.
You can use all cogs and bricks on the action strip between your emissary
and the emperor pawn (also the symbol on the space where your emissary is standing on).
Then, you can perform up to two actions: one build action and
one produce action. You can perform these actions in any order,
but you can perform each action only once per turn. You must
fully resolve your first action before performing a second action.
There are two symbols from the action strip used to perform
actions: bricks, which are used during build actions, and cogs,
which are used during produce actions. You gain bricks and cogs
based on the position of your emissary on the action strip. You
gain the symbol from the space your emissary is standing on, plus the symbols of every space between your emissary and the
emperor pawn.
Note: You can perform both actions during your turn, regardless of whether your emissary is standing on a brick or a cog.
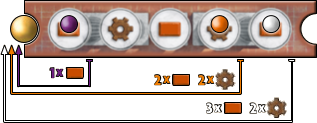
Buying Additional Bricks and Cogs
Additional bricks and cogs can be bought.
Each brick costs two coins.
Each cog costs one coin.
Before performing an action, you can spend coins to gain additional bricks and cogs:
Each brick costs two coins.
Each cog costs one coin.
Return the coins you spend to the general supply.
Note: Each coin will be worth one point at the end of the game. Consider the purchase of additional bricks and cogs carefully.
Build Action
You can build one building vertically or horizontally adjacent to one of your other buildings.
Exception: The aqueduct can replace another building, however there can be at most one
aqueduct in each row or column (see building reference).
The maximal width and height of your city is 4.
When building a public building, you immediately use the effect of that building once.
If the building shows some star icon(s), you take that many influence tokens.
Any excess bricks are lost.
When you perform the build action, you can build one building from
your hand. In the top-left corner of each building, you can see the
minimum number of bricks required to build it. Any excess bricks are
lost; they do not carry over to the next round.
Note:
Because the build action can be performed only once per round,
there is no benefit to having more than three bricks.
To build a building, place it so that at least one edge of the building is
vertically or horizontally adjacent to one of your existing buildings. It
must be built in an empty space, and buildings that are already in the
city cannot be moved or replaced (aqueducts are the exception, see the
building reference).
Your city can have a maximum of four buildings in any row or column.
Thus, the largest your city can become is a 4x4 square. You can choose
not to perform the build action during your turn, and thus your city can
have fewer buildings at the end of the game.

When you build a public building, immediately use the effect of that building
once. See the building reference for the effects of the different public buildings.
Some buildings from deck I have between one and three star icons above the
bottom bar. When you build one of these buildings, take that many influence
tokens from the supply and place them next to your city.
Produce Action
If you have two cogs, you can use the ability of each production building in your city once.
When you perform the produce action, you can use the abilities of each production building in your city once. To produce,
you must have two cogs. See the building reference for the abilities of the different production buildings.
Note:
Because you can produce only once per round, there is no benefit to having more than two cogs during your turn.
After performing actions, take your emissary off the action strip and place it next to your city.
Note: Any unused bricks and cogs are lost and do not carry over to the next round.
The player whose emissary is now closest to the emperor pawn then takes a turn, continuing until there are no emissaries
remaining on the action strip.
End of Round
After all players have taken their turns during the action phase, the round ends. The player with the first player marker passes
the marker clockwise, and the next round begins.
Influence Scoring
If there is at least one influence card in the middle of the table, the player with the most
influence tokens returns all of them to the general supply and takes the available influence card(s).
If there is a tie, the influence scoring is postponed to the next round (at the end of the game,
the remaining influence cards are not awarded).
If there is at least one influence card in the middle of the table, influence scoring happens before the next round begins.
If you have the most influence tokens, you win the influence scoring; take the influence card and place it next to your city,
then return all of your influence tokens to the general supply. At the end of the game, players score points equal to the
values shown on their influence cards.
If there is a tie, the influence card is not taken that round. It remains in play until a single player has the most influence
tokens at the end of one of the following rounds. Thus, it is possible for more than one influence card to be in play. The
player who wins the next influence scoring takes all these influence cards.
If, at the end of the final round, there is a tie for the influence scoring, the influence card (or cards) are not taken.
End of the Game
After resolving influence scoring in the 14
th round, the game ends.
You score points for your buildings, coins, influence tokens and influence cards.
The player with the most points wins the game. The two tie breakers are:
most influence tokens, then most coins.
At the end of the game, you score points for your buildings, coins, and influence. See the building reference for a detailed
explanation of how you score points for each building type. Use the score pad to record your points in each category. The player
with the most points wins the game. In the event of a tie, the tied player with the most influence tokens wins. If there is still a
tie, the tied player with the most coins wins. If there is still a tie, the tied players share the victory.
Residential
Residential buildings with the same value (two, three or four) that are horizontally or vertically adjacent form a residential
area.
For each residential area score points according to the total of the values of the residential buildings of that area multiplied
by the number of public buildings of different colors adjacent to that residential area horizontally or
vertically.
Residential buildings with the same value (two, three or four) that are horizontally or vertically adjacent form a residential
area. A residential area can also consist of a single residential building if it is not horizontally or vertically adjacent to
another residential building with the same value. There can be multiple different residential areas with residential
buildings of the same value in your city.
Calculate the points scored for a residential area by multiplying the total of the values of the residential buildings of that
residential area by the number of public buildings of different colors adjacent to that residential area horizontally or
vertically.
If there is more than one public building of the same color adjacent to the same residential area, only one of these public
buildings counts when calculating points for that residential area. However, one public building can count for multiple
different residential areas adjacent to it.
Note:
During final scoring, only the color of the public buildings matters. The special public buildings have improved
effects when you build them, but are identical to standard buildings of the same color for the purposes of final
scoring. For example, if an Arena and the Colosseum are adjacent to the same residential area, only one of them
counts for scoring that area.
Note:
A residential area that has no public buildings horizontally or vertically adjacent to it at the end of the game does
not score any points.
Aqueduct
You score points based on the number of aqueducts in your city.
|
Number of Aqueducts
|
1
|
2
|
3
|
4
|
|
Victory points
|
4
|
12
|
24
|
40
|
Temple
You score points based on the conditions shown on the buildings. See the building reference
for descriptions of how you score points for each temple.
Coins
You score one point for each coin you have at the end of the game.
Influence Tokens
You score one point for every two influence tokens you have at the end of the game.
Influence cards
You score points equal to the value printed on the cards.
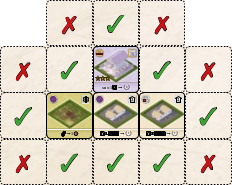
Scoring Example

Residential areas with 2-value buildings
You have two residential areas with 2-value buildings: one in the top-left with one building, and one in the middle with three
buildings. There is only one public building (red) adjacent to the first area. You score:
2 (total of the building values) x 1 (number of adjacent public buildings with different colors) = 2 points.
There are four public buildings adjacent to the second area, but only three different colors (two blue, and one each red and
yellow). Only one of the blue buildings counts for scoring this area. You choose the blue building with the most point tokens on
it. You score:
6 (total of the building values) x 3 (number of adjacent public buildings with different colors) + 4 (number of point tokens) = 22 points.
Residential areas with 3-value buildings
You have one residential area with 3-value buildings. It consists of two residential buildings, with two public buildings (red and
blue) adjacent to it. You score:
6 (total of the building values) x 2 (number of adjacent public buildings with different colors) + 2 (number of point tokens) = 14 points.
Residential areas with 4-value buildings
You have one residential area with 4-value buildings. It consists of one residential building, with one public building (blue)
adjacent to it. You score:
4 (total of the building values) x 1 (number of adjacent public buildings with different colors) + 4 (number of point tokens) = 8 points.
Aqueducts
You have two aqueducts, and score 12 points for them.
Temples
You have two temples: the Temple of Fortuna and the Temple of Luna
The Temple of Fortuna (in the lower-right) would score 15 points if you had at least one public building of each color. However,
you have public buildings of only three colors. Thus, you score 0 points for the Temple of Fortuna.
The Temple of Luna (in the lower-left) scores one point for each star on the buildings in your city. You have four stars on your
buildings, including the one on the Temple of Luna itself. Thus, you score 4 points for the Temple of Luna.
Coins
You have nine coins, and score 9 points for them.
Influence token
You have three influence tokens, and score 1 point for them.
Influence Cards
You have one influence card with a value of three, and score 3 points for it.
With two players, use the following rules:
Setup
Playing the Game
The 2-player game is played over only seven rounds, instead of 14. Both players take two turns during the emissary and action
phases.
During the upkeep phase, draw the top two buildings from both decks and place them faceup in front of their respective decks.
The offer will consist of four buildings each round.
Note: As with three or four players, all 14 buildings from deck I will be available in the offer over the course of the game.
During the emissary phase, both players take two turns placing emissaries. Starting with the first player, players alternate placing
their first emissary on the action strip. Then, in the same order, the players take another turn placing their second emissary.
During the action phase, both players take two turns (because both players have placed two emissaries on the action strip). The
action phases for each emissary are resolved independently; the action phase for one emissary must be entirely resolved before
resolving the next action phase, and unused bricks or cogs from one emissary cannot be used by another emissary.
End of the Game
After resolving influence scoring in the seventh round, the game ends. Final scoring is resolved as normal.
-
There are four different types of production buildings, each with a different ability.
-
All production buildings cost two bricks to build.
-
When you produce, you can use the abilities of each type of production building in your city once.
-
The special production building from deck I (the vineyard) has the abilities of both the vegetable farm and the grain farm.
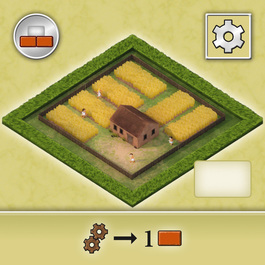
Vegetable Farm (3x + 4x starting buildings)
Building costs: 2 Bricks
When you produce, take one coin for each
vegetable farm in your city. For example, if
you have three vegetable farms in your city,
you would take three coins when you produce.
Grain Farm (3x)
Building costs: 2 Bricks
When you produce, place one brick token on each grain farm in your city that does not already have a brick
token on it. There can never be more than one brick token on each grain farm. When you build, you can spend
any number of brick tokens from your city to gain one brick per token spent. Return spent brick tokens to the
supply. You can use brick tokens during the action phase you placed them, if you produce before you build. Brick tokens remain
on grain farms between rounds until they are spent.
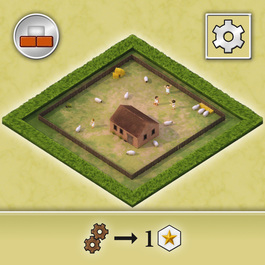
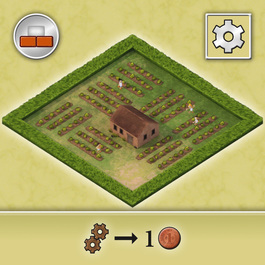
Sheep Farm (3x)
Building costs: 2 Bricks
When you produce, take one influence token for each sheep farm in your city. For example, if you have three
sheep farms in your city, you would take three influence tokens when you produce.
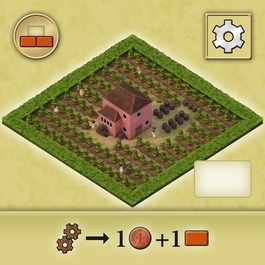
Vineyard (1x - Deck I)
Building costs: 2 Bricks
When you produce, take one coin (because
it is treated as a vegetable farm) and place
one brick token on the vineyard if it does
not already have a brick token.
When you build, you can spend
any number of brick tokens from your city to gain one brick per token spent. Return spent brick tokens to the
supply. You can use brick tokens during the action phase you placed them, if you produce before you build.
Brick tokens remain on the vineyard between rounds until they are spent.
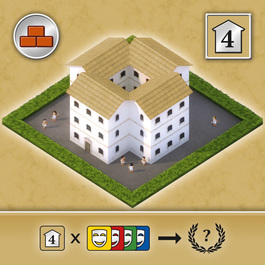
Residential Buildings
-
Each residential building has a value of two, three or four, as shown by the number in the house in the top-right corner of the
building.
-
Residential buildings cost one, two, or three bricks to build, based on the value of the building.
-
Adjacent residential buildings with the same value form a residential area. At the end of the game, you score points for
residential areas based on adjacent public buildings (see Final Scoring).
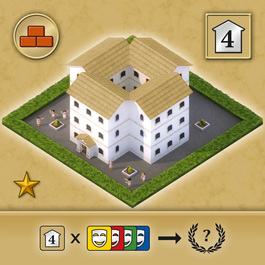
-
The special residential buildings from deck I each have a star icon (meaning you will take one influence token when you build
them); otherwise, they are identical to standard residential buildings.
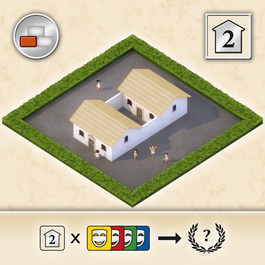
2-Value Residential Building (11x + 4x starting buildings)
Building costs: 1 Brick
Points: 2 x number of differently colored public buildings adjacent to the residential area consisting of 2-value residential buildings.
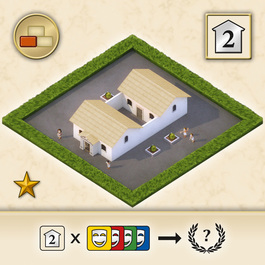
Luxury 2-Value Residential Building (1x - Deck I)
Building costs: 1 Brick
When bulding: The player receives 1 influence token.
Points: 2 x number of differently colored public buildings adjacent to the residential area consisting of 2-value residential buildings.
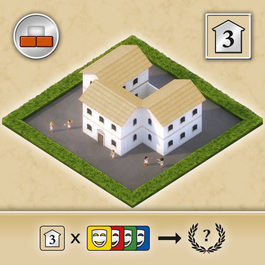
3-Value Residential Building (9x)
Building costs: 2 Bricks
Points: 3 x number of differently colored public buildings adjacent to the residential area consisting of 3-value residential buildings.
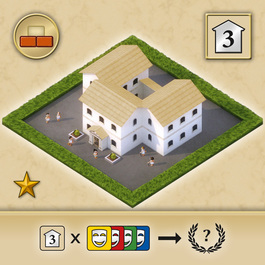
Luxury 3-Value Residential Building (1x - Deck I)
Building costs: 2 Bricks
When bulding: The player receives 1 influence token.
Points: 3 x number of differently colored public buildings adjacent to the residential area consisting of 3-value residential buildings.
4-Value Residential Building (4x)
Building costs: 3 Bricks
Points: 4 x number of differently colored public buildings adjacent to the residential area consisting of 4-value residential buildings.
Luxury 4-Value Residential Building (1x - Deck I)
Building costs: 3 Bricks
When bulding: The player receives 1 influence token.
Points: 4 x number of differently colored public buildings adjacent to the residential area consisting of 4-value residential buildings.
-
There are four different types of public buildings (green, red, yellow, and blue), each with a different effect. When you build a
public building, you immediately use its effect once.
-
All public buildings cost three bricks to build.
-
The special public buildings from deck I have improved effects when you build them, but are otherwise identical to standard
public buildings.
-
At the end of the game, you score points for residential areas based on adjacent public buildings (see
Final Scoring).
Market (3 x)
Building costs: 3 Bricks
When you build a market, take one coin
for each building horizontally or vertically
adjacent to that market.
Forum Romanum (1 x - Deck I)
Building costs: 3 Bricks
When you build the Forum Romanum, take one coin
plus one for each building horizontally or vertically
adjacent to that market.
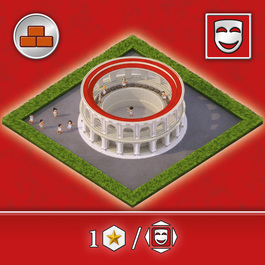
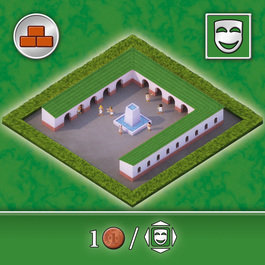
Arena (3 x)
Building costs: 3 Bricks
When you build an arena, take one influence
token for each building horizontally or vertically
adjacent to that arena.
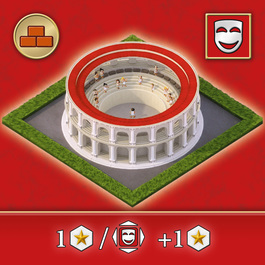
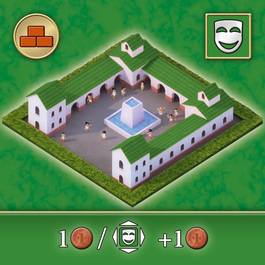
Colosseum (1 x - Deck I)
Building costs: 3 Bricks
When you build the Colosseum, take one influence
token plus one for each building horizontally or vertically
adjacent to that arena.
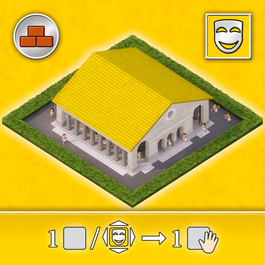
School (3 x)
Building costs: 3 Bricks
When you build a school, choose one deck
other than deck I and draw one building from
it for each building horizontally or vertically
adjacent to that school. Choose one of those buildings to keep
in your hand, and put the rest at the bottom of that deck in
any order.
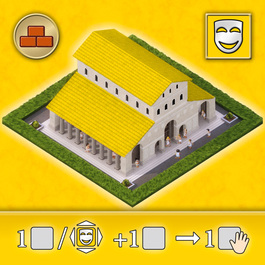
University (1 x - Deck I)
Building costs: 3 Bricks
When you build the University, choose one deck
other than deck I and draw one building from
it plus one for each building horizontally or vertically
adjacent to the University. Choose one of those buildings to keep
in your hand, and put the rest at the bottom of that deck in
any order.
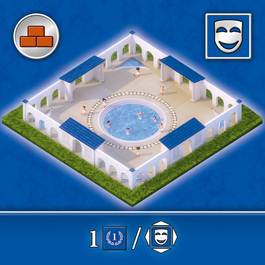
Thermal Baths (3 x)
Building costs: 3 Bricks
When you build a thermal bath, place one
point token on that thermal bath for each
building horizontally or vertically adjacent
to it. During final scoring, when scoring residential areas,
each residential area horizontally or vertically adjacent to a
thermal bath scores you one additional point for each point
token on that thermal bath. However for each residential area,
only the adjacent thermal bath with the highest number of point tokens
is considered.
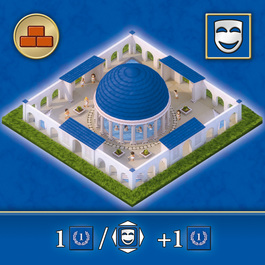
Imperial Thermal Baths (1 x - Deck I)
Building costs: 3 Bricks
When you build the Imperial Thermal Bath, place one
point token on that Imperial Thermal Bath plus one for each
building horizontally or vertically adjacent
to it. During final scoring, when scoring residential areas,
each residential area horizontally or vertically adjacent to a
thermal bath scores you one additional point for each point
token on that thermal bath. However for each residential area,
only the adjacent thermal bath with the highest number of point tokens
is considered.
-
You can build only one aqueduct in each row or column of your city. Thus, you can have a maximum of four aqueducts in your
city. When you build an aqueduct, you can either build it following the normal building rules, or replace an existing building
in your city with the aqueduct. You must still follow the building rules when replacing an existing building. If you replace an
existing building, return the replaced building to the box
-
The special aqueduct from deck I has a star icon (meaning you will take one influence token when you build it), but is
otherwise identical to standard aqueducts.
-
Aqueducts cost one brick to build.
-
During final scoring, you score points based on the number of aqueducts in your city
(refer to Final Scoring).
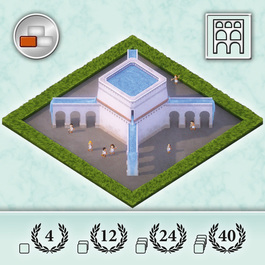
Aqueduct (8 x)
Building costs: 1 Brick
In each row and column only 1 aqueduct can be built (replacing a building is allowed).
For 1 / 2 / 3 / 4 aqueducts you get 4 / 12 / 24 / 40 points during the final scoring.
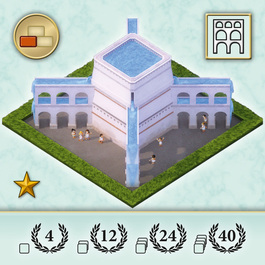
Grand Aqueduct (1 x - Deck I)
Building costs: 1 Brick
When bulding: The player receives 1 influence token.
In each row and column only 1 aqueduct can be built (replacing a building is allowed).
For 1 / 2 / 3 / 4 aqueducts you get 4 / 12 / 24 / 40 points during the final scoring.
-
There is only one copy of each temple, and you score points for each temple in a unique way during final scoring. Some
temples score points only when a specific condition is met. You score for these temples only once, even if the condition
would be fulfilled multiple times.
-
Standard temples cost three bricks to build.
-
Special temples cost two bricks to build.
-
The special temples from deck I have different scoring conditions, as well as between one and three star icons (meaning you
will take that many influence tokens when you build them).
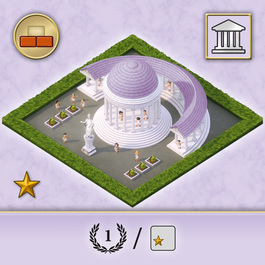
Temple of Luna (1 x - Deck I)
Building costs: 2 Bricks
When bulding: The player receives 1 influence token.
During final scoring, score one point for
every star icon on buildings in your city
(including the icon on the Temple of Luna.
Temple of Mars (1 x - Deck I)
Building costs: 2 Bricks
When bulding: The player receives 3 influence tokens.
During final scoring, score five points if you
have at least one 4-value residential building
in your city.
Temple of Venus (1 x - Deck I)
Building costs: 2 Bricks
When bulding: The player receives 1 influence token.
During final scoring, score two points for
each 2-value residential building in your city.
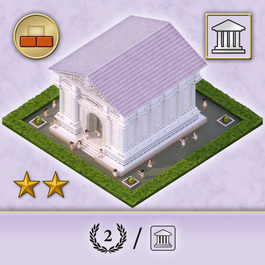
Temple of Jupiter (1 x - Deck I)
Building costs: 2 Bricks
When bulding: The player receives 2 influence tokens.
During final scoring, score two points for
each temple in your city (including the
Temple of Jupiter).
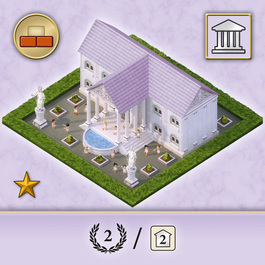
Temple of Mercury (1 x - Deck I)
Building costs: 2 Bricks
When bulding: The player receives 2 influence tokens.
During final scoring, score one point for
every three coins you have (in addition to the
points normally scored for coins).
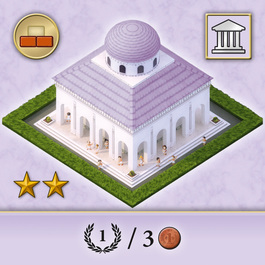
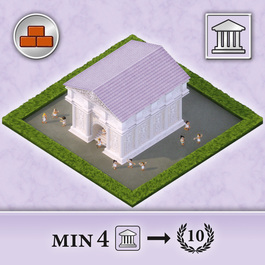
Temple of Minerva (1 x - Deck II)
Building costs: 3 Bricks
During final scoring, score ten points if there
are sixteen buildings in your city.
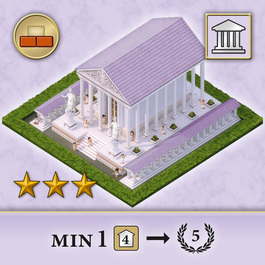
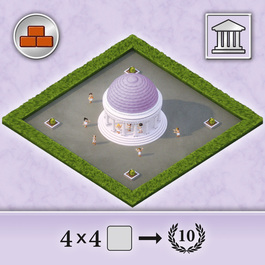
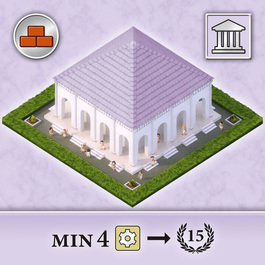
Temple of Fortuna (1 x - Deck III)
Building costs: 3 Bricks
During final scoring, score fifteen points if
you have at least one public building of each
color in your city.
Temple of Cupid (1 x - Deck III)
Building costs: 3 Bricks
During final scoring, score ten points if
you have at least four 2-value residential
buildings in your city
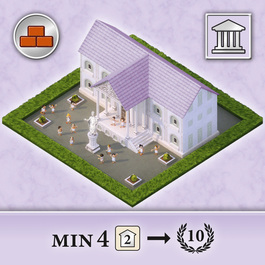
Temple of Juno (1 x - Deck IV)
Building costs: 3 Bricks
During final scoring, score ten points if
you have at least four temples in your city
(including the Temple of Juno).
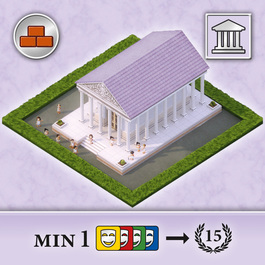
Temple of Saturn (1 x - Deck IV)
Building costs: 3 Bricks
During final scoring, score fifteen points if
you have at least four production buildings
in your city.
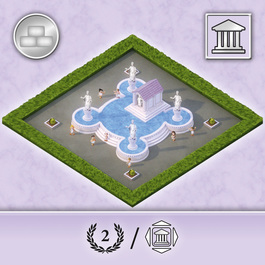
The Shrine (4 x - mini expansion)
Building costs: 0 Bricks
During the final scoring, the player
scores 2 victory points for each
building card that is horizontally or
vertically adjacent to the shrine.