|
|
If you are reading these rules for the first time, ignore the text along the right hand side. These rules serve as a summary to help you quickly familiarize yourself with the game.
Show
→ summary only
→ detailed version only
→ both summary and detailed version
Queen Gimnax has ordered the reclamation of the northern lands.
As a cartographer in her service, you are sent to map this territory, claiming it for
the Kingdom of Nalos. Through official edicts, the queen announces which lands she
prizes most, and you will increase your reputation by meeting her demands.
But you are not alone in this wilderness. The Dragul contest your claims with their
outposts, so you must draw your lines carefully to reduce their influence.
Reclaim the greatest share of the queen’s desired lands and you will be declared the
greatest cartographer in the kingdom.
The expedition to the Western Lands is the kind of honor that comes once in a
lifetime for a royal cartographer.
But these are dangerous times. War ravages the land, and you are sure to
encounter Dragul forces determined to thwart Queen Gimnax’s plans for western
expansion.
Fortunately, brave heroes have risen to the defense of Nalos. Chart their deeds
alongside the queen’s edicts and secure your place in history.
-
 Give each player a blank map sheet. Players collectively decide whether to
use the wilderness side (A) or the wastelands side (B).
-
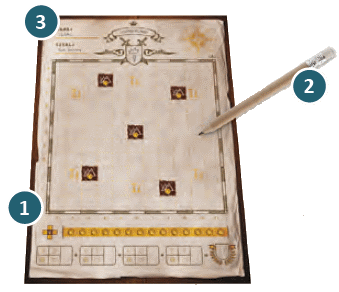 Give each player a pencil. If playing with more than four players, additional
pencils will need to be provided.
-
Have each player write a name for their cartographer at the top of their
map sheet, optionally adding a title and family crest.
-
Arrange the four edict cards in a face-up row in the center of the play area,
so that they are in alphabetical order (edict A, edict B, etc.).
-
Separate the scoring cards into four stacks according to their card backs.
Shuffle the stacks separately, then randomly draw one card from each stack.
Place one of these scoring cards in any order below each of the edict cards,
face up. Return the rest of the scoring cards to the game box.
-
Place the four season cards in a face-up stack, arranged in order by the
progression of seasons (spring, summer, fall, winter). The spring card should
be visible on top of the stack.
-
Shuffle the four ambush cards to form a face-down deck, then place this
ambush deck off to one side of the play area.
-
Shuffle the explore cards to form a face-down deck. Take the top card of
the ambush deck and shuffle it into this explore deck, without revealing it.
Finally, place the explore deck next to the stack of season cards.
-
The game is ready to begin!
In Cartographers, players compete to earn the most reputation stars by the
time four seasons have passed.
Each season, players draw on their map sheets and earn reputation by carrying
out the queen’s edicts before the season is over.
The player with the most reputation stars at the end of winter wins!
The game is played over four seasons. Each season is divided into multiple
turns, and each turn has three phases:
- the Explore Phase,
- Draw Phase,
- and Check Phase.
At the end of each season, players earn reputation stars.
Reveal the top card of the explore deck, so that all players can see it, and
place it on top of any explore
cards already in play such that the time
values  on all revealed cards are visible. on all revealed cards are visible.
If the first revealed card is a ruins card ( ),
immediately reveal another card from the
explore deck and place it on top of the ruins card. ),
immediately reveal another card from the
explore deck and place it on top of the ruins card.
Reveal the top card of the explore deck and place it face up in the center of the
play area, so that all players can see it.
 Place the new card on top of any explore
cards already in play, displaying the cards in a column to ensure that the time
values
  on all revealed cards are visible. on all revealed cards are visible.
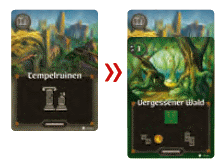
If the first revealed card is a ruins card ( ),
immediately reveal another card from the
explore deck and place it on top of the ruins card. ),
immediately reveal another card from the
explore deck and place it on top of the ruins card.
If the second revealed card is also a ruins card,
immediately reveal another card from the explore
deck and place it on top of both ruins cards.
At the same time, each player independently chooses one of the terrain types
and one of the available shapes depicted on the revealed explore card, then
draws it on their map with a pencil and fills it with the chosen terrain type.
The following rules apply:
-
The chosen shape cannot overlap filled spaces
or the edges of the map.
(Mountain spaces
and wasteland spaces are filled spaces. )
-
The chosen shape does not have to be
drawn adjacent to any shapes previously
drawn on the map.
-
The chosen shape may be drawn so that it
overlaps a ruins space on the map.
The 6 ruins spaces
count as empty and have no effect
unless Cartographers Heroes and
Cartographers are combined.
-
The chosen shape can be rotated and/or
flipped as needed before drawing.
-
Shaded fields on the chosen shape may be
empty or already filled.
-
If a player cannot legally draw any of the
available shapes, they must instead draw a
1x1 square anywhere on their map and fill it with
any terrain type (excluding mountains).
-
If a player chooses a
shape with a coin, they fill in the next coin symbol on
their coin track.
-
Each mountain space has four adjacent spaces. If a
player surrounds a mountain space by filling all four
adjacent spaces, they fill in the next coin symbol on
their coin track.
 Forest  Village  Farm  Water  Monster  Hero  Mountain
Special Terrains
Rift Lands/Kethra's Gates: If the rift lands card or
Kethra's Gates card is revealed, each player draws a
1x1 square anywhere on their map and fills it with any terrain type
shown on the card. All normal rules and restrictions apply.
Ambush: If an ambush card is revealed, each player immediately passes their
map sheet to their neighbor in the direction of the arrow shown on the card.
Each player draws the depicted shape on their neighbor’s map,
then fills the shape with the monster terrain type ( ) )
He then writes the initial of the monster into the drawn shape.
If a player cannot legally draw the depicted shape on their
neighbor’s map, they must instead draw a 1x1 square anywhere
on their neighbor’s map and fill it with the monster terrain type.
Note:
If an ambush card is revealed immediately after a ruins card,
the ambush card is resolved normally; the effect
will apply to the next explore card that is revealed.
Give the map back to its owner.
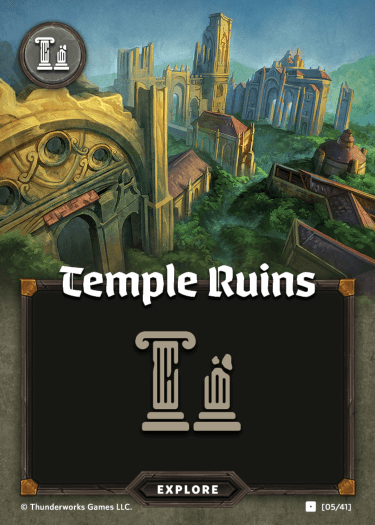
Ruins: If one or more ruins cards are revealed, each player must
draw one of the available shapes, depicted on the next explore
card that is revealed, so that it overlaps a ruins space on their map
(if possible).
If a player cannot legally draw one of the available shapes so that
it overlaps a ruins space -OR- there are no unfilled ruins spaces left
on their map, they must instead draw a 1x1 square anywhere on
their map and fill it with any terrain type (excluding mountains).
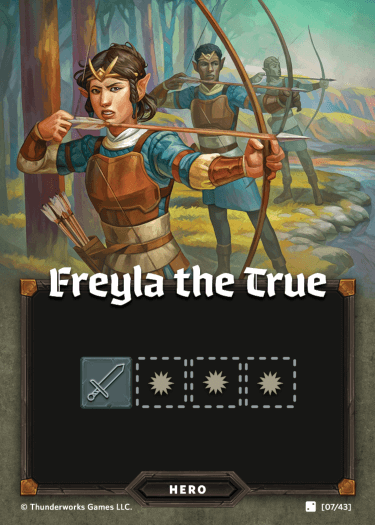
When a hero card is revealed, each player draws a 1x1
square anywhere on their map, then fills it with the hero
terrain type.
Each player then marks spaces in the depicted attack pattern,
relative to the hero space. Attack patterns can overlap filled
spaces and the edge of the map.
Heroes destroy monsters in two ways: When a hero is drawn,
all monster spaces within the hero’s attack pattern are immediately destroyed.
Then, for the rest of the game, all monster spaces drawn within any hero’s
attack pattern are destroyed.
Rift Lands/Kethra's Gates: If the rift lands card or
Kethra's Gates card is revealed, each player draws a
1x1 square anywhere on their map and fills it with any terrain type
shown on the card. All normal rules and restrictions apply.
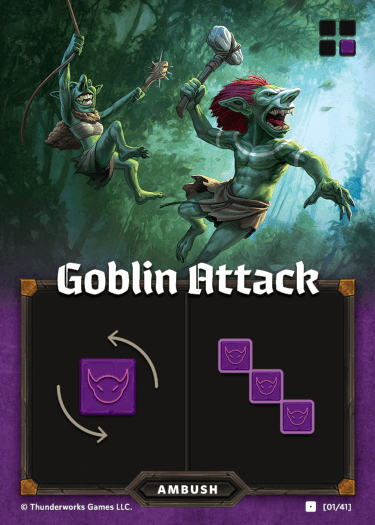
Ambush: If an ambush card is revealed, check the direction of the
arrow shown on the card. Each player immediately passes their
map sheet to their neighbor in that direction.
Each player draws the depicted shape on their neighbor’s map,
then fills the shape with the monster terrain type ( ). ).
He then writes the initial of the monster into the drawn shape.
If a player cannot legally draw the depicted shape on their
neighbor’s map, they must instead draw a 1x1 square anywhere
on their neighbor’s map and fill it with the monster terrain type.
Then pass all map sheets back to their owners and discard the
ambush card, returning it to the game box.
Note:
If an ambush card is revealed immediately after a ruins card,
the ambush card is resolved normally. The effect of the ruins card
will apply to the next explore card that is revealed.
The Ambush card Bugbear Assault shows 2 spaces between the
monsters. Those can be empty or already filled out on the map.
The symbol in the upper right corner is only used in Solo Mode.

Ruins: If one or more ruins cards are revealed, each player must
draw one of the available shapes, depicted on the next explore
card that is revealed, so that it overlaps a ruins space on their map
(if possible).
If a player cannot legally draw one of the available shapes so that
it overlaps a ruins space -OR- there are no unfilled ruins spaces left
on their map, they must instead draw a 1x1 square anywhere on
their map and fill it with any terrain type (excluding mountains).

When a hero card is revealed, each player draws a 1x1
square anywhere on their map, then fills it with the hero
terrain type.
Each player then marks spaces in the depicted attack pattern,
relative to the hero space. Attack patterns can overlap filled
spaces and the edge of the map.
Heroes destroy monsters in two ways: When a hero is drawn,
all monster spaces within the hero’s attack pattern are immediately destroyed.
Then, for the rest of the game, all monster spaces drawn within any hero’s
attack pattern are destroyed.
After all players have finished, discard the hero card and return it
to the game box.
DESTROYED SPACES
When a space is destroyed, draw a large “X” over the space.
Destroyed spaces count as filled spaces, but
have no terrain type. If a hero space is destroyed, that
hero’s attack pattern remains active.
Some spaces on a player’s map might get destroyed.
Destroyed spaces count as filled spaces, but
have no terrain type. If a hero space is destroyed, that
hero’s attack pattern remains active.
Check to see if the end of the season has been reached
by adding together the time values of all explore cards that are
currently revealed in the column.
If the total meets or exceeds the time threshold of the current
season card, the season ends.
If the total is less than the time threshold, the current
season continues.
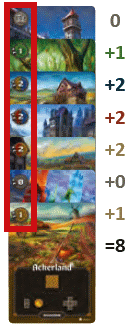
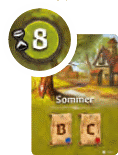 Check to see if the end of the season has been reached.
Examine the current season card to find the
time threshold. For example, spring has a time
threshold of eight.
Add together the time values of all explore cards that are
currently revealed in the column.
-
If the total meets or exceeds the time threshold, the current
season ends. Proceed immediately to the end of the season.
-
If the total is less than the time threshold, the current
season continues. Return to the Explore Phase.
At the end of each season, players are evaluated, earning reputation
stars based on how well they followed the queen’s edicts.
-
Determine how many
reputation
stars
you earn for each of the two scoring cards being evaluated this
season.
-
Earns one reputation star for each filled-in coin symbol on your
coin track.
-
Lose
one reputation star for each
empty space adjacent to a
monster
space on your map
If any ambush cards with ongoing effects are revealed, resolve them now, in the order the ambush cards were revealed.
If the current season is winter, the game is now over; proceed to the end of the
game. Otherwise, prepare for the next season.
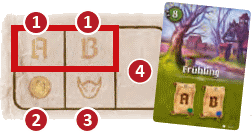 Examine the current season card to see which
two
scoring cards
to evaluate. For example, in spring,
evaluate the scoring cards below edicts A and B
 1 .
-
Each player evaluates their own map to determine how many
reputation
stars
they earn for each of the two scoring cards being evaluated this
season, writing those numbers in the corresponding boxes.
(See glossary for details on the scoring cards.)
-
Each player earns one reputation star for each filled-in coin symbol on their
coin track, writing that number in the corresponding box
2 .
-
Each player
loses one reputation star for each empty space adjacent to a
monster
space on their map, writing that number in the corresponding box
3 .
(If an empty space is adjacent to multiple monster spaces, the player still
only loses one reputation star for that space.)
-
Sum up all reputation stars and write the number in the corresponding box
4 .
Some ambush cards have ongoing effects that resolve after scoring each
season. If any are revealed, resolve them now.
If there are multiple ambush
cards with these effects, resolve them one at a time in the order that the
ambush cards were revealed.
If the current season is winter, the game is now over; proceed to the end of the
game. Otherwise, prepare for the next season.
Discard the top card of the season stack, revealing the next
season card in the stack.
Reshuffle all explore cards together with the top card of the ambush deck
Now you can start with the next season.
Discard the top card of the season stack, returning it to the game box. This
will reveal the next season card in the stack.
Reshuffle the explore deck, including all explore cards revealed this season.
Then take the top card of the ambush deck and shuffle it into the explore
deck, without revealing it.
Now you can start with the next season.
Note: If an ambush card in the explore deck is not revealed during a season,
it remains in the explore deck for the next season, and an additional ambush
card is added! In this way, it is possible to have multiple ambush cards in the
explore deck during later seasons.
The game concludes at the end of Winter, after four scorings.
Total the reputation stars that you earned across all four
seasons.
The player with the most
reputation stars is the winner!
In the event of a tie, the tied player who lost the least reputation stars to
monster terrain across all four seasons is the winner. If there is a further tie,
all tied players share the victory.
Once winter has ended and players have been evaluated for the fourth time,
the game is over.
Each player totals the reputation stars that they earned across all four
seasons, writing their final score on their map sheet. The player with the most
reputation stars is the winner!
In the event of a tie, the tied player who lost the least reputation stars to
monster terrain across all four seasons is the winner. If there is a further tie,
all tied players share the victory.
General rules:
-
Spaces that share a side with each other are
adjacent. Spaces that are only at diagonals with
each other are not adjacent.
-
A group of connected spaces that all have the
same terrain type is a cluster.
Clusters can have any
number of spaces (including just a single space).
-
All spaces with drawn terrain count as filled spaces (even if destroyed).
Mountains and wastelands count as filled spaces. Attack patterns and ruins
do not count as filled spaces unless otherwise filled.
-
The star in the lower right corner is only used in Solo mode.
When scoring, keep in mind these general rules:
-
Spaces that share a side with each other are
adjacent. Spaces that are only at diagonals with
each other are not adjacent.
-
A group of connected spaces that all have the
same terrain type is a cluster. Clusters can have any
number of spaces (including just a single space).
-
All spaces with drawn terrain count as filled spaces (even if destroyed).
Mountains and wastelands count as filled spaces. Attack patterns and ruins
do not count as filled spaces unless otherwise filled.
-
The star in the lower right corner is only used in Solo mode.
-
Detailed information on the scoring cards can be found in the
glossary.
Gameplay has the following changes:
Set off as a lone cartographer to explore the Kingdom of Nalos. In solo mode,
you attempt to earn a prestigious title from Queen Gimnax at the end of your
journey!
Gameplay has the following changes:
CHANGES TO SETUP
You get your title appointed to you by Queen Gimnax at the end of the game.
Do not write a title on your map sheet. This is where you’ll record the title
appointed to you by Queen Gimnax at the end of the game.
CHANGES TO AMBUSHES
When an ambush card is revealed, examine the grid in the upper
right corner of the card.
On your map sheet, starting in the corner indicated by the ambush card, and
proceeding along the edges of the map in the direction indicated by the arrow,
attempt to legally draw the monster shape without flipping or rotating it.
If you cannot legally draw the monster shape anywhere along the edge of the
map, move one space in from the edge and attempt it again, starting in the
same corner and proceeding in the same direction.
If the shape cannot be legally drawn, disregard the
ambush card.
When an ambush card is revealed, examine the grid in the upper
right corner of the card to see which corner of the map is shown.
On your map sheet, starting in the corner indicated by the ambush card, and
proceeding along the edges of the map in the direction indicated by the arrow,
attempt to legally draw the monster shape without flipping or rotating it.
If you cannot legally draw the monster shape anywhere along the edge of the
map, move one space in from the edge and attempt it again, starting in the
same corner and proceeding in the same direction.
Repeat this process, moving one space further in from the edge of the map
each time, until you are able to legally draw the monster shape or confirm that
it cannot be legally drawn. If the shape cannot be legally drawn, disregard the
ambush card.
CHANGES TO SCORING
Subtract from your
score the total of
the numbers in the lower corners of
the four scoring cards in play.
Queen Gimnax awards you a title
based on the highest rating that
you met or surpassed:
| 30+ | Legendary Cartographer |
| 20 | Master Mapsmith |
| 10 | Journeyman Topographer |
| 0 | Apprentice Surveyor |
| -5 | Amateur Assessor |
| -10 | Inept Assistant |
| -20 | Dimwitted Doodler |
| -30 | Oblivious Inkdrinker |
| 30+ | Legendary Cartographer |
| 20 | Master Mapsmith |
| 10 | Journeyman Topographer |
| 0 | Apprentice Surveyor |
| -5 | Amateur Assessor |
| -10 | Inept Assistant |
| -20 | Dimwitted Doodler |
| -30 | Oblivious Inkdrinker |
After determining your score, total
the numbers in the lower corners of
the four scoring cards in play.
Then subtract that total from your
score to find your rating.
Queen Gimnax awards you a title
based on the highest rating that
you met or surpassed.
Glossary
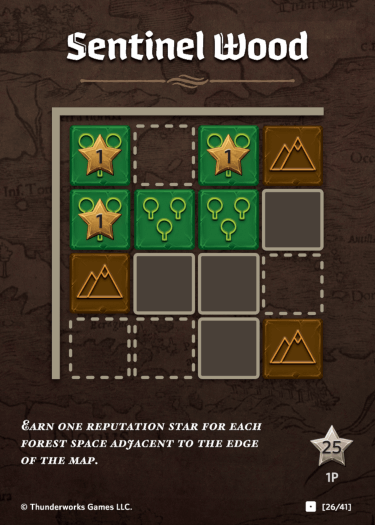
Sentinel Wood:
Earn one
reputation star for each forest
space adjacent to the edge of
the map.
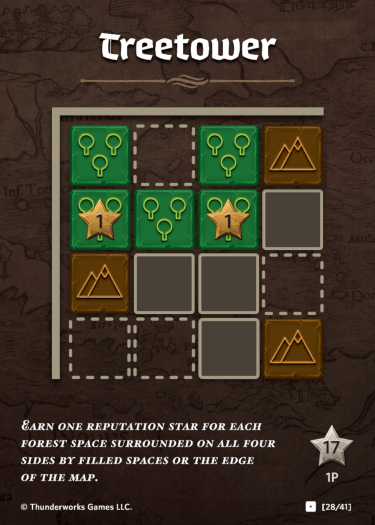
Treetower:
Earn one reputation
star for each forest space
surrounded on all four sides
by filled spaces or the edge of
the map.
Druids planted these towering ranks to shield us from
something in the wilds beyond.
Beneath the canopy, far from bright blue skies, every
trail led through tangled thorns and suspicious shadows.
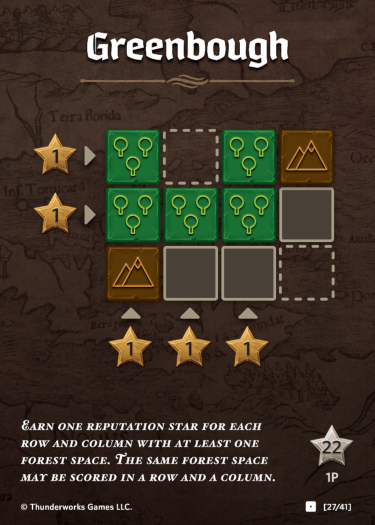
Greenbough:
Earn one
reputation star for each row
and column with at least one
forest space. The same forest
space may be scored in a row
and a column.
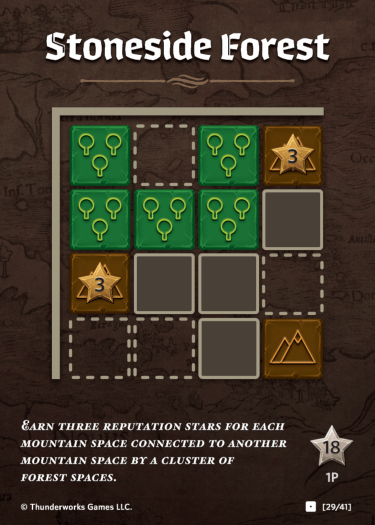
Stoneside Forest:
Earn three
reputation stars for each
mountain space connected to
another mountain space by a
cluster of forest spaces.
I’ve mapped deserts. It’s much easier to survey forests,
and much more pleasant to take breaks in the shade.
Mountains are clear landmarks, islands in a wide sea
of trees, but a cartographer’s job is to chart every track
hidden in those depths.
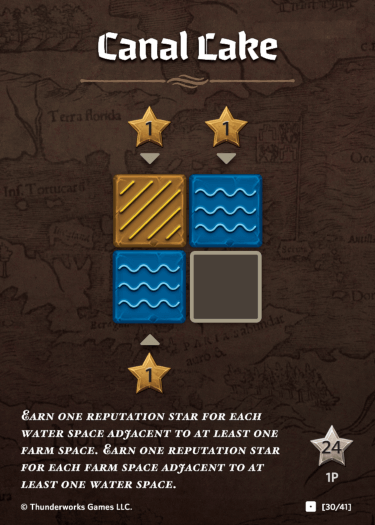
Canal Lake:
Earn one reputation
star for each water space
adjacent to at least one farm
space.
Earn one reputation star
for each farm space adjacent to
at least one water space.
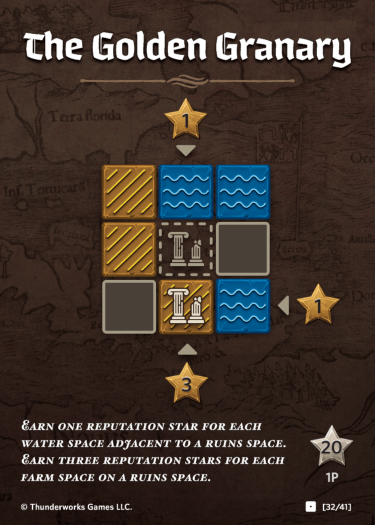
The Golden Granary:
Earn one
reputation star for each water
space adjacent to a ruins space.
Earn three reputation stars
for each farm space on a ruins
space.
Pathways laid with colorful stones topped the channels
along each family’s crops, a bit of beauty among their
labors in the dirt.
The histories say that long ago this place fed an empire.
Now nothing grows in the sands blowing among the ruins.
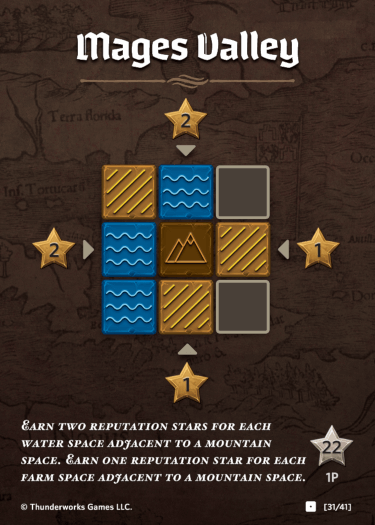
Mages Valley:
Earn two
reputation stars for each water
space adjacent to a mountain
space.
Earn one reputation star
for each farm space adjacent to
a mountain space.
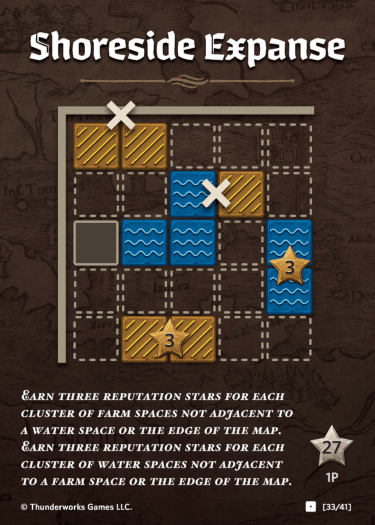
Shoreside Expanse:
Earn three
reputation stars for each cluster of
farm spaces not adjacent to a water
space or the edge of the map.
Earn
three reputation stars for each cluster
of water spaces not adjacent to a
farm space or the edge of the map.
The wizards chose their high valley homes carefully,
hidden from prying eyes but fertile enough for their
strange harvest to thrive.
A true cartographer knows how to use a theodolite on
both rock and raft. You can’t stop drawing the line just
because the land ends.
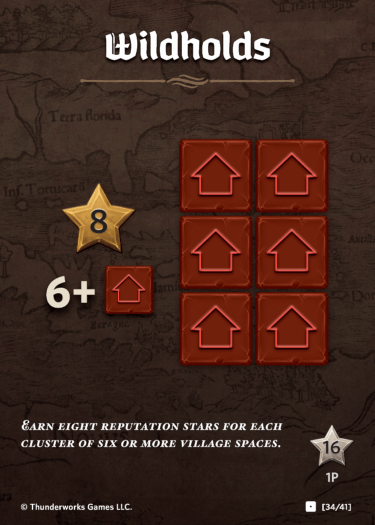
Wildholds:
Earn eight
reputation stars for each cluster
of six or more village spaces.
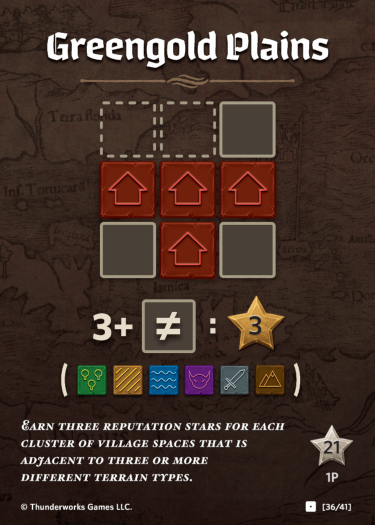
Greengold Plains:
Earn three
reputation stars for each
cluster of villages spaces that
is adjacent to three or more
different terrain types.
There had to be six in a cluster to earn a mark on my
map, enough to justify the queen dispatching a justice ...
or a tax collector.
Long ago we were a land of wanderers. But when the
people put down roots they did so wisely, near everything
they needed.
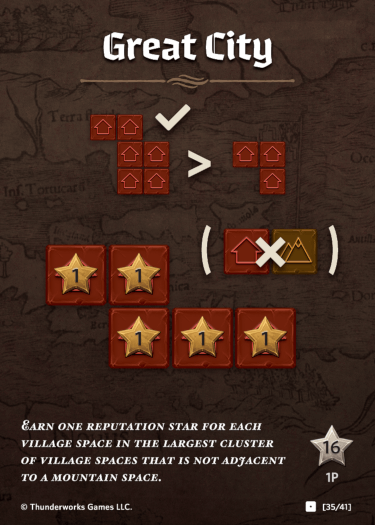
Great City:
Earn one reputation
star for each village space in
the largest cluster of village
spaces that is not adjacent to a
mountain space.
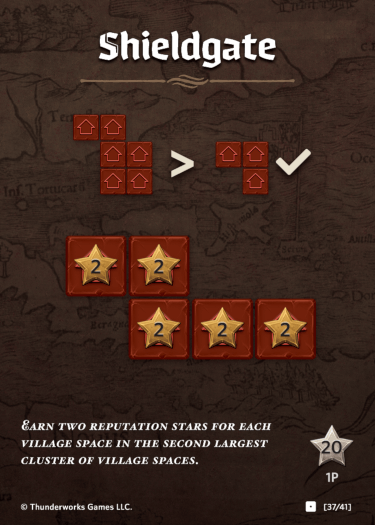
Shieldgate:
Earn two reputation
stars for each village space
in the second largest cluster
of village spaces. If there are
multiple largest clusters, score
one of the largest.
In this sprawling nest of intrigue where guilds pursue
ancient vendettas, the queen will burn out their venom or
rule over ashes.
Stake walls ran along paths betwen the villages, and
the inhabitants rushed to defend one another when the
wildclans returned.
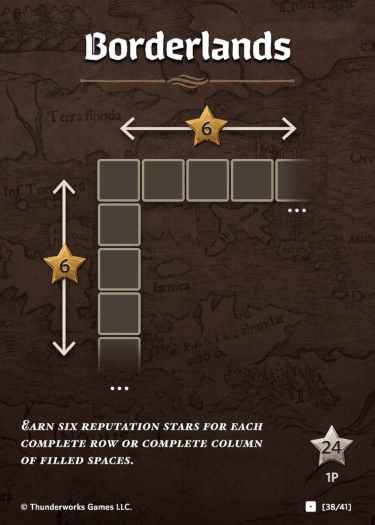
Borderlands:
Earn six
reputation stars for each
complete row or complete
column of filled spaces.
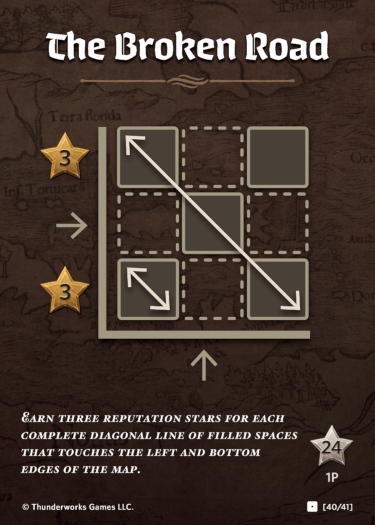
The Broken Road:
Earn three
reputation stars for each
complete diagonal line of filled
spaces that touches the left and
bottom edges of the map.
Once far out beyond the edge of the map, now these
lands are squarely on it. Someday our next expedition
will begin here.
What’s more incredible: the centuries of labor that it took
to build these paved paths or the precision that laid them
so straight?
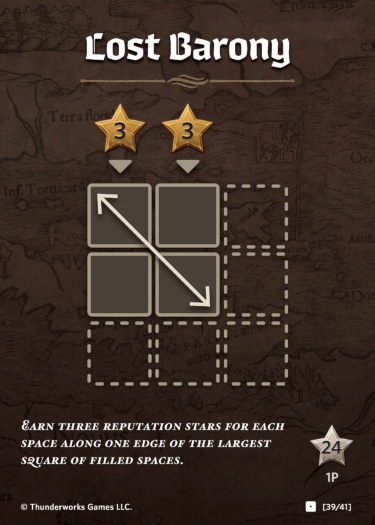
Lost Barony:
Earn three
reputation stars for each space
along one edge of the largest
square of filled spaces.
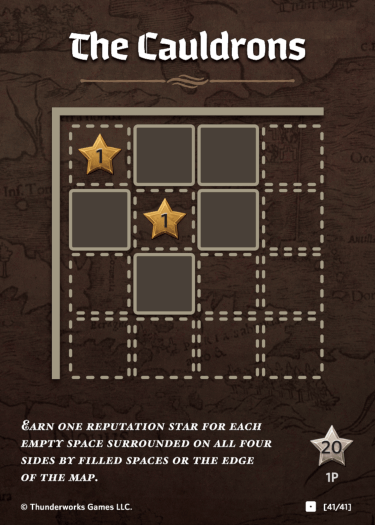
The Cauldrons:
Earn one
reputation star for each empty
space surrounded on all four
sides by filled spaces or the
edge of the map.
Lines on a map may not define the loyalty of these
fiercely independent people...
For generations they have lived in the surrounding lands,
but none dare to explore the acrid openings in the ground.
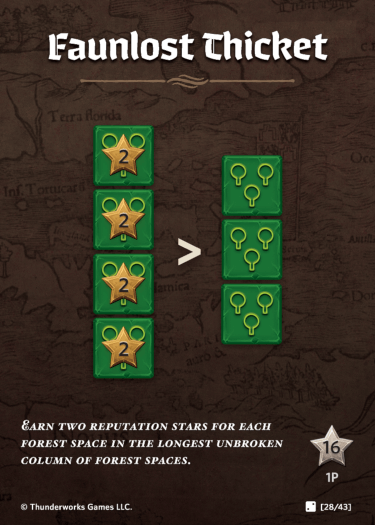
Faunlost Thicket:
Earn two
reputation stars for each
forest space in the longest
unbroken column of forest
spaces.
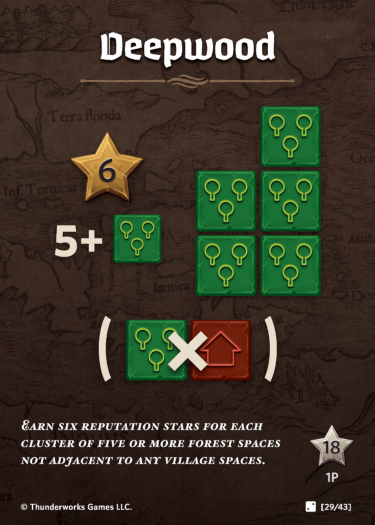
Deepwood:
Earn six
reputation stars for each
cluster of five or more forest
spaces that is not adjacent to
any village spaces.
The branches in this thicket all reach northward,
toward Brizoor Waal, as if they too long for Azema’s
return.
Shadowy creatures stalk these dark woods. I
cannot say for certain if they are spirits or the trees
themselves.
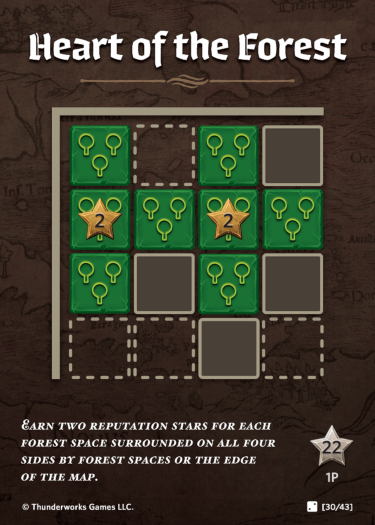
Heart of the Forest:
Earn
two reputation stars for
each forest space surrounded
on all four sides by forest
spaces or the edge of the
map.
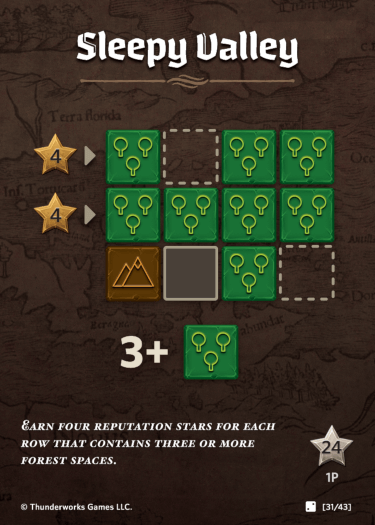
Sleepy Valley:
Earn four
reputation stars for each row
that contains three or more
forest spaces.
In a sunlit clearing, a single apple ripened on a
waisthigh sprout. Though starving, I dared not pick that
enchanted fruit.
The black earth gives life to fruiting trees of every
kind. Even the royals in Sabek do not eat as well as
I did today.
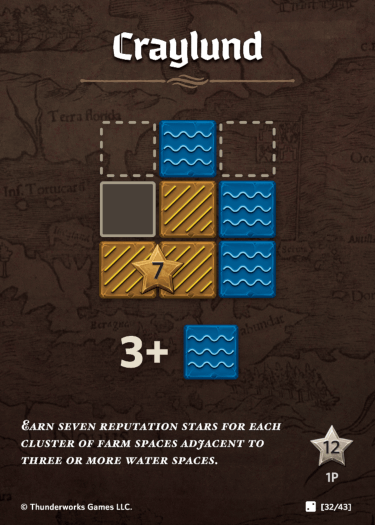
Craylund:
Earn seven reputation
stars for each cluster of farm
spaces adjacent to three or
more water spaces.
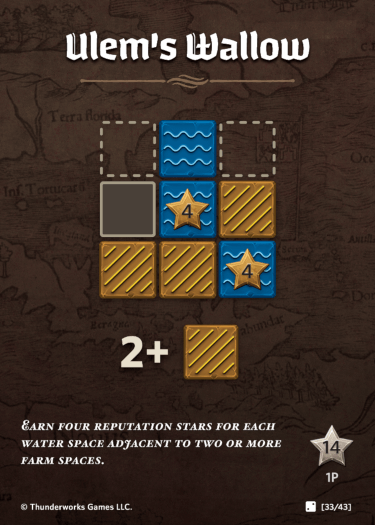
Ulem's Wallow:
Earn four
reputation stars for each
water space adjacent to two
or more farm spaces.
The paddy fields grow root and grain and provide
freshwater fish and shelled meats. The inn at
Craylund serves a stew that is to die for.
The locals all say that strange creatures sleep at
the bottom of these ponds. Cows and adventurous
farmhands go missing every spring, apparently.
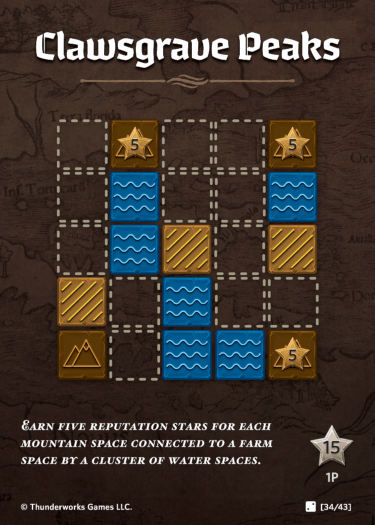
Clawsgrave Peaks:
Earn five
reputation stars for each
mountain space connected to
a farm space by a cluster of
water spaces.
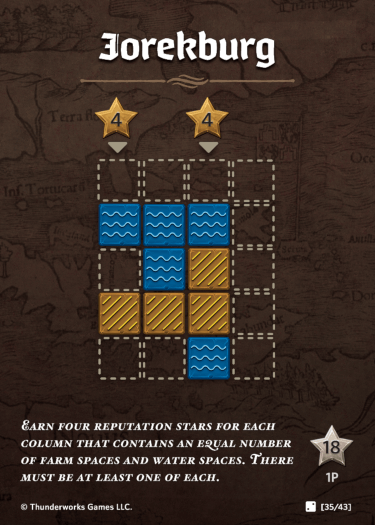
Jorekburg:
Earn four
reputation stars for each
column that contains an equal
number of farm spaces and
water spaces. There must be
at least one of each.
You can make a good living by ferrying grain up to
the mountains and stone back down to the valley. So
long as the Dragul don’t sink your boat, anyway.
I met several Halflings starting swine farms on these
swampy lands. They told me that the marsh grasses
would produce the finest bacon any Halfling ever had.
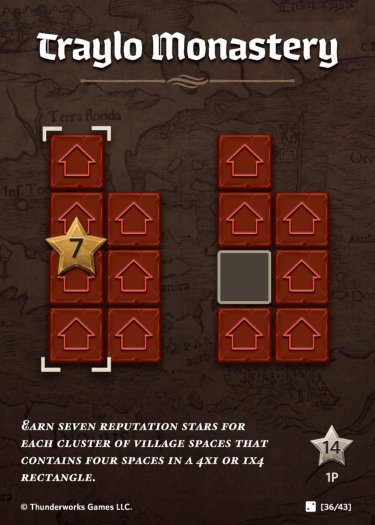
Traylo Monastery:
Earn seven
reputation stars for each
cluster of village
spaces that contains four spaces
in a 4x1 or 1x4 rectangle.
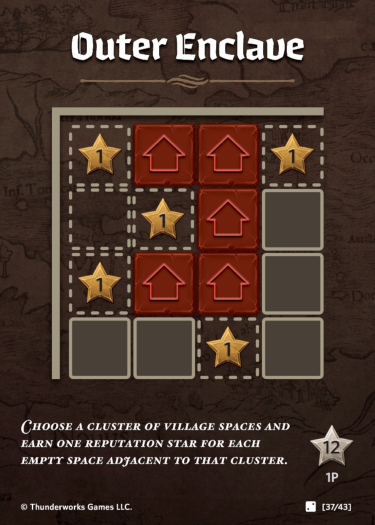
Outer Enclave:
Choose a
cluster of village spaces and
earn one reputation star for
each empty space adjacent to
that cluster.
The Elves here have strange ways. I woke to find my
pack filled with crickets and my shoes with worms.
Worshippers of Kehstore, methinks.
There, in the unmappable wastes, lives a rough
collection of misfits and outlaws, making their living by
theft and raiding the Dragul homesteads.
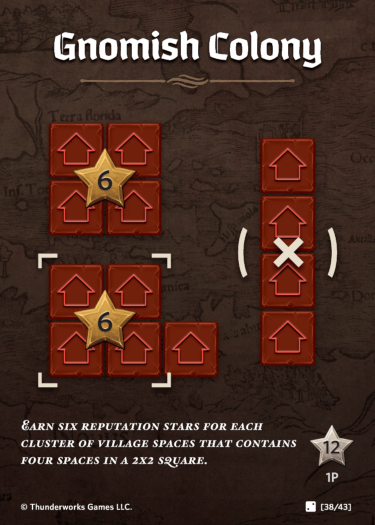
Gnomish Colony:
Earn six
reputation stars for each
cluster of village spaces that
contains four village spaces in
a 2x2 square.
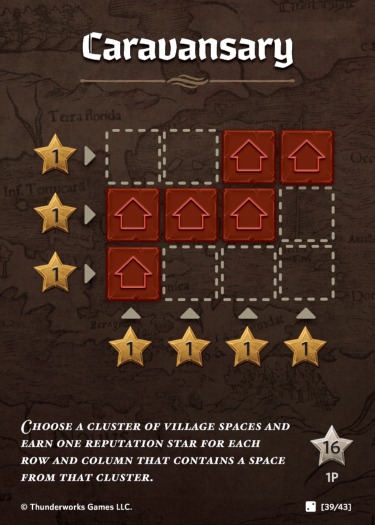
Caravansary:
Choose a cluster
of village spaces and earn one
reputation star for each row
and column that contains a
space from that cluster.
Ahh, it was good to be among my people, who square
every street and every meal and who keep all things
right-sized.
Along the kingdom’s former trade routes with the
North, wagons lose their wheels and become homes.
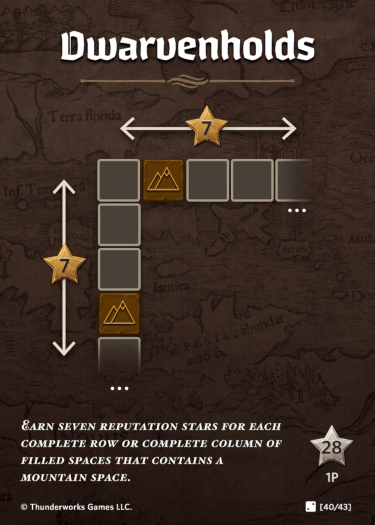
Dwarvenholds:
Earn seven
reputation stars for each
complete row or complete
column of filled spaces that
contains a mountain space.
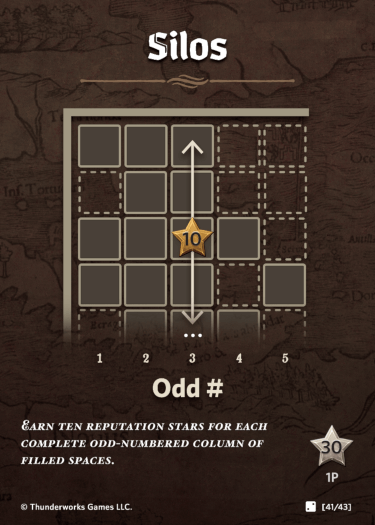
Silos:
Earn ten reputation
stars for each complete odd-numbered column of filled
spaces.
A fire burns atop each peak whenever trouble is
brewing in the land below. Thus are the heroes of
Nalos summoned to defend their lands.
Rivers and mountains need be the borders of our lands
no longer. With my alidade, I can chart a line straight
through the Vorkheim range.

Banded Hills:
Earn four
reputation stars for each
row of filled spaces
that contains five or more
different terrain types.
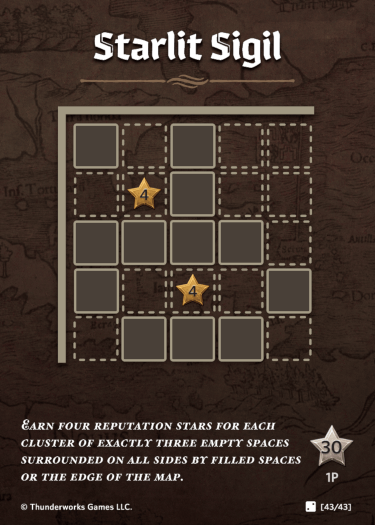
Starlit Sigil:
Earn four
reputation stars for each
cluster of exactly three empty
spaces surrounded on all
sides by filled spaces or the
edge of the map.
No matter the bend of the path nor the steep of the
terrain, my trusty compass of silver points ever
home again.
A cartographer sometimes holds allegiance to orders
higher than the guild. And that is all I will say about
these particular omissions.
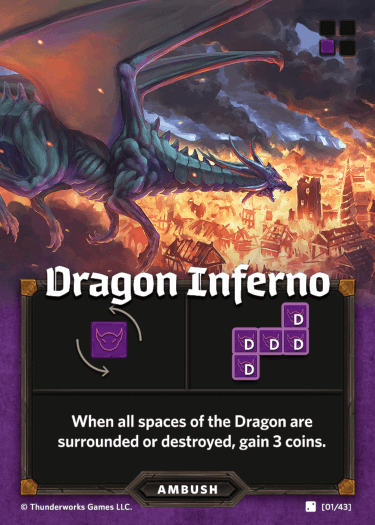
D
Dragon Inferno
When all spaces of the Dragon are surrounded or destroyed,
gain 3 coins.
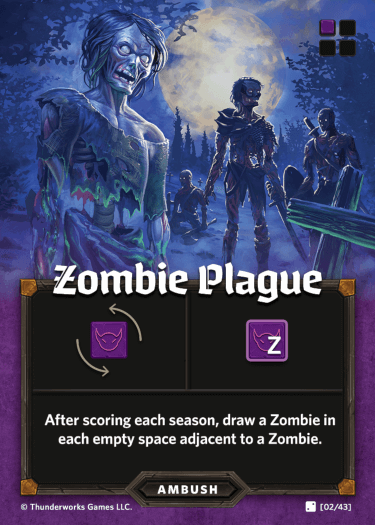
Z
Zombie Plague
After scoring each season, draw a Zombie in each empty space
adjacent to a Zombie
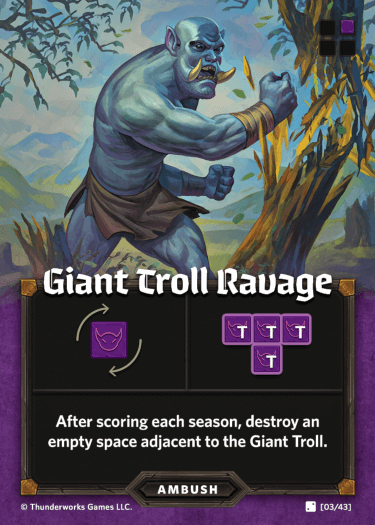
T
Giant Troll Ravage
After scoring each season, destroy an empty space adjacent
to the Giant Troll.
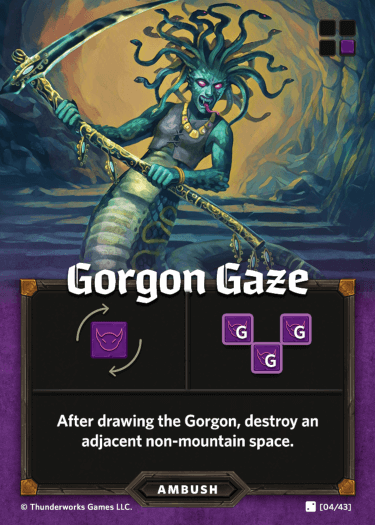
G
Gorgon Gaze
After drawing the Gorgon, destroy an adjacent non-mountain space
You can place your shape by using drag&drop, or by first clicking it and then the desired position on the map.
Reputation stars that you are projected to receive in a future scoring are displayed in pale. You can hover your mouse over a scoring card or a score to highlight the spaces that will be scored there.
If you want to adjust the layout, you can drag the edge of the exploration deck and the scoring cards, or use the settings menu.
| |