|
|
If you are reading these rules for the first time, ignore the text along the right hand side. These rules serve as a summary to help you quickly familiarize yourself with the game.
Show
→ summary only
→ detailed version only
→ both summary and detailed version
“Why are the Bonfires no longer lit? It began a few months ago, when the Bonfires atop the towers of the nearby cities darkened.
Now they seem fully extinguished. We gnomes do not live in the cities, but rather in the forests close to it. But we also need the
light and energy the Bonfires provide! Perhaps the Guardians of Light know more – after all, they created the Bonfires as the
light of the distant sun was barely enough to survive.
We went to the nearest city – something we usually try to avoid because the citizens look down upon us forest dwellers.
However, the cities were deserted. Only a single Guardian was left behind. She did not want to explain exactly what happened
there. But she did tell us that the Guardians have withdrawn to the sacred islands taking the Bonfires with them. They went to
their holy islands, where they now wait for those humble enough to ask for help. They want you to show them your goodwill, by
completing their tasks – only then will they regain their former faith in other beings and ignite the Bonfires once again.
Relieved that it is within our power to change our fate, we make our way to the holy islands. We shall light up the city’s
Bonfires once again. On our way there, we realized that other gnomes plan to do the same in other cities – but I am sure WE
can do it better!”
Game Components
1
4
4 Starting Tiles for Guardians
4 Extensions (1 Building and 3 Terraces)
28 28 Path Tiles (10x blue Crystal, 10x red Crystal, 8x yellow Crystal)
66
28 Portals (4 of each shape/symbol)
72 Action Tiles (12x yellow, 10x of each other type)
5 Countdown Tiles
1 Figure “Great Bonfire”
16 Guardians of Light, "Guardians" (4 of each color)
5 Neutral Novices
57 Resources (9 Blossoms, 9 Fruits, 9 Herbs, 9 Shells, 9 Roots, 12 Gold)
33
4 Action Overview
32 Fate Tiles
1 “0/50”-Marker
40 Offering Tiles
4 Score Marker
4 Ship
4 Guardian
28 Novices
4 Overview Cards (for the Final Scoring)
Setup
Setup Game board
The game is mostly independent of the player count. The exceptions are
emphasized in green
writing
and summarized here:
- Number of Tasks
- Number of Portals in a 2 player game
- Game End Condition
- Place the Game Board in the play area
-
Shuffle the Tasks and place them with the dark side face up on the islands:
- 4 players: Place 3 Tasks on each island.
- 3 players: Place 2 Tasks on each of the 4 corner islands and 3 Tasks on each remaining island.
- 1 or 2 players: Place 2 Tasks on each island.
Return any remaining Tasks back to the box.
-
Place each Guardian on the
island of its respective color
-
Stack the Countdown Tiles
in ascending order and
place the pile on the
designated space on
the Game Board.
-
Place the 6 Elders face up
on the designated spaces on
the Game Board.
-
In a 2 player game,
return 1 of each of the
7 Portal Tiles back to the
box.
Shuffle the Portal Tiles
and distribute them evenly
among the 7 spaces surrounding the Great Bonfire
on the Game Board.
-
Place the Great Bonfire on its space on
the Game Board and make sure its tip is
pointing in the direction south.
-
Shuffle the Path Tiles and place
them as 2-3 face down piles next to
the Game Board. Then, reveal 4 Tiles
and place them on the designated spaces on the
Game Board creating the display.
-
Shuffle the Specialists and
place the Gnome Pile face
down beside the Board.
Draw 6 Specialists and place
them face up on the designated
spaces of the Game Board.
-
Place 1 Neutral Novice on
each of the 5 Common
Tasks printed on the Game
Board.
-
Take all the Components of
your player color: Place
your Score Marker and
your 0/50-Marker on
the space 0 of the Scoring
Track.
Flip your 0/50-Marker as
soon as you exceed
50 Points.
Place your Ship on the
landing stage on the
Game Board.
-
Place the Action Tiles and
Resources in a general sup�ply next to the Game Board.
Setup Player boards
- Place your Player Board in front of you.
-
Attach a Starting Tile for
Guardians to your
Player Board and place
your Guardian
onto it.
-
Place your Novices on the
7 corresponding spaces.
-
1 of the players: Take 1 Extension for
each player (making sure the one with
the oval Building is among them) and
distribute 1 to each player at random.
Every player: Attach the Extension to your Player Board.
Whoever received the oval
Building is the Starting Player.
-
Place the Action Overview
next to your Player Board. Place
your Overview Card nearby.
You will need it during the Final
Scoring.
-
Shuffle the 10 Offering
Tiles face down and place
them as 2 piles with
5 Offering Tiles each on
your Action Overview.
Flip the topmost Tile of
each pile face up.
-
Shuffle your Fate Tiles
and create a face up
personal supply with 7 of
them next to your Action
Overview. Keep the
remaining Tile in front
of you for now.
-
Before taking your first turn, decide
to either use the Fate Tile in front of you or
to swap it with the one in the middle of your
personal supply. Place the chosen Tile on the
marked spaces in the center of your Fate Area.
Take 1 of each of the 6 Resources and place
them in your supply on the left side of the
Player Board.
Take 5 Action Tiles: 2 yellow Tiles and 3 Tiles
matching the 3 colors on your chosen Fate
Tile. Place these in your supply on the right
side of your Player Board.
 You may spend Gold as a replacement for any
other Resource. You may spend Gold as a replacement for any
other Resource.
 You may spend a yellow Action Tile as a
replacement for any other Action Tile. You may spend a yellow Action Tile as a
replacement for any other Action Tile.
Game Overview
HOW DOES THE GAME PLAY?
- You alternate taking single turns in clockwise order (A Player’s Turn)
- During the course of the game your will receive and fulfill Tasks (Receive a Task)
- With a fulfilled Task you can ignite 1 Bonfire and send a Novice to the High Council (Ignite a Bonfire)
- Play continues until there is a specific number of Novices in the High Council (End of Game)
- This will trigger a Countdown for the last 5 rounds, after which you will proceed to the Final Scoring.
The player who scores the most Points wins the game
WHAT CAN I DO ON MY TURN?
You have 3 options, pick 1 of them:
I. Place a Fate Tile into your Fate Area and gain Action Tiles.
II. Perform an action by using 1 type of Action Tile:
Build a Path for the procession of Guardians.
Move your Ship to an island.
Receive a Task from an island by offering 2 Resources.
Retrieve a Guardian from an island and bring
her into your city or
trigger a Procession of Guardians through your city.
Visit the Great Bonfire and receive Action Tiles,
Resources, or Portals.
Recruit a Gnome into your city.
III. Ignite a Bonfire and send a Novice to the High Council.
Additionally, you may perform Bonus Actions if you fulfill
a corresponding Common Task
HOW DO I GAIN POINTS?
The Guardian moved from
the Path to a Bonfire via a
Portal. You will gain Points
for the Bonfire, the Guardian,
the Portal as well as the Path
Tile, because its crystal color
corresponds with the color of
the Bonfire.
During the game you will not gain many Points - only a few
for recruiting Gnomes (Recruiting Gnomes).
You gain most of the Points during the Final Scoring.
Then, you will gain Points for your Bonfires and fulfilled Common Tasks.
You will gain Bonus Points for your Bonfires, when you
have Guardians, Portals, or matching Crystal colors on the
Path Tiles (see example to the right).
Whenever you gain Points, advance your Score Marker on
the Scoring Track accordingly.
Tips for the first game:
-
There is no "best first turn". Examples of good first turns are:
-
Take a Specialist: It makes sense to have them in your city early (Recruit a Gnome).
-
Use the Great Bonfire: If you are the first to perform this action, you can immediately take your first
Portal. This could cost more Action Tiles later (Use the Great Bonfire).
-
Move your Ship and take a Task: Performing this Action early, allows you to choose from all available
Tasks and to select one you want for your strategy (Move your Ship).
-
Start with easier, i.e. blue, Tasks in the beginning and try to get a feeling for the difficulty of the
individual Tasks.
-
Do not take too many Tasks - sometimes the game ends earlier than expected, and then you may not
be able to fulfill all of them
On each of your turns, perform 1 of the following options I, II, or III.
I. Place a Fate Tile and gain Action Tiles
II. Use Action Tiles
III. Ignite a Bonfire
Additionally, you may perform Bonus Actions if you fulfill
a corresponding Common Task.
Special case: If you are no longer able to perform any of
the 3 options, the game is over for you.
You may still pass during the Countdown Phase to gain
as many Points as the current Countdown Tile shows (see Countdown Phase).
However, this should only occur in extremely rare cases.
By placing a Fate Tile you decide which and how many Action Tiles you gain. This will influence the Actions available to
you later.
In this case, you have the choice between the 2 highlighted
Fate Tiles.
In order to perform this Action, you may have no more than
1 Action Tile left in your personal supply. However, you
may discard any excess Tiles at any time during your turn.
Take the top or bottom Fate Tile from your supply and
place it in your Fate Area on your Player Board.
In the image to the right, the Fate Tile protrudes beyond the
edge of the Fate Area. This is not allowed.
Place the Fate Tile into your Fate Area in horizontal or
vertical orientation making sure that it ...
- is orthogonally adjacent to at least 1 of the Tiles already placed
- does not protrude beyond the edge of the Fate Area.
- does not (partly) cover another Fate Tile.
The white symbol is adjacent to an area of 2 more white symbols.
Therefore, you gain a total of 3 white Action Tiles.
Additionally, you gain 2 purple and 1 red Action Tile
Gain the 3 Action Tiles depicted on the Fate Tile you just
placed.
If the symbols of the newly placed Tile are adjacent to the
same symbols on Tiles placed earlier gain an additional Tile
for each symbol in the adjacent connected area.
You covered a Gold symbol and gain 1 Gold in addition to
the 5 Action Tiles.
If you place your Fate Tile onto a  or a
 on your Fate Area, you also gain the
depicted object.
II. USE ACTION TILES
You can perform a variety of Actions with your Action Tiles.
 If you must pay an Action Tile, you may replace it either with 1 yellow Action Tile or with any 2 Action Tiles.
 If you must pay a Resource, you may replace it either with 1 Gold or with any 2 Resources.
Important:

If you must pay an Action Tile, you may replace it either with 1 yellow
Action Tile or with any 2 Action Tiles.
 If you must pay a Resource, you may replace it either with 1 Gold or with any 2 Resources.
You may also replace Gold with 2 Resources.
You may not use these alternatives to fulfill Tasks, because you are not paying Action Tiles
or Resources then!
You can perform a variety of Actions with your Action Tiles. To do so, you will have to pay 1 or more Action Tiles,
depending on the Action you wish to perform.
Take 1 of the 4 face up Path Tiles or the top Path Tile from
a draw pile.
-
Pay 1 Action Tile for building
one of the first 3 Path Tiles.
-
Pay 2 Action Tiles for building
one of the last 3 Path Tiles
You have 2 reasons to build Paths in your city: Firstly, the Guardians perform their Procession on them providing you with
Resources along the way. Secondly, you are awarded with Points during the Final Scoring, if the color of the Crystal on the
Path matches the color of the adjacent Bonfire.
Take 1 of the 4 face up Path Tiles or the top Path Tile from
a draw pile and add it to your city, connecting it to your
previous Path Tile. Then refill the display if applicable.
-
Pay 1 Action Tile for building
one of the first 3 Path Tiles.
-
Pay 2 Action Tiles for building
one of the last 3 Path Tiles
You may only add 6 Path Tiles to your city. Thereafter, you may not use this Action anymore.
Special case: If, before you take a Path Tile, all Tiles in the display show a Crystal of the same color, you may place
these 4 Tiles under the draw piles and then refill the display with new Tiles.
With the help of your Ship, you can move to islands:
-
Pay 1 Action Tile to move along one of the ship routes
(light blue lines) to a neighboring island.
-
Pay 2 Action Tiles to move along one of the ship routes
to a neighboring island, twice.
-
Pay 3 Action Tiles to move to any island of your choice.
Extra Action: Immediately after moving your Ship, you
may carry out the action belonging to the island on which
you ended the movement (Receive a Task or Retrieve
a Guardian). You must pay the normal cost of Action Tiles
and Resources for the extra turn.
With the help of your Ship, you can move to 2 different
types of islands: Those where you can retrieve Guardians
and those where you can receive Tasks.

You pay 1 Action Tile and move your Ship to the island to
the right. There you perform the Action Receive a Task.

You pay 2 Action Tiles and move your Ship 2 steps to an
island further right. There you perform the Action Retrieve a Guardian.
When you move your Ship for the first time in a game,
pay 1 Action Tile to move to any island of your choice.
The next time, when you move your Ship, you may depart
from any side of the island, and the costs for moving are as
follows:
-
Pay 1 Action Tile to move along one of the ship routes
(light blue lines) to a neighboring island.
-
Pay 2 Action Tiles to move along one of the ship routes
to a neighboring island, twice.
-
Pay 3 Action Tiles to move to any island of your choice.
Extra Action: Immediately after moving your Ship, you
may carry out the action belonging to the island on which
you ended the movement (Receive a Task or Retrieve
a Guardian). You must pay the normal cost of Action Tiles
and Resources for the extra turn.
The amount of Ships harboring at an island is not limited.
On the islands you can receive Tasks. The front of each Task shows a condition to be met and the Points you may gain if
you fulfill it.
Your Ship must be at the island of which you want to receive a Task. Perform the following steps a) - c) in order:
a) Pay Action Tile(s)
The number of Tiles to pay depends on how many of your
own Offering Tiles you have already placed on this island:
If it is your:
- First own Offering Tile: Pay 1 Action Tile.
- Second own Offering Tile: Pay 2 Action Tiles.
- Third own Offering Tile: Pay 3 Action Tiles.
Offering Tiles from other players have no effect on you.
b) Pay Resources
Choose 1 of your 2 face up Offering Tiles.
Now pay 2 Resources:
- The Resource depicted on the selected Offering Tile
- The Resource depicted on the island itself
c) Deliver the Offering Tiles and receive the Task
Take a Task from the island and replace it with the chosen
Offering Tile, face down. Place the Task on any unoccupied
Task Space on your Player Board.
On the islands you can receive Tasks. The front of each Task shows a condition to be met and the Points you may gain if
you fulfill it. The back, i.e. the Bonfire side, shows only the Points.
Your Ship must be at the island of which you want to receive a Task. Perform the following steps a) - c) in order:
a) Pay Action Tile(s)
a+b)
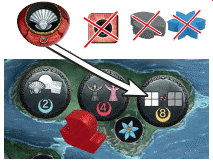 This is the first time you
deliver an Offering Tile to
this island. Therefore, you
must pay 1 Action Tile in
addition to the Resources
depicted on the island and
the Offering Tile.
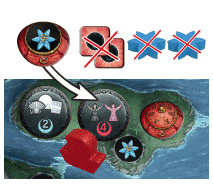
There is 1 of your Offering
Tiles on this island.
Therefore, you must pay
2 Action Tiles in addition
to the 2 Resources.
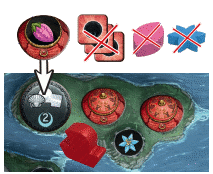 There are 2 of your Offering
Tiles on this island.
Therefore, you must pay
3 Action Tiles in addition
to the 2 Resources.
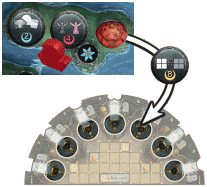
c)
You take the yellow Task
from the island and put
an Offering Tile in its
place, face down. You now
place the Task onto a Task
Space of your choice on
your Player Board.
The number of Tiles to pay depends on how many of your
own Offering Tiles you have already placed on this island:
If it is your:
- First own Offering Tile: Pay 1 Action Tile.
- Second own Offering Tile: Pay 2 Action Tiles.
- Third own Offering Tile: Pay 3 Action Tiles.
Offering Tiles from other players have no effect on you.
b) Pay Resources
Choose 1 of your 2 face up Offering Tiles.
Now pay 2 Resources:
- The Resource depicted on the selected Offering Tile
- The Resource depicted on the island itself
c) Deliver the Offering Tiles and receive the Task
Take a Task from the island and replace it with the chosen
Offering Tile, face down. Place the Task on any unoccupied
Task Space on your Player Board.
Then flip the next face down Offering Tile on your Action
Overview face up.
You may only add 7 Tasks to your city. Thereafter, you may
not use this Action anymore.
The yellow Bonfires show the most
difficult tasks. These award more
Points for their fulfillment than the
moderate red and the easy blue Tasks.
For further details, see Ignite a Bonfire
and Appendix I.
You retrieve a Guardian and bring her into your city. Later
she may take part in Processions.
-
Your Ship must be at an island with a Guardian of a color
you do not already have.
- Pay 1 Action Tile and take a Guardian from that island.
-
Place her on the Starting Tile for Guardians on your Player
Board.
You retrieve a Guardian and bring her into your city. Later
she may take part in Processions.
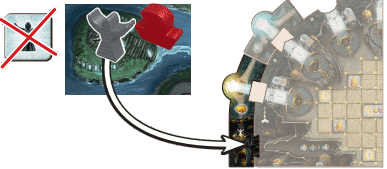
You pay 1 Action Tile, take the grey Guardian from her
island, and place her on the Starting Tile for Guardians
on your Player Board.
Your Ship must be at an island with a Guardian of a color
you do not already have.
Pay 1 Action Tile and take a Guardian from that island.
Place her on the Starting Tile for Guardians on your Player
Board. There is no limit to the number of Guardians
present on the Starting Tile.
You cannot have more than 5 Guardians in your city.
Thereafter, you may not use this Action anymore.
During a Procession, Guardians either grant you Resources immediately, or Points during the Final Scoring.
- Pay 1 or more Action Tiles: You may advance each Guardian by no more than the number of steps you have paid Tiles.
- Start with the Guardian furthest ahead on the Path. The Guardians may overtake each other.
- At the end of the Procession, each Path Tile and each Bonfire may only contain a single Guardian.
During a Procession, Guardians either grant you Resources immediately, or Points during the Final Scoring.
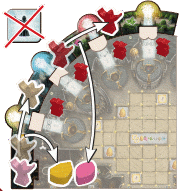
Your red and wood-colored
Guardians each move 1 step
forward along the Path.
You gain 1 Fruit and 1 Gold.
The pink Guardian may not
move further because the
next Path Tile is occupied.
Pay 1 or more Action Tiles: You may advance each Guardian by no more than the number of steps you have paid Tiles.
Start with the Guardian furthest ahead on the Path. The Guardians may overtake each other.
At the end of the Procession, each Path Tile and each Bonfire may only contain a single Guardian. If there are several
Guardians on the Starting Tile, you may decide which one moves first.
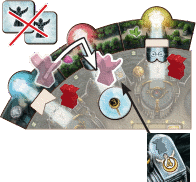
You move the pink Guardian
2 steps forward, placing
her next to a Bonfire.
You do not gain any
Resources, but will be
awarded 4 Points during
the Final Scoring.
1 step could mean either "straight ahead along the path", or "turn right towards a Bonfire". For the latter you must have
already placed a Portal leading towards the Bonfire.
If the movement of a Guardian of at least 1 step ends on a Path Tile, you take its depicted Resource. If the movement ends
next to a Bonfire, you will score Points during Final Scoring.
The Guardians left behind a last Bonfire for support. Here you can gain Resources, Action Tiles, and magic symbols,
representing the Portals.
-
Pay 1 Action Tile to rotate the Great Bonfire 1 space
in clockwise direction.
-
Pay 2 Action Tiles to rotate the Great Bonfire 2 spaces
in clockwise direction.
-
Pay 3 Action Tiles to rotate the Great Bonfire to any
space of your choice.
Then gain 2 of the following 3 rewards:
- Gain the depicted Action Tile.
- Gain the depicted Resource or the depicted 2 Points.
-
Take 1 of the available Portals and place it into the next available notch of your Player Board.
You must place the first Portal on the right side of your Player Board and continue counterclockwise.
The Guardians left behind a last Bonfire for support. Here you can gain Resources, Action Tiles, and magic symbols,
representing the Portals.

You have the choice to gain a Root, a red Action Tile, or
take 1 of the Portals. You decide to take the fitting Portal
and gain the Root.
When the Great Bonfire is used the first time in a game, you pay 1 Action Tile to rotate it to any space of your choice.
From now on, when anyone uses the Great Bonfire, the costs
are as follows:
-
Pay 1 Action Tile to rotate the Great Bonfire 1 space
in clockwise direction.
-
Pay 2 Action Tiles to rotate the Great Bonfire 2 spaces
in clockwise direction.
-
Pay 3 Action Tiles to rotate the Great Bonfire to any
space of your choice.
Then gain 2 of the following 3 rewards:
- Gain the depicted Action Tile.
- Gain the depicted Resource or the depicted 2 Points.
-
Take 1 of the available Portals and place it into the next available notch of your Player Board.
You must place the first Portal on the right side of your Player Board and continue counterclockwise.
Note: If shape and symbol do not match your next available notch, you may not take the Portal!
Gnomes give you permanent abilities or grant extra Points.
To recruit a Gnome, choose from the following 2 options:
- Pay 2 Action Tiles and the Resource depicted on the Gnome.
- Pay 1 Action Tile and 2x the Resource depicted on the Gnome.
Then, take the Gnome and place it below your Player Board.
- If you recruited a Specialist, refill the display if possible.
- If you recruited an Elder, calculate and gain its Points immediately.
Gnomes give you permanent abilities or grant extra Points (Appendix III).
There are 2 Types of Gnomes:
- the Specialists, providing you with a permanent ability
- the Elders, from whom you will immediately gain Points
You may only recruit 6 Gnomes. Thereafter, you may not use this Action anymore.
To recruit a Gnome, choose from the following 2 options:
- Pay 2 Action Tiles and the Resource depicted on the Gnome.
- Pay 1 Action Tile and 2x the Resource depicted on the Gnome.
Then, take the Gnome and place it below your Player Board.
- If you recruited a Specialist, refill the display if possible.
- If you recruited an Elder, calculate and gain its Points immediately.
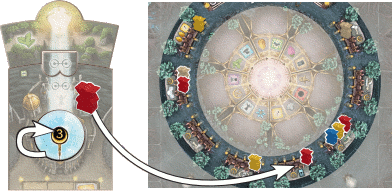
You flip a fulfilled Task to the Bonfire side.
Take the Novice and place it into the High Council onto
the space providing you with a free Specialist of your
choice from the display.
Flip over 1 of your Tasks, of which you have met the
condition. By doing so you ignite the Bonfire again!
Take the Novice standing next to the Bonfire and place
it on any of the 8 spaces of the High Council. There may
be any number of Novices on a space, but not of the same
color.
Gain 1 of the bonuses depicted on the chosen space. One
option is always to gain 1 Point (Appendix II).
You gain the Points for the Bonfire during the Final Scoring.
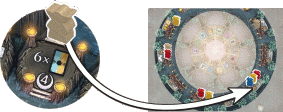
You fulfill a Common Task (having 6 Gnomes).
Therefore, you place the Neutral Novice onto the space in
the High Council granting you a Guardian of your choice.
Before or after your turn, you may additionally perform
any number of Bonus Actions.
The Bonus Action consists of sending 1 Neutral Novice to
the High Council and gaining the corresponding reward.
In order to do that, you must fulfill 1 of the
Common
Tasks
, depicted in the center of the Game Board
(Common Tasks).

You can only perform the Bonus Action if the Neutral
Novice is still present at the corresponding Task.
Then, you may place that Neutral Novice on 1 of the
8 spaces of the High Council, where no Novice of its color
is already present. Gain the bonus of this space (Appendix II).
The end of the game depends on the number of Novices and
Neutral Novices on the 8 spaces in the High Council. Check
this number whenever a Novice is placed in the High Council.
The Countdown for the last 5 rounds is triggered, if in a
| 2 | 3 | 4 | player game there are |
| 7 | 10 | 13 | Novices in the High Council |
-
The Starting Player takes the pile
of 5 Countdown Tiles and places
it onto her Extension.

-
Each time the Starting Player finishes their turn, they take
the Tile with the highest remaining number and passes
it on to the next player in clockwise order. The number
on this Countdown tile displays the number of turns
remaining for this player. Each player passes this Tile to
the next player in turn order after their turn. As soon as
the Countdown Tile returns to the Starting Player, they
return it to the box
-
Instead of taking a turn, a player may pass during the
Countdown, gaining as many Points as the current
Countdown Tile shows. They then do not participate in
the remaining rounds.
-
When the “1”-Tile is returned to the box, the game ends.
Proceed with the Final Scoring.
-
2–8 Points for each of your Bonfires, according to its
printed value.
-
2–8 Points for each of your Guardians standing next
to a Bonfire as depicted next to her space.
-
2 Points for each of your Portals, if adjacent to a Bonfire.
-
2 Points for each of your Path Tiles showing a Crystal
of the same color as the adjacent Bonfire.
-
4 Points for each Common Task you fulfill.
If you have 7 Bonfires, gain 7 instead of 4 Points.
- 3 Points for each Fate Tile left in your personal supply.
-
1 Point for any 2 Action Tiles/Resources in your
personal supply.
The player with the most Points wins.
In case of a tie, the player with more Bonfires wins the tie.
You gain Points as follows (Example on Page 16, Appendix IV):
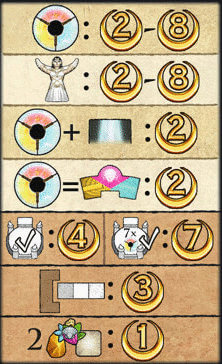 |
2–8 Points for each of your Bonfires, according to its
printed value.
|
|
2–8 Points for each of your Guardians standing next
to a Bonfire as depicted next to her space.
|
|
2 Points for each of your Portals, if adjacent to a Bonfire.
|
|
2 Points for each of your Path Tiles showing a Crystal
of the same color as the adjacent Bonfire.
|
|
4 Points for each Common Task you fulfill.
If you have 7 Bonfires, gain 7 instead of 4 Points.
|
| 3 Points for each Fate Tile left in your personal supply. |
|
1 Point for any 2 Action Tiles/Resources in your
personal supply.
|
The player with the most Points wins.
In case of a tie, the player with more Bonfires wins the tie.
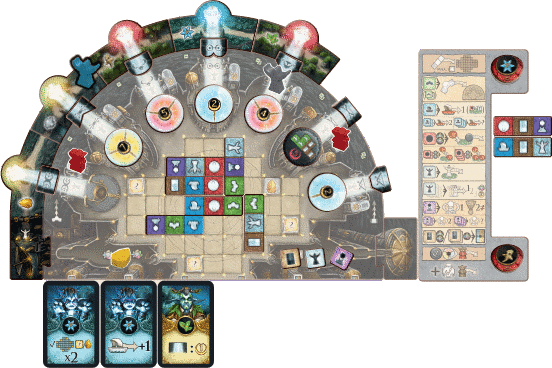
- 20 Points for the 5 Bonfires (7+5+2+4+2)
- 6 Points for the grey Guardian standing next to the red Bonfire
- 10 Points for 5 Portals next to a Bonfire
- 8 Points for 4 Path Tiles showing the same Crystal color as the Bonfire
- 4 Points for 1 Common Task “Have 7 Portals”
- 6 Points for 2 Fate Tiles in the supply
- 2 Points for the 3 Action Tiles + the 1 Resource remaining in your supply
- 5 Points for the Elder (gained during the game)
- 61 Points in total
Note: A Task is also fulfilled, if you have more than the requested number(s).
Tasks with 2–3 Points, blue Bonfires
Have 1 Path Tile
showing the
depicted Resource
Have 1 Path Tile
showing the
depicted Resource
Have 1 Path Tile
showing the
depicted Resource
Have 1 Path Tile
showing the
depicted Resource
Have the depicted
Guardian
Have the depicted
Guardian
Have the depicted
Guardian
Have the depicted
Guardian
Have 1 Offering Tile
on an island showing
the depicted Resource
Have 1 Offering Tile
on an island showing
the depicted Resource
Have 1 Offering Tile
on an island showing
the depicted Resource
Have 2 Offering Tiles on 1 island
Have 1 Offering Tile on
3 different islands, each
Have 1 Gnome that
shows the depicted
Resource
Have 1 Gnome that
shows the depicted
Resource
Have 1 Gnome that
shows the depicted
Resource
Have 1 blue and 1 red Bonfire
Have any 2 Resources each 2x
(no Gold)
Have the depicted group of 3 adjacent identical Action Symbols on the
Fate Area. The Symbols may be arranged in any shape or form as long
as they are adjacent.
Have the depicted group of 3 adjacent identical Action Symbols on the
Fate Area. The Symbols may be arranged in any shape or form as long
as they are adjacent.
Have the depicted group of 3 adjacent identical Action Symbols on the
Fate Area. The Symbols may be arranged in any shape or form as long
as they are adjacent.
Have the depicted group of 3 adjacent identical Action Symbols on the
Fate Area. The Symbols may be arranged in any shape or form as long
as they are adjacent.
Tasks with 4–5 Points, red Bonfires
Have 2 adjacent Path Tiles
showing the same Resource
Have the 2 depicted
Guardians
Have the 2 depicted
Guardians
Have the 2 depicted
Guardians
Have fulfilled the condition of
1 Common Task
Have 1 Offering Tile
on each of the
2 islands showing the
depicted Resource
Have Bonfires of all
3 colors
Have 1 Offering Tile
on each of the
2 islands showing the
depicted Resource
Have the 2 depicted groups of 3 adjacent identical Action Symbols in
your Fate Area. The Symbols may be arranged in any shape or form as
long as they are adjacent. The 2 groups don't need to be adjacent.
Have the 2 depicted groups of 3 adjacent identical Action Symbols in
your Fate Area. The Symbols may be arranged in any shape or form as
long as they are adjacent. The 2 groups don't need to be adjacent.
Have the 2 depicted groups of 3 adjacent identical Action Symbols in
your Fate Area. The Symbols may be arranged in any shape or form as
long as they are adjacent. The 2 groups don't need to be adjacent.
Have the 2 depicted groups of 3 adjacent identical Action Symbols in
your Fate Area. The Symbols may be arranged in any shape or form as
long as they are adjacent. The 2 groups don't need to be adjacent.
Have the 2 depicted groups of 3 adjacent identical Action Symbols in
your Fate Area. The Symbols may be arranged in any shape or form as
long as they are adjacent. The 2 groups don't need to be adjacent.
Have 3 of the depicted
Resources
Have 3 of the depicted
Resources
Have 3 of the depicted
Resources
Have 4 blue Tasks and/or
Bonfires
Have 4 Guardians of any color.
Have 1 Offering Tile
on each of the
2 islands showing the
depicted Resource
Tasks with 6–8 Points, yellow Bonfires
Have 1 depleted pile of Offering
Tiles (no matter which one)
Have 3 Offering Tiles on 1 island
(Do not use this if you are
playing a 2 player game)
Have 1 Offering Tile on
5 different islands
Have 3 Path Tiles showing a
red Crystal
Have 4 red Tasks and/or Bonfires
Have all highlighted spaces of
your Fate Area covered with Fate
Tiles
Have 4 Path Tiles showing a
blue Crystal
Have 4 yellow Tasks and/or
Bonfires
Have 2 Guardians next to
a Bonfire
Have 2 Resources each 3x
(no Gold)
Have 5 identical Resources
(no Gold)
Have the 5 depicted
Action Tiles in your
supply
Have the 5 depicted
Action Tiles in your
supply
Have the 5 depicted
Action Tiles in your
supply
Have 2 Offering Tiles on each of
3 different islands
Have 2 groups of 4 identical Action
Symbols in your Fate Area. The Symbols may be arranged in any shape
or form as long as they are adjacent.
Have each space of the
2 outermost columns in your
Fate Area covered with Fate Tiles
Have all Gold spaces of your Fate
Area covered with Fate Tiles
Have 7 Tasks and/or Bonfires to
gain 4 Points
OR: Have 7 Bonfires to gain
7 Points
Have 7 Path Tiles (including
your Starting Tile)
Gain 2 Gold and 1 yellow Action Tile.
Note: You cannot choose the alternative
“Gain 1 Point” bonus here, because it would
be worth less in any case.
Take 1 Path Tile from the display or choose
1 from the draw piles. If you take 1 from a
pile, shuffle the piles afterwards.
OR: Gain 1 Point.
Move 1 of your Guardians as many steps as
you like forward or backward to an empty
Path Tile or Bonfire. Gain the usual reward.
OR: Gain 1 Point.
Turn the Great Bonfire to a space of your
choice and gain the corresponding rewards
as usual.
OR: Gain 1 Point.
Take 1 Specialist for free.
OR: Gain 1 Point.
Take 1 Guardian in a color you do not
already have.
OR: Gain 1 Point.
Perform the Action Move your Ship: Move
to an island of your choice for free. Pay for
the action of the island as usual with Action
Tile(s) and Resources.
OR: Gain 1 Point.
Immediately place the next Fate Tile and
gain Action Tiles as usual. You do not need
to discard any excess Action Tiles.
OR: Gain 1 Point.
Specialists
Each of your path tiles may contain any number of Guardians.
This does not apply to Bonfires.
During every Procession, you
may move every Guardian
1 step further than you paid for.
When receiving a Task, you may
pay 2 Resources of your choice.
You gain 2 additional Points
when recruiting an Elder.
Each of your yellow Action Tiles
is treated as 2 identical Tiles of
your choice, when you use it.
When a Guardian ends her
movement on a Path Tile, you
choose which Resource you gain.
You may also choose to gain any
Resource instead of Gold on the
first Path Tile.
Gain 1 Gold when placing a
Novice in the High Council in
addition to the bonus.
Whenever you take a new Path
Tile, gain the Resource depicted
on it.
When recruiting Gnomes, you
may pay using 1 or 2 Resources
of your choice instead of the
depicted one (even, if this is
Gold).
Whenever the depicted Guardian ends her
movement on a Path Tile, gain the corresponding Resource an additional time.
Whenever the depicted Guardian ends her
movement on a Path Tile, gain the corresponding Resource an additional time.
Whenever the depicted Guardian ends her
movement on a Path Tile, gain the corresponding Resource an additional time.
Whenever the depicted Guardian ends her
movement on a Path Tile, gain the corresponding Resource an additional time.
You may keep up to 3 Action
Tiles, before placing the next
Fate Tile.
Gain 1 yellow Action Tile when
recruiting an Elder or a
Specialist, including this one.
Whenever you place a Fate Tile
onto a symbol in your Fate
Area, gain the depicted object
1 additional time.
Whenever you place a Guardian
on the Starting Tile, make a
Procession (1 Step). You do not
gain any Resources during this
Procession!
You gain 2 Points when any
of your Guardians moves to a
Bonfire.
The Points for having the
Guardian at a Bonfire you'll still
get during the Final Scoring.
As soon as you fulfill a
Common Task, gain 1 Gold and
1 yellow Action Tile. It does not
matter whether there still is a
Neutral Novice present, or not.
Whenever any Guardian ends
her movement on the first Path
Tile, gain 1 additional Gold.
Whenever you pay at least
1 Action Tile to move your
Ship, you may move it 1 step further than you paid for.
Whenever you pay at least
1 Action Tile to use the Great
Bonfire, you may rotate it
1 more space than you paid for.
Whenever you use the Great
Bonfire, you may gain all
3 rewards.
You may place multiple Novices
of the same color on a space of
the High Council.
You may place the Portals in
any order.
Whenever you receive a Task,
you pay only 1 Action Tile,
no matter how many of your
Offering Tiles are on the
respective island.
You may place Fate Tiles so
they protrude beyond your
Fate Area. At least 1 symbol
of the Fate Tile must remain
within your Fate Area.
Elders
Gain 1 point for each Path Tile (including the Starting Tile) you have.
Gain 1 point for each Fate Tile in your Fate Area.
Gain 1 point for each Portal you have.
Gain 1 point for each Task and 1 point for each Bonfire you have.
Gain 1 point for each Guardian you have.
Gain 1 point for each Gnome you have, including this card.
First choose the action you want to perform, then you will need to pay the required action tiles in a popup. Clicking action tiles in your play area will discard them.
When you chose to refresh the path tiles on the board, you need to take a path tile afterwards (on the board or from the draw pile). You will not be allowed to take another action.
During a procession, you need to move the guardians from right to left, skipping those you don't want to move. When you're asked to pay action tiles, the dialog indicates the cost of the first move.
You are free to pay more action tiles in view of moving other guardians over a longer distance during the same procession.
Remember: to take a task from an island, you do not only need to pay Action Tile(s) but also the Resources required by the island and one from your offer tiles.
Hovering over an empty portal slot on anyone's player board will highlight the corresponding portal tiles in the great bonfire.
| |